Introduction - what is imaging?
Beneath the file system, resides the most basic structure of any device - disk sectors. These are actual, physical parcels containing the data, regardless of the file system used. If this structure is mirrored to another device, it is possible to create an exact clone. Any operating system that exists on the device will not know any difference.
This is what imaging is all about. Imaging is a process during which the device structure and the entire contents are copied, sector by sector to a backup file called image. If you take the image and extract it to a device, overriding any existing, previous structure, you will have created a perfect copy of the imaged system, the way it was the moment the image was taken.
This grants computer users the ability to not only save the actual files, but the actual status of a device, be it a hard disk, a partition or any other, frozen in time at the moment it was created. These temporal snapshots can then be restored at later times, allowing the users to undo changes to their devices (and the relevant operating systems). This opens a huge window of opportunity and flexibility, in regard to backup, testing and disaster recovery.
Any serious computer user will deploy some sort of imaging software in his/her arsenal and use them periodically, to backup their operating system and also restore them, if needed.
I can give you a personal example. In the last 3 years, I have backed up my systems at least 200 times and restored some of them about 20-30 times, for various reasons, mainly software testing. Imagine that I had to reinstall the systems instead of image-restoring them every time. Imagine the time cost, the long hours needed to reinstall everything and configure the applications, to say nothing of the additional nuisance the Windows operating system poses with its Activation policy.
Unfortunately, most imaging software products cost a lot of money. Furthermore, since imaging is such an important and crucial procedure, you cannot risk the chance of using a second-hand imaging software. Luckily, there are two excellent free programs that offer the reliability and quality that you require - CloneZilla and PartImage.
Both these programs are relatively easy to use, if not the easiest. On the other hand, they are fast, reliable and very much free. They will also work with practically any filesystem, including Windows NTFS.
In this article, I will reach you how to use them to backup your system, demonstrating the use of each in rich detail. I will use CloneZilla to backup an Ubuntu station and then I will use PartImage to backup a Windows machine.
Requirements
Both of these programs require that you be able to burn ISO files to CD/DVD, boot from a live CD and in general, understand the Linux notation of hard drives and partitions - and, of course, know what hard disks and partitions are. There is also some use of the command line involved.
If you're not ready for this, maybe CloneZilla and PartImage are not for you. Just be aware that many payware imaging solutions also require some knowledge of the hardware terminology. It is definitely worth spending some time reading and learning how to master this area.
But do not let this deter you. The programs ARE rather simple - and you have my tutorial to guide you, step by step. Furthermore, here's a list of several other articles I have written, which can help you prepare for the task at hand.
CloneZilla
CloneZilla is a fast, light imaging software that runs from a CD. It is well suited for desktop use, as well as massive deployment in server environment.
CloneZilla is rather simple to use. Let's demonstrate.
First, download the ISO and burn it to CD/DVD. Next, choose a computer that you want to test it on and boot from the CD on that machine. For testing purposes, this can also be a virtual machine, in case you're afraid to tamper with your real system.
The boot menu offers you to launch the application in a number of graphic modes, switch to the local hard disks and boot from them, boot from the network, run a memory test, or boot into FreeDOS. We'll choose the first option.

Next, choose your language and keyboard map.

Confirm your choice:


Start CloneZilla:

First, you need to decide whether you wish to image or clone your system. The difference is in the output. Imaging results in a file being created. Cloning results in a target drive / partition being rewritten during the cloning process - for instance, this is useful if you have bought a new hard disk and want to use it instead of the old one. However, for now, we just wish to image our system.

Now, we need to mount a local partition that will be our target. We will create the image and save it to this partition.

Before we do that, let us understand what we have here. Our system is Ubuntu, with three partitions, root, home and swap. root is a primary partition, hence the notation hda1. The second partition is hda2, which is the extended partition, inside which numerous logical partitions can reside. Logical partitions begin with the notation hda5 - or sda5 for SCSI disks, because the first four numbers are reserved for primary partitions. Swap is our hda5.
root (/)
hda1
Extended partition
hda2
swap
hda5
home (/home)
hda6
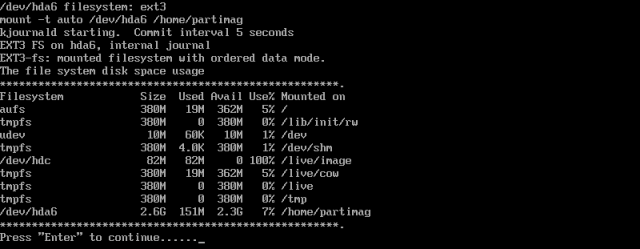
Now, hda6 is thus the second logical partition - and it is the home partition of our Ubuntu system. This is where we will save the image of the root partition.


Please notice the last entry in the image above. /dev/hda6 is the target partition that we mounted.
Now, you need to decide what you want to do, backup or restore your system. The option savedisk allows you to backup the entire hard disk. The option restoredisk allows you to restore an image of an entire hard disk. The third option, saveparts, allows you to backup only individual partitions. And accordingly,restoreparts allows you to restore individual partitions.
We wish to backup individual partitions.

Some advanced options, no need to tamper with:


Choose the compression:

Choose the name for the image:

Next, you need to select the source partition - the one we want to image. This is our root, hda1. Please note that hda6 is no longer available. This is because mounted partitions cannot be imaged. They need to be unmounted. CloneZilla automatically removes mounted partitions from the menu.

You are ready to image.


The imaging process will now begin. It takes only about 4-5 minutes for a typical Ubuntu installation.

After the imaging process is done, you will be taken to a console. You'll have the choice to restart CloneZilla again and create another image, power off the machine or reboot.

Now, let's boot into Ubuntu. Indeed, here's our image. Job done, as the peasant Orc in Warcraft likes to say!

PartImage
PartImage is slightly more difficult than CloneZilla. This is because some of the operations that CloneZilla does automatically need to be performed manually. Nevertheless, it is fast and reliable and should be considered when weighing out imaging solutions.
PartImage comes bundled as a part of numerous Linux distribution. One of the best tools to have - and which includes PartImage - is the SystemRescueCD, a bootable Linux live CD that specializes in diagnosis, repair and recovery of crashed systems.
You can read more about SystemRescueCD in my article A (cool) list of Linux tool. Among many other useful tools, SystemRescueCD also includes GParted, an excellent disk partitioning tool, TestDisk, a great tool for recovering lost partitions and data.
So let's begin using PartImage. First, we will boot off the SystemRescueCD live CD.

Hit Enter to continue. After a few moments, the system will boot. By default, SystemRescueCD boots into the command-line mode. But don't worry. Type startx into the console and hit Enter. You will reach the desktop shortly.


Now, before we start using PartImage, let us review our setup. We want to backup a Windows XP C: drive to another partition (in this case, E:). Since SystemRescueCD is a Linux tool, it will use the Linux notation for the partitions. The Windows C: drive must be a primary partition - and it will most likely be the first, thus it will be either hda1 or sda1.
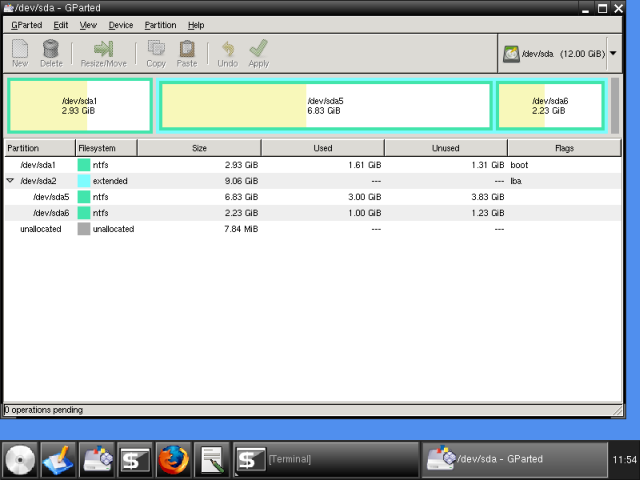
Additional Windows partitions are usually logical (if created when installing Windows XP). Therefore, they will be marked hda6, hda7 (or sda6, sda7) etc. But why guess? Let's check. As we've said earlier, SystemRescueCD comes with some handy tools, including a powerful partitioning program, GParted. Let's power it up and examine our layout.

Here, we can see our partitions. sda1 is our Windows C:. We will back it up to sda5, because it has most space.

If you have noticed a warning earlier, before typing startx, there are two things we must do before we can use PartImage. We must mount our target partition, so we can save the image to it.
Since our target partition is formatted as NTFS, we will have to use a special driver, called NTFS-3g, which allows Linux systems to read and write to NTFS partitions. We must do this manually, from the command line. Actually, this is the only difficult part of the whole thing.
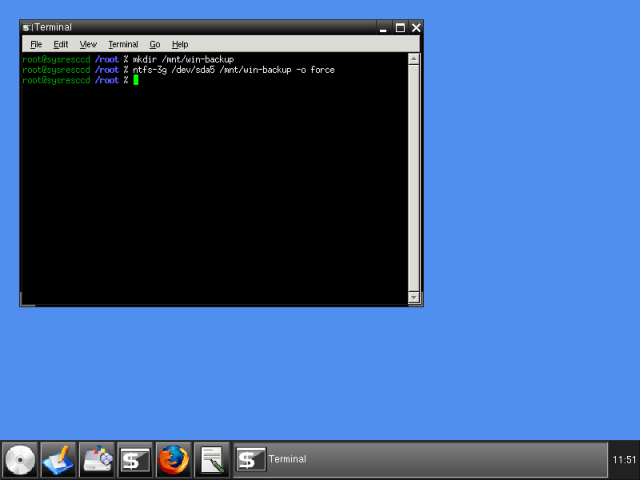
Let's first create a mount point:
mkdir /mnt/win-backup
Then, we need to mount the sda5:
ntfs-3g /dev/sda5 /mnt/win-backup -o force
This is what it looks like:

And checking through GParted, we can see sda5 is now mounted.

Now, start PartImage:

First, we need to select the source partition (sda1) and give the name to our image. In our case, it will be:
/mnt/win-backup/windows-c-backup-2008-08-21

Press F5 to continue. Next, we need to select some advanced options. There's no need to change anything. The default settings are good enough. The only thing you may want to change is whether you wish to split the image into smaller files, so they can fit onto CDs. Use the arrow keys to navigate.

Add comments, if necessary:

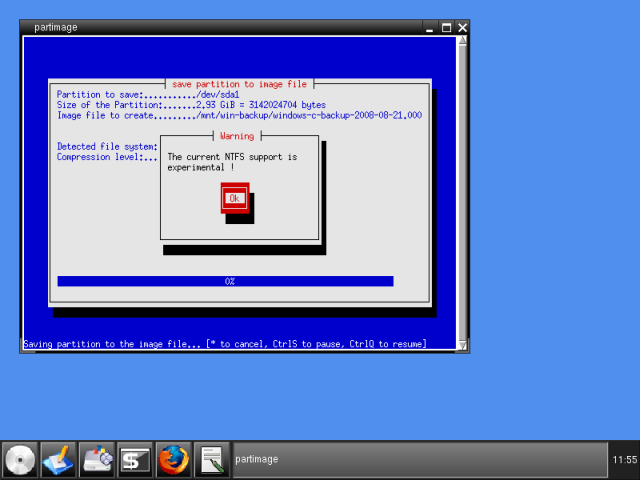
You will be warned that NTFS support is experimental. Don't worry, everything will work just fine.

You will be presented with some info about the NTFS-formatted partition you're about to image.

And the actual imaging process will begin. It takes about 5 minutes for a 1GB Windows XP installation, but this is slower than the results you'll have with Linux filesystems. Even so, PartImage is somewhat slower than CloneZilla.


After you're done, reboot into Windows. Indeed, everything looks good. The image footprint is approx. 40% of the original size (400MB).


Recovery!
Oh yes, you should test your saved images work. There's no point creating system images only to discover that they do not really work in the time of emergency. Now, you surely do not want to test software with your production setup, so you should make sure there's a spare box around - or maybe a virtual machine, which you can use to test the functionality of the imaging software during the restore.
This is possibly the most important part. If you need help, ping me.
Conclusion
CloneZilla and PartImage are excellent products, if you are willing to spend the extra five minutes learning the few basic principles that you require to use them. On the other hand, they cost nothing, are reliable and efficient, and will provide you with an efficient backup-and-restore solution, for both Windows and Linux systems.
Well, have a good day, fellas.