Raspberry Pi as a Tor router and web filter

Lead Image © Daniel Villeneuve, 123RF.com
Personal Protection
With a WiFi stick and a few simple steps, you can turn your Raspberry
Pi into a Tor proxy that will route all Internet connections from your
home network over the anonymous Tor network.
Twenty years ago, communication changed forever in the western
world with the appearance of mobile telephones and the Internet. The
leading edge of this industry is currently represented by social
networks like Facebook, Google+, and Twitter. The resulting flood of
information has given rise to a tendency among government agencies to
eaves drop on personal communication, as demonstrated by the programs
Tempora and Prism.
However, users are not powerless in the fight to protect the privacy of their data. The Tor network makes it possible to hide your IP address, the most important identifying characteristic when surfing the web, and thereby preserve anonymity. The most elegant way of using Tor is to convert a standard Raspberry Pi into a Wi-Fi network access point that routes all connections over the Tor network.
Figure 1 provides an overview of how Tor functions. At startup, the client requests a list of Tor nodes from a directory server for the Tor network and downloads them. From this list of nodes, the client chooses a so-called "entry guard" for entry into the network. The resulting connection runs over middle and exit nodes to the targeted server; all data remains encrypted as it moves from the client to the Tor exit node.
Neither the exit node nor the target server can identify the originator of the request. Only the entry guard has that information, but it does not know the target server.
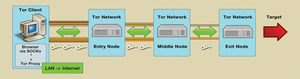 Figure 1: Tor uses entry and middle nodes to send the data over an exit node to the target server.
In this type of scenario, operating Tor on one central point in your home network makes more sense. If this point also works as the Wi-Fi access point, using Tor becomes even easier. In that case, you could ten use Tor without any problems on all devices, from smartphones to smart TVs and PCs. Because of its energy efficiency and small physical size, the Raspberry Pi provides a perfect basis for your own Tor router.
Adafruit [1] offers such a Rasp Pi and Tor combination for around US$ 90 under the product name "Onion Pi" (Figure 2). If you want to save money and are not afraid to deal with Linux, you can put together your own Onion Pi one step at a time.
 Figure 2: A prebuilt and preconfigured Onion Pi, as offered by Adafruit. (Photo: Adafruit.com)
Although a housing for the Rasp Pi is not part of the necessary equipment, it does help make the ssystem more living room compatible. If you want to install the OS via your desktop, you will also need an active USB hub. These instructions assume you operate a router with an activated DHCP server, to which the Tor-Rasp Pi later connects.
At this point, you need to decide which operating system you would like to use for the Tor-Rasp Pi. Although the Onion Pi Project recommends Occidentalis [2], as part of its own distribution targeted to those who like to tinker with hardware, I used Raspbian because it is easier for beginners. You should first download the system image onto a computer and extract it there.
Make sure the computer correctly recognizes and attaches the SD card. You can locate the appropriate device identifier via
 Figure 3: The utility program raspi-config starts during the first boot of Raspbian to facilitate initial setup.
The entry 3 Enable Boot to Desktop lets you
determine whether or not Raspbian should boot into a desktop
environment. Because this type of environment is not needed for the
envisioned server usage and would merely consume resources, you should
select the console option.
Figure 3: The utility program raspi-config starts during the first boot of Raspbian to facilitate initial setup.
The entry 3 Enable Boot to Desktop lets you
determine whether or not Raspbian should boot into a desktop
environment. Because this type of environment is not needed for the
envisioned server usage and would merely consume resources, you should
select the console option.
You may optionally use the entry marked 4 Internationalization Options to adjust the time zone settings and keyboard layout. To be able to reach the router without typing an IP address, you should use 8 Advanced Options to configure the host name – in this example, I have chosen the host name OnionRPG. By selecting Finish and then confirming with Reboot now, you will commit all changes.
In this example, I assume that your Raspberry is attached to your network via LAN cable, has obtained an IP address from the router, and is connected to the Internet.
In the
To get the Rasp Pi to function as an access point, the service in the
To allow Upstart to load the demon automatically, enter the assignment
After updating the access point software, you can start the two service components by invoking
The next step addresses the need for modifying the rules for iptables. You should first delete already existing rules using the commands
To use Tor from now on, you just need to register the device of
your choice with the new Wi-Fi network. You can check whether this
arrangement works as intended by calling up the web page https://check.torproject.org. In case of success, you will see the message Congratulations. Your browser is configured to use Tor (Figure 4).
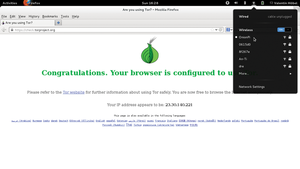 Figure 4: The website check.torproject.org checks whether your system is properly connected to the Tor network..
Logging into your email provider or using a credit card during online shopping also reveals personal data and details about you. Additionally, so-called bad exit nodes represent another danger if you are sending login data through a connection not secured via SSL. The operators of such nodes filter login data out of the data stream and misuse it for their own purposes.
For increased protection, I therefore recommend not only being careful when dealing with your own personal data but also using Firefox in combination with the free extension NoScript [3]. The NoScript add-on blocks all additional multimedia plugins as well as scripts (Figure 5).
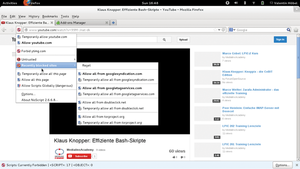 Figure 5: Once YouTube is removed from the whitelist of NoScript, it no longer shows videos in your browser.
I recommend that, immediately after installation,
you take a look at the settings for the NoScript extension. You will be
able to choose the plugins to be deactivated as well as determine which
web pages can execute Java or Flash content in the browser by way of an
exception list. If you wish to install a central content filter instead,
refer to the "Privoxy" box.
Figure 5: Once YouTube is removed from the whitelist of NoScript, it no longer shows videos in your browser.
I recommend that, immediately after installation,
you take a look at the settings for the NoScript extension. You will be
able to choose the plugins to be deactivated as well as determine which
web pages can execute Java or Flash content in the browser by way of an
exception list. If you wish to install a central content filter instead,
refer to the "Privoxy" box.
To install Privoxy, enter
Similar to an ad blocker for web browsers, Privoxy also provides the capability to block a list of known (advertisement) web pages. The commands in Listing 8 allow you to download such a list and deposit it with the content filter. The installed script automatically downloads filter lists, converts them to the format required by Privoxy, and stores them under
The provider updates the filter lists several times a month. Thus, you are advised to establish a cron job, which avoids manual refreshes of the filter lists. To do this, enter
To be on the safe side, restart Privoxy now via
Privoxy does have one disadvantage: With several concurrently active users, its CPU usage is rather high. During my tests, this situation caused load times of representative web pages to increase by up to 15 seconds.
 Figure 6: The correct proxy settings in Firefox.
 Figure 7: On the left, the website cnet.com is shown without NoScript or
activated Privoxy; on the right, it is filtered via Privoxy.
Figure 7: On the left, the website cnet.com is shown without NoScript or
activated Privoxy; on the right, it is filtered via Privoxy.
However, there's no such thing as a free lunch. The surfing performance for a Tor-enabled Raspberry Pi system lags significantly behind performance of the unprotected solution. Although testing showed hardly any reduction in data throughput, the latency times turned out to be a bottleneck. With Tor, the latency amounted to about 600 milliseconds. By comparison, a similat system running without Tor had a latency of 20 milliseconds.
If you use Google as the search engine on the Tor-Rasp Pi, the system will regularly prompt you to enter a captcha; even worse, sometimes searches will not be performed at all. The reason for this behavior stems from an automatic mechanism for recognizing bots, which classifies the IP address presented by Tor as a possible open proxy or a script. The reason for this is because the address of the actual Tor exit node is presumably used by several hundred users at the same time.
Alternative search engines, such as DuckDuckGo [4] or Startpage [5], avoid this issue, because they route search requests to Google and display the results directly.
However, users are not powerless in the fight to protect the privacy of their data. The Tor network makes it possible to hide your IP address, the most important identifying characteristic when surfing the web, and thereby preserve anonymity. The most elegant way of using Tor is to convert a standard Raspberry Pi into a Wi-Fi network access point that routes all connections over the Tor network.
What Is Tor?
Tor originated at Cambridge University, where it was christened "The
Onion Router," because its multi-level approach to packet transfers
resembles the layers of an onion. Shortly thereafter, the US Navy
Research Laboratory, which had already been working with similar
methods, took note of Tor and supported the project. Since December
2006, the non-profit foundation "Tor Project" has been promoting the
development of the software.Figure 1 provides an overview of how Tor functions. At startup, the client requests a list of Tor nodes from a directory server for the Tor network and downloads them. From this list of nodes, the client chooses a so-called "entry guard" for entry into the network. The resulting connection runs over middle and exit nodes to the targeted server; all data remains encrypted as it moves from the client to the Tor exit node.
Neither the exit node nor the target server can identify the originator of the request. Only the entry guard has that information, but it does not know the target server.
 Figure 1: Tor uses entry and middle nodes to send the data over an exit node to the target server.
Centralized Instead of Local
As soon as your computer is outfitted with a SOCKS-compliant browser and a Tor proxy, you are ready to conceal its IP address. However, to use Tor throughout your home LAN, you would need to install it on each and every device, including smartphones and tablets. Even then, Tor could only be used with applications that also communicate via SOCKS.In this type of scenario, operating Tor on one central point in your home network makes more sense. If this point also works as the Wi-Fi access point, using Tor becomes even easier. In that case, you could ten use Tor without any problems on all devices, from smartphones to smart TVs and PCs. Because of its energy efficiency and small physical size, the Raspberry Pi provides a perfect basis for your own Tor router.
Adafruit [1] offers such a Rasp Pi and Tor combination for around US$ 90 under the product name "Onion Pi" (Figure 2). If you want to save money and are not afraid to deal with Linux, you can put together your own Onion Pi one step at a time.
 Figure 2: A prebuilt and preconfigured Onion Pi, as offered by Adafruit. (Photo: Adafruit.com)
Preparations
If you want to build the Onion Pi yourself, the required hardware components include a Raspberry Pi Model B, preferably Rev.2, a Wi-Fi adapter that is compatible with the operating system (Raspbian, in this example), a LAN cable, an SD card with at least 4GB of memory, and a power supply with a micro-USB connector and an output of at least 700 mAh.Although a housing for the Rasp Pi is not part of the necessary equipment, it does help make the ssystem more living room compatible. If you want to install the OS via your desktop, you will also need an active USB hub. These instructions assume you operate a router with an activated DHCP server, to which the Tor-Rasp Pi later connects.
At this point, you need to decide which operating system you would like to use for the Tor-Rasp Pi. Although the Onion Pi Project recommends Occidentalis [2], as part of its own distribution targeted to those who like to tinker with hardware, I used Raspbian because it is easier for beginners. You should first download the system image onto a computer and extract it there.
Make sure the computer correctly recognizes and attaches the SD card. You can locate the appropriate device identifier via
fdisk -l or dmesg. Before you transfer the image, be sure to unmount any potentially mounted partitions on the SD card via sudo umount /dev/<Device>. Then, switch to the directory containing the unpacked image and write the image file to the SD card.# dd if=/<path>/<to>/<image>/2013-07-26-wheezy-Raspbian.img of=/dev/<target> bs=4MThe output target (
of) must be a device (e.g., /dev/sdd) rather than a partition (/dev/sdd1).
After the image transfer, you should remove the SD card and insert it
into your Rasp Pi. Now you can connect the power supply, the LAN cable,
and the Wi-Fi adapter, together with the HDMI cable, to the Raspberry Pi
and boot the Raspberry Pi system.Configuring Raspbian
During the first boot, theraspi-config utility comes up automatically, which allows you to configure basic system settings (Figure 3). Select the menu option 1 Expand Filesystem to allow the operating system to access the entire memory on the SD card. The next entry (2 Change User Password) allows you to change the predefined password.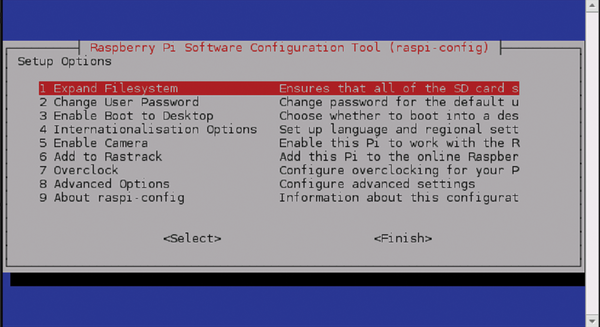 Figure 3: The utility program raspi-config starts during the first boot of Raspbian to facilitate initial setup.
You may optionally use the entry marked 4 Internationalization Options to adjust the time zone settings and keyboard layout. To be able to reach the router without typing an IP address, you should use 8 Advanced Options to configure the host name – in this example, I have chosen the host name OnionRPG. By selecting Finish and then confirming with Reboot now, you will commit all changes.
In this example, I assume that your Raspberry is attached to your network via LAN cable, has obtained an IP address from the router, and is connected to the Internet.
Access Point
As root, you should first configure the Wi-Fi access point together with the DHCP server, which will later supply IP addresses to the Wi-Fi interface. Install the necessary software components as follows:# apt-get update && apt-get install hostapd isc-dhcp-server torNext, enter
nano /etc/dhcp/dhcpd.conf to call up the editor with the DHCP server configuration file and then comment out the following lines:#option domain-name "example.org"; #option domain-name-servers ns1.example.org, ns2.example.org;Remove the comment symbol (#) in front of the command
authoritative; and append the configuration block from Listing 1
to the end of the file. Make sure to adjust the subnet according to
your local setting. By pressing Ctrl+O and then Ctrl+X, you save the
changes and exit from the editor.
Listing 1
Configuring /etc/dhcp/dhcpd.conf
subnet 192.168.42.0 netmask 255.255.255.0 {
  range 192.168.42.10 192.168.42.50;
  option broadcast-address 192.168.42.255;
  option routers 192.168.42.1;
  default-lease-time 600;
  max-lease-time 7200;
  option domain-name "local";
  option domain-name-servers 8.8.8.8, 8.8.8.4;
}
/etc/default/isc-dhcp-server file, the directive INTERFACES= lets the server know which interface should be used for assigning IP addresses. For the present scenario, enter the value wlan0. Then, assign a static IP address to wlan0 in the file /etc/network/interfaces (Listing 2) and activate it by invoking ifup wlan0.
Listing 2
Assigning Static IP Address
iface lo inet loopback
iface eth0 inet dhcp
allow-hotplug wlan0
#iface wlan0 inet manual
#wpa-roam /etc/wpa_supplicant/wpa_supplicant.conf
#iface default inet dhcp
iface wlan0 inet static
    address 192.168.42.1
    netmask 255.255.255.0
/etc/hostapd/hostapd.conf file needs to be prepared accordingly (Listing 3). The value for wpa_passphrase needs adjusting as well; this is the password for signing into the Wi-Fi network later.
Listing 3
Preparing /etc/hostapd/hostapd.conf
interface=wlan0
driver=rtl871xdrv
ssid=OnionRPG
hw_mode=g
channel=6
macaddr_acl=0
auth_algs=1
ignore_broadcast_ssid=0
wpa=2
wpa_passphrase=<secret>
wpa_key_mgmt=WPA-PSK
wpa_pairwise=TKIP
rsn_pairwise=CCMP
DAEMON_CONF="/etc/hostapd/hostapd.conf" into the /etc/default/hostapd
configuration file. To ensure compatibility with the latest Wi-Fi
sticks, the developers of Onion Pi additionally recommend an update of
Hostapd (Listing 4).
Listing 4
Adding Hostapd
# wget http://www.adafruit.com/downloads/adafruit_hostapd.zip
# unzip adafruit_hostapd.zip
# mv /usr/sbin/hostapd /usr/sbin/hostapd.ORIG
# mv hostapd /usr/sbin
# chmod 755 /usr/sbin/hostapd
service hostapd start and service isc-dhcp-server start. To load both of them automatically during subsequent system starts, enter the commands update-rc.d hostapd enable and update-rc.d isc-dhcp-server enable.Activating IP Forwarding
The communication between the Wi-Fi subnet and Tor requires several adjustments of the network configuration. To begin, open the/etc/sysctl.conf file and append the directive net.ipv4.ip_forward=1 at the end. Then, activate the change by issuing sysctl -p.The next step addresses the need for modifying the rules for iptables. You should first delete already existing rules using the commands
iptables -F and iptables -t nat -F. You can then activate the new rules, which are shown in Listing 5, and immediately save them in the file /etc/iptables.ipv4.nat. Finally, open the /etc/network/interfaces file and append an empty line and the entry up iptables-restore /etc/iptables.ipv4.nat. This step instructs the system to process the rules on subsequent reboots.
Listing 5
Activating New Rules
# iptables -t nat -A PREROUTING -i wlan0 -p tcp --dport 22 -j REDIRECT --to-ports 22
# iptables -t nat -A PREROUTING -i wlan0 -p udp --dport 53 -j REDIRECT --to-ports 53
# iptables -t nat -A PREROUTING -i wlan0 -p tcp --syn -j REDIRECT --to-ports 9040
# iptables-save > /etc/iptables.ipv4.nat
Installing Tor
The/etc/tor/torrc file contains the Tor configuration information. Directly following the line ##https://www.torproject.org/docs/faq#torrc, add the text from Listing 6. You should also create a log file (Listing 7) so that Tor has a place to record its messages. Finally, you can start Tor by invoking service tor start. By issuing the command update-rc.d tor enable, you ensure that this service also starts up automatically after a reboot.
Listing 6
Configuring /etc/tor/torrc
Log notice file /var/log/tor/notices.log
VirtualAddrNetwork 10.192.0.0/10
AutomapHostsSuffixes .onion,.exit
AutomapHostsOnResolve 1
TransPort 9040
TransListenAddress 192.168.42.1
DNSPort 53
DNSListenAddress 192.168.42.1
Listing 7
Creating a Log File
# touch /var/log/tor/notices.log
# chown debian-tor /var/log/tor/notices.log
# chmod 644 /var/log/tor/notices.log
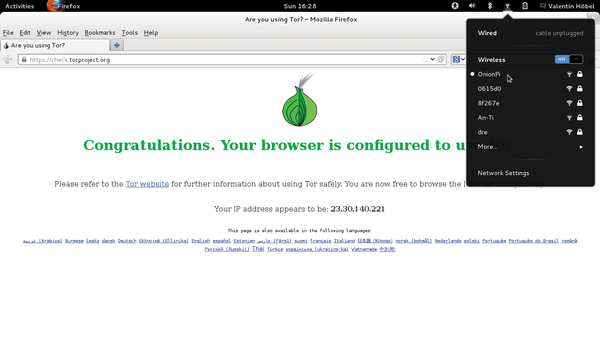 Figure 4: The website check.torproject.org checks whether your system is properly connected to the Tor network..
Lack of Comprehensive Protection
In this configuration, Onion Pi effectively conceals your IP address. Nevertheless, you do not surf completely anonymously, because scripts and browser extensions such as Java and Flash are able to circumvent this type of anonymization. One example is a flaw in the Javascript engine of Firefox, which Tor used to deliver as part of its browser bundle until the end of June 2013. If a Tor user visited an appropriately prepared web page, the script contained on the page could grab the MAC address and the host name and send the information to a server of a US intelligence agency.Logging into your email provider or using a credit card during online shopping also reveals personal data and details about you. Additionally, so-called bad exit nodes represent another danger if you are sending login data through a connection not secured via SSL. The operators of such nodes filter login data out of the data stream and misuse it for their own purposes.
For increased protection, I therefore recommend not only being careful when dealing with your own personal data but also using Firefox in combination with the free extension NoScript [3]. The NoScript add-on blocks all additional multimedia plugins as well as scripts (Figure 5).
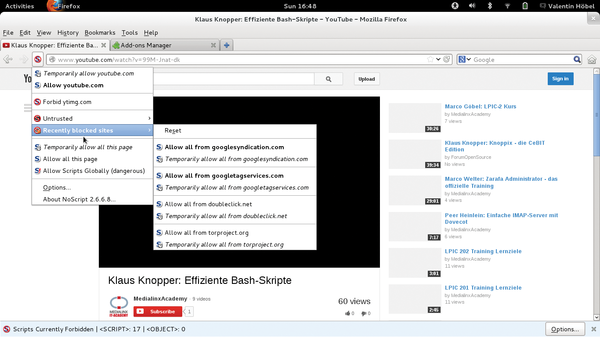 Figure 5: Once YouTube is removed from the whitelist of NoScript, it no longer shows videos in your browser.
Privoxy
The task of installing a content filter for all devices and browsers
that use the Tor network over the Tor-Rasp Pi is best done via a
centralized control, for obvious reasons. A favorite tool for this
purpose is Privoxy. Thanks to finely adjustable rules, the software
reliably blocks ads and cookies and provides increased security by also
blocking scripts.To install Privoxy, enter
sudo apt-get install privoxy at the console. To make the filter available to the entire Wi-Fi network, open /etc/privoxy/config and assign the value 0.0.0.0:8118 to the variable listen-address.Similar to an ad blocker for web browsers, Privoxy also provides the capability to block a list of known (advertisement) web pages. The commands in Listing 8 allow you to download such a list and deposit it with the content filter. The installed script automatically downloads filter lists, converts them to the format required by Privoxy, and stores them under
/etc/privoxy. Additionally, the lists are recorded in file /etc/privoxy/config for future use.The provider updates the filter lists several times a month. Thus, you are advised to establish a cron job, which avoids manual refreshes of the filter lists. To do this, enter
crontab -e as user "root" and append the following to the end of the file:0 22 * * * root /bin/bash /usr/local/bin/privoxy-blocklist.shThis setting causes the script to run every night at 10pm. Next, you should add a directive to the iptables rules to prevent the communication between the client and Privoxy from being directly communicated to Tor and store it right away (Listing 9).
To be on the safe side, restart Privoxy now via
service privoxy restart to apply the changes to the configuration. Also, remember to record the proxy setting in the browsers of all your clients (Figure 6). In my test, Privoxy reliably filtered out ads from web pages without any browser add-ons (Figure 7).Privoxy does have one disadvantage: With several concurrently active users, its CPU usage is rather high. During my tests, this situation caused load times of representative web pages to increase by up to 15 seconds.
Listing 8
Adding Blocklist
# cd /usr/local/bin
# wget -O privoxy-blocklist.sh "http://andrwe.org/doku.php/scripting/bash/privoxy-blocklist?do=export_code&codeblock=0"
# chmod +x privoxy-blocklist.sh
# ./privoxy-blocklist.sh -v 1
Listing 9
Configuring iptables
# iptables -t nat -I PREROUTING -i wlan0 -p tcp --dport 8118 -j REDIRECT --to-ports 8118
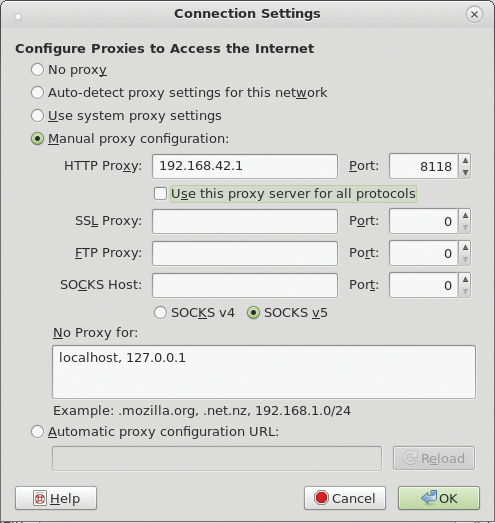 Figure 6: The correct proxy settings in Firefox.
 Figure 7: On the left, the website cnet.com is shown without NoScript or
activated Privoxy; on the right, it is filtered via Privoxy.
Figure 7: On the left, the website cnet.com is shown without NoScript or
activated Privoxy; on the right, it is filtered via Privoxy.
Up and Running
The Tor proxy on the Raspberry Pi is impressive because of its fast installation and minimal operating costs. This type of Onion router is the ideal tool for ensuring maximum privacy on your own home network.However, there's no such thing as a free lunch. The surfing performance for a Tor-enabled Raspberry Pi system lags significantly behind performance of the unprotected solution. Although testing showed hardly any reduction in data throughput, the latency times turned out to be a bottleneck. With Tor, the latency amounted to about 600 milliseconds. By comparison, a similat system running without Tor had a latency of 20 milliseconds.
If you use Google as the search engine on the Tor-Rasp Pi, the system will regularly prompt you to enter a captcha; even worse, sometimes searches will not be performed at all. The reason for this behavior stems from an automatic mechanism for recognizing bots, which classifies the IP address presented by Tor as a possible open proxy or a script. The reason for this is because the address of the actual Tor exit node is presumably used by several hundred users at the same time.
Alternative search engines, such as DuckDuckGo [4] or Startpage [5], avoid this issue, because they route search requests to Google and display the results directly.
Infos
- Onion Pi on Adafruit: http://learn.adafruit.com/onion-pi/overview
- Occidentalis: http://learn.adafruit.com/adafruit-raspberry-pi-educational-linux-distro/occidentalis-v0-dot-2
- Firefox add-on NoScript: https://addons.mozilla.org/en-US/firefox/addon/noscript/
- Web proxy for Google: https://duckduckgo.com
- Alternative web proxy for Google: http://www.startpage.com