The Device Tree
takes the place of the kernel command line, but does much more by
providing information about the hardware that is present in the system.
This creates a separation between the kernel source code and the
hardware such that the list of hardware can be modified without
requiring the entire kernel to be modified. This is a very nice feature
for virtual platform developers as it is often possible to just remove
hardware descriptions from the device tree as the models are being
developed, or if they have problems.
Like the kernel and file system, the device tree can be loaded into memory using the same SystemC loader model. We have been doing this with the Cadence Virtual System Platform for a couple of years now. If you are interested in examples about using the device tree, I covered it in an article about running a Linaro filesystem on the Zynq Virtual Platform last year. Although it's easy to forget, the kernel source tree also has documentation. For the device tree, look in the Documentation/devicetree directory of any kernel source tree.
The most recent development I wanted to cover today is support for combining the kernel image and the device tree into a single file. It turns out that some bootloaders may have trouble getting the device tree into memory, or maybe it's just easier to eliminate dealing with the extra file on the target system.
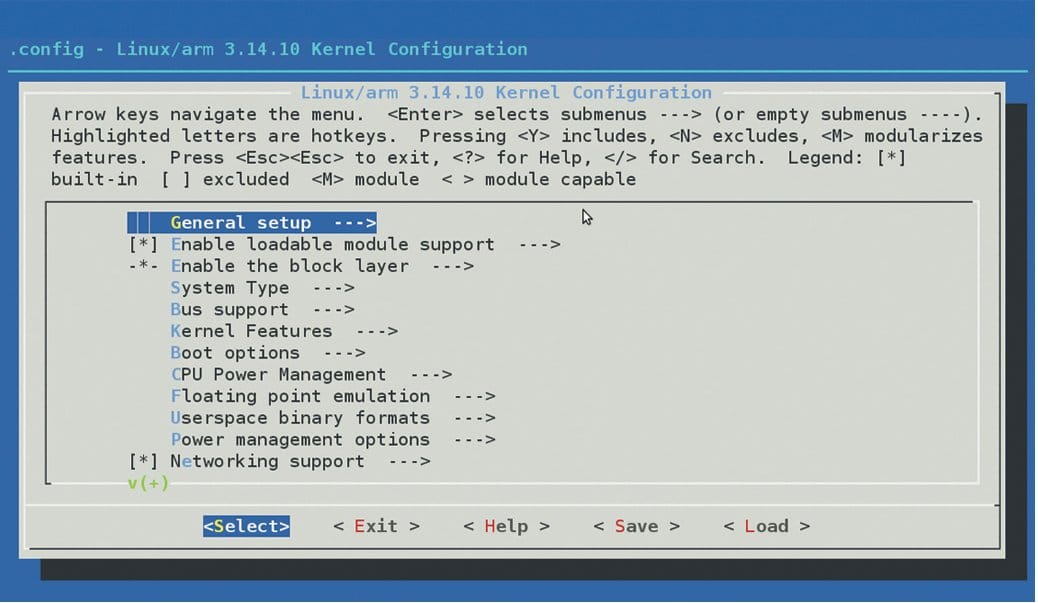
I have used the appended device tree feature on the ARM Versatile Express platform with kernel versions in the 3.9 to 3.11 range. Using it is straightforward. First, make sure the kernel configuration has the feature enabled. It is in the "Boot options --->" menu and called "Use appended device tree blob to zImage" as shown in the screenshot below.

Preparing the zImage is easy -- just cat the compiled device tree .dtb file to the end of the zImage:
$ cat arch/arm/boot/dts/vexpress-v2p-ca15-tc1.dtb >> arch/arm/boot/zImage
That's it -- the need to separately load the device tree into memory is gone. Just the zImage can be loaded into memory and the kernel will automatically find the appended device tree and use it.
The trick is remembering that the new zImage has the device tree appended. It may be better to rename the file so you know the device tree has been appended. Also, don't forget this has to be done after every kernel build or device tree compile.
Jason Andrews
Related Resources:
At Cadence, we are strong believers in standards, and for Virtual Platforms one of the key standards is SystemC TLM 2.0. Since more and more companies are adopting SystemC for Virtual Platform development I thought it might be useful for readers to look at the Linux loading process from a SystemC perspective.
I mentioned before that it is very convenient to load the kernel, file system, and kernel command line as separate items into memory and just start running. Today, I will continue with this approach. Perhaps in the future I will cover other approaches that involve combining all of these (plus a complete boot loader like u-boot) into a single file for loading into memory. Some Virtual Platforms also use SD card images that are read directly by a memory model.
I have posted a SystemC ARM Linux Loader model (.cpp and .h files) that is derived from both qemu source code and the OVP SmartLoaderARMLinux component. There is nothing much new about the model except that it can be easily used in a SystemC TLM 2.0 environment. Please note the model is for blogging purposes only, but it does work. Feel free to send any ideas or feedback on the code itself.
Review of the Boot Loader
For more information about the ARM Linux boot process I found the Booting ARM Linux article to be most useful.
Each of the following three items is loaded into memory at a pre-determined address:
#define KERNEL_ARGS_ADDR 0x100
#define KERNEL_LOAD_ADDR 0x00010000
#define INITRD_LOAD_ADDR 0x00800000
The last component is the boot loader that is placed at the reset vector of the CPU (address 0). In this case, the boot loader is a small fragment of assembly code that performs the minimum before starting the kernel:
static uint32_t bootloader[] = { 0xe3a01000, /* mov r1, #0x?? */
0xe3811c00, /* orr r1, r1, #0x??00 */
0xe59f2000, /* ldr r2, [pc, #0] */
0xe59ff000, /* ldr pc, [pc, #0] */
0, /* Address of kernel args. Set by integratorcp_init. */
0 /* Kernel entry point. Set by integratorcp_init. */
};
Some of the elements of the boot loader are filled in later as the kernel is being loaded by the method arm_load_kernel():
// Load bootcode
bootloader[1] |= info->board_id & 0xff;
bootloader[2] |= (info->board_id >> 8) & 0xff;
bootloader[5] = info->loader_start + KERNEL_ARGS_ADDR;
bootloader[6] = entry;
Now, let's look into some of the SystemC aspects of the loader and how to get all the parts into memory.
TLM 2.0 Initiator Socket
The loader model uses a TLM 2.0 initiator socket to write data into memory. The socket is defined in the .h file:
tlm_utils::simple_initiator_socket<ARMLinuxLoader> isocket;
In a Virtual Platform there are a number of models connected by a memory mapped bus. Some models have initiator (master) interfaces, some have target interfaces (slave), and some have both. A CPU will have one or more initiator interfaces. Peripherals such UARTs or timers will have target interfaces, and some models like DMA controllers will have both initiator and target interfaces.
Designs using TLM 2.0 commonly have a router to route all of the transactions coming from initiators to the correct target based on the memory map of the design.
To use the loader model in SystemC, bind the initiator socket to a target socket to make the connection to the rest of the design. Here is an example of binding the loader initiator socket to a target socket on a multiplexer. The multiplexer then connects into a SystemC TLM 2.0 router (not shown here).
loader->isocket(*multiplexer1->tsocket[1]);
Loading Memory
Since the loader only needs to write memory there is no need to consider reads. Loading data into memory is done using the TLM 2.0 transport_dbg() interface. This interface is meant for non-intrusive, non-time consuming memory accesses.
When the generic part of the code decides to write a block of memory it uses the write_memory() method passing the start address, length, and pointer to the data.
Now, the SystemC specific part starts. A TLM 2.0 transaction is configured for a write, and the address and other values of the transaction payload are set. Finally, the transport_dbg() method of the initiator socket is called. The beauty of TLM 2.0 is that we don't need to know anything about where in the system the memory is located or how it is modeled. The router will automatically take care of making sure the memory data gets written to the right model.
Here are the details of the method used to write the data into memory:
ARMLinuxLoader::write_memory(uint32_t address, int length, unsigned char *data)
{
tlm::tlm_generic_payload trans;
trans.set_write();
trans.set_address(address);
trans.set_data_length(length);
trans.set_streaming_width(length);
trans.set_data_ptr((unsigned char *) data);
trans.set_byte_enable_ptr((unsigned char *) NULL);
trans.set_byte_enable_length(0);
isocket->transport_dbg(trans);
}
Data Transfer Size
The BYTES_PER_ACCESS define in the model header file determines the maximum size of each write transaction. It's set at only 128, but can be easily increased to make each transaction length larger and reduce the number of transport_dbg() calls.
Setting parameters at instantiation
The Linux kernel takes a wide assortment of parameters at run time. You can find their description in any kernel source tree in Documentation/kernel-parameters.txt.
You must pass the parameters to the kernel by putting them at address 0x100, as shown above. The loader model puts the parameters in the correct area by providing a constructor with a string that serves as the kernel parameters.
One example that can be easily demonstrated using a virtual platform is the Linux console. In many systems, the default kernel console is the LCD, but can be changed to use a UART instead.
By adding console=ttyAMA0 to the kernel command line, the kernel uses the first UART as the console for printing messages during the boot.
The instantiation of the loader would look like this:
ARMLinuxLoader *loader = new ARMLinuxLoader("loader", true, "Image/zImage","Image/arm_root2.img", "console=ttyAMA0");
Setting parameters from command line
Another way to specify the parameters to the loader is using command line arguments. SystemC provides access to the regular C type argv/argc arguments via sc_argc() and sc_argv(). Below is the code in the loader that processes the command line:
int sc_argc_c = sc_argc();
char **sc_argv_c = (char **) sc_argv();
int i;
// +systemc_args+"-kernel <file> -initrd <file> -append <command_string>"
// <command_string> is command line args to be passed to kernel.
for (i = 1; i < sc_argc_c; i++) {
if ((!strcmp((char *) sc_argv_c[i], "-kernel")) && (sc_argc_c >= i+1)) {
kernelfile = sc_argv_c[i+1];
}
else if ((!strcmp((char *) sc_argv_c[i], "-initrd")) && (sc_argc_c >= i+1)) {
initrdfile = sc_argv_c[i+1];
}
else if ((!strcmp((char *) sc_argv_c[i], "-append")) && (sc_argc_c >= i+1)) {
commandString = sc_argv_c[i+1];
}
}
For Cadence SystemC simulators the arguments are passed using +systemc_args+ as shown in the comment in the code fragment above.
To confirm the loader has done its job the memory data can be viewed using a SystemC memory viewer or using a software debugger to examine memory data.
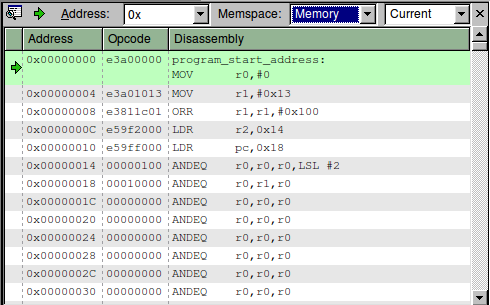
The screenshot below shows a memory view from a software debugger. The data starting from address 0 maps directly to the bootloader[] array.
The next screenshot shows the memory contents at address 0x100, the area with the Linux kernel command line arguments. The parameters start with the various tags as initialized in the set_kernel_args() method of the loader model.
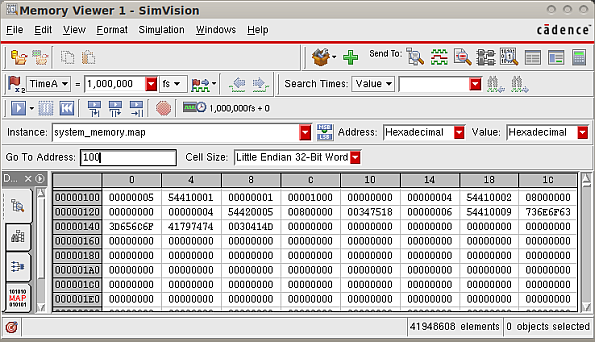
Then the user argument console=ttyAMA0 finally starts at address 0x13c as shown when the memory viewer is changed to display ASCII instead of hex values.

Hopefully, this introduction to the Linux loading process is helpful for users who need to run Linux on a SystemC Virtual Platform. Loading Linux is a bit more complex than just compiling a program and loading it using a debugger command, and there are many ways to do it, but once you get it set up it works great.
Like the kernel and file system, the device tree can be loaded into memory using the same SystemC loader model. We have been doing this with the Cadence Virtual System Platform for a couple of years now. If you are interested in examples about using the device tree, I covered it in an article about running a Linaro filesystem on the Zynq Virtual Platform last year. Although it's easy to forget, the kernel source tree also has documentation. For the device tree, look in the Documentation/devicetree directory of any kernel source tree.
The most recent development I wanted to cover today is support for combining the kernel image and the device tree into a single file. It turns out that some bootloaders may have trouble getting the device tree into memory, or maybe it's just easier to eliminate dealing with the extra file on the target system.
I have used the appended device tree feature on the ARM Versatile Express platform with kernel versions in the 3.9 to 3.11 range. Using it is straightforward. First, make sure the kernel configuration has the feature enabled. It is in the "Boot options --->" menu and called "Use appended device tree blob to zImage" as shown in the screenshot below.
Preparing the zImage is easy -- just cat the compiled device tree .dtb file to the end of the zImage:
$ cat arch/arm/boot/dts/vexpress-v2p-ca15-tc1.dtb >> arch/arm/boot/zImage
That's it -- the need to separately load the device tree into memory is gone. Just the zImage can be loaded into memory and the kernel will automatically find the appended device tree and use it.
The trick is remembering that the new zImage has the device tree appended. It may be better to rename the file so you know the device tree has been appended. Also, don't forget this has to be done after every kernel build or device tree compile.
Jason Andrews
Related Resources:
A SystemC TLM 2.0 ARM Linux Boot Loader
Earlier this year I wrote an article with some details related to loading Linux into memory for Virtual Platform execution. I reviewed a problem related to Ubuntu on qemu for the ARM Versatile Platform.At Cadence, we are strong believers in standards, and for Virtual Platforms one of the key standards is SystemC TLM 2.0. Since more and more companies are adopting SystemC for Virtual Platform development I thought it might be useful for readers to look at the Linux loading process from a SystemC perspective.
I mentioned before that it is very convenient to load the kernel, file system, and kernel command line as separate items into memory and just start running. Today, I will continue with this approach. Perhaps in the future I will cover other approaches that involve combining all of these (plus a complete boot loader like u-boot) into a single file for loading into memory. Some Virtual Platforms also use SD card images that are read directly by a memory model.
I have posted a SystemC ARM Linux Loader model (.cpp and .h files) that is derived from both qemu source code and the OVP SmartLoaderARMLinux component. There is nothing much new about the model except that it can be easily used in a SystemC TLM 2.0 environment. Please note the model is for blogging purposes only, but it does work. Feel free to send any ideas or feedback on the code itself.
Review of the Boot Loader
For more information about the ARM Linux boot process I found the Booting ARM Linux article to be most useful.
Each of the following three items is loaded into memory at a pre-determined address:
- kernel command-line arguments
- kernel image
- file system
#define KERNEL_ARGS_ADDR 0x100
#define KERNEL_LOAD_ADDR 0x00010000
#define INITRD_LOAD_ADDR 0x00800000
The last component is the boot loader that is placed at the reset vector of the CPU (address 0). In this case, the boot loader is a small fragment of assembly code that performs the minimum before starting the kernel:
static uint32_t bootloader[] = { 0xe3a01000, /* mov r1, #0x?? */
0xe3811c00, /* orr r1, r1, #0x??00 */
0xe59f2000, /* ldr r2, [pc, #0] */
0xe59ff000, /* ldr pc, [pc, #0] */
0, /* Address of kernel args. Set by integratorcp_init. */
0 /* Kernel entry point. Set by integratorcp_init. */
};
Some of the elements of the boot loader are filled in later as the kernel is being loaded by the method arm_load_kernel():
// Load bootcode
bootloader[1] |= info->board_id & 0xff;
bootloader[2] |= (info->board_id >> 8) & 0xff;
bootloader[5] = info->loader_start + KERNEL_ARGS_ADDR;
bootloader[6] = entry;
Now, let's look into some of the SystemC aspects of the loader and how to get all the parts into memory.
TLM 2.0 Initiator Socket
The loader model uses a TLM 2.0 initiator socket to write data into memory. The socket is defined in the .h file:
tlm_utils::simple_initiator_socket<ARMLinuxLoader> isocket;
In a Virtual Platform there are a number of models connected by a memory mapped bus. Some models have initiator (master) interfaces, some have target interfaces (slave), and some have both. A CPU will have one or more initiator interfaces. Peripherals such UARTs or timers will have target interfaces, and some models like DMA controllers will have both initiator and target interfaces.
Designs using TLM 2.0 commonly have a router to route all of the transactions coming from initiators to the correct target based on the memory map of the design.
To use the loader model in SystemC, bind the initiator socket to a target socket to make the connection to the rest of the design. Here is an example of binding the loader initiator socket to a target socket on a multiplexer. The multiplexer then connects into a SystemC TLM 2.0 router (not shown here).
loader->isocket(*multiplexer1->tsocket[1]);
Loading Memory
Since the loader only needs to write memory there is no need to consider reads. Loading data into memory is done using the TLM 2.0 transport_dbg() interface. This interface is meant for non-intrusive, non-time consuming memory accesses.
When the generic part of the code decides to write a block of memory it uses the write_memory() method passing the start address, length, and pointer to the data.
Now, the SystemC specific part starts. A TLM 2.0 transaction is configured for a write, and the address and other values of the transaction payload are set. Finally, the transport_dbg() method of the initiator socket is called. The beauty of TLM 2.0 is that we don't need to know anything about where in the system the memory is located or how it is modeled. The router will automatically take care of making sure the memory data gets written to the right model.
Here are the details of the method used to write the data into memory:
ARMLinuxLoader::write_memory(uint32_t address, int length, unsigned char *data)
{
tlm::tlm_generic_payload trans;
trans.set_write();
trans.set_address(address);
trans.set_data_length(length);
trans.set_streaming_width(length);
trans.set_data_ptr((unsigned char *) data);
trans.set_byte_enable_ptr((unsigned char *) NULL);
trans.set_byte_enable_length(0);
isocket->transport_dbg(trans);
}
Data Transfer Size
The BYTES_PER_ACCESS define in the model header file determines the maximum size of each write transaction. It's set at only 128, but can be easily increased to make each transaction length larger and reduce the number of transport_dbg() calls.
Setting parameters at instantiation
The Linux kernel takes a wide assortment of parameters at run time. You can find their description in any kernel source tree in Documentation/kernel-parameters.txt.
You must pass the parameters to the kernel by putting them at address 0x100, as shown above. The loader model puts the parameters in the correct area by providing a constructor with a string that serves as the kernel parameters.
One example that can be easily demonstrated using a virtual platform is the Linux console. In many systems, the default kernel console is the LCD, but can be changed to use a UART instead.
By adding console=ttyAMA0 to the kernel command line, the kernel uses the first UART as the console for printing messages during the boot.
The instantiation of the loader would look like this:
ARMLinuxLoader *loader = new ARMLinuxLoader("loader", true, "Image/zImage","Image/arm_root2.img", "console=ttyAMA0");
Setting parameters from command line
Another way to specify the parameters to the loader is using command line arguments. SystemC provides access to the regular C type argv/argc arguments via sc_argc() and sc_argv(). Below is the code in the loader that processes the command line:
int sc_argc_c = sc_argc();
char **sc_argv_c = (char **) sc_argv();
int i;
// +systemc_args+"-kernel <file> -initrd <file> -append <command_string>"
// <command_string> is command line args to be passed to kernel.
for (i = 1; i < sc_argc_c; i++) {
if ((!strcmp((char *) sc_argv_c[i], "-kernel")) && (sc_argc_c >= i+1)) {
kernelfile = sc_argv_c[i+1];
}
else if ((!strcmp((char *) sc_argv_c[i], "-initrd")) && (sc_argc_c >= i+1)) {
initrdfile = sc_argv_c[i+1];
}
else if ((!strcmp((char *) sc_argv_c[i], "-append")) && (sc_argc_c >= i+1)) {
commandString = sc_argv_c[i+1];
}
}
For Cadence SystemC simulators the arguments are passed using +systemc_args+ as shown in the comment in the code fragment above.
To confirm the loader has done its job the memory data can be viewed using a SystemC memory viewer or using a software debugger to examine memory data.
The screenshot below shows a memory view from a software debugger. The data starting from address 0 maps directly to the bootloader[] array.
The next screenshot shows the memory contents at address 0x100, the area with the Linux kernel command line arguments. The parameters start with the various tags as initialized in the set_kernel_args() method of the loader model.
Then the user argument console=ttyAMA0 finally starts at address 0x13c as shown when the memory viewer is changed to display ASCII instead of hex values.
Hopefully, this introduction to the Linux loading process is helpful for users who need to run Linux on a SystemC Virtual Platform. Loading Linux is a bit more complex than just compiling a program and loading it using a debugger command, and there are many ways to do it, but once you get it set up it works great.