The below content is copied from URL: https://blog.techiescamp.com/docs/jenkins-shared-library/
Introduction to Jenkins Shared Library
In this lesson, we’ll cover the essential concepts of Jenkins shared libraries.
We are in an era of microservices, where modern applications are composed of individually deployable components. Unlike monolithic applications, this approach often requires multiple pipelines to manage the deployment of each microservice.
With Jenkins' pipeline-as-code, you can script your entire CI/CD process, treating it just like application code. This allows you to version control your pipeline, ensuring that it undergoes rigorous testing before being used for any application deployments.
What is Jenkins Shared Library?
When we say CI/CD as code, it should be modular and reusable and mainly follow the DRY principles (Don’t repeat yourself). This is where Jenkins Shared Library comes into play.
Shared library – As the name indicates, it is a library that can be shared.
Jenkins Shared library is the concept of having a common pipeline code in the version control system that can be used by any number of pipelines just by referencing it. In fact, multiple teams can use the same library for their pipelines.
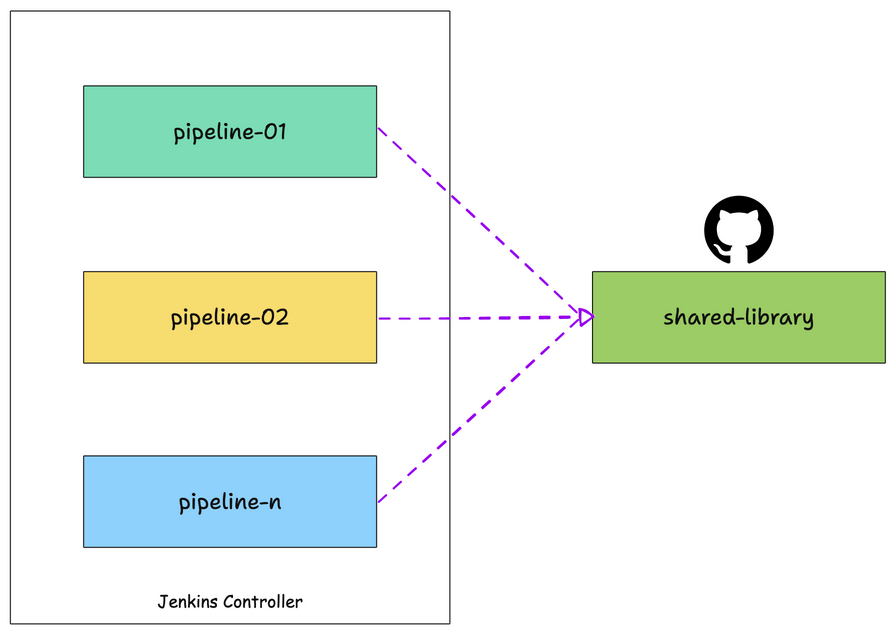
You can compare it with the common programming library. In programming, we create individual libraries that anyone can use just by importing them into their code.
Assume, you have ten Java microservices pipelines, the maven build step gets duplicated on all the ten pipelines. Whenever a new service is added, you will have to copy and paste the pipeline code again. Let’s say you want to change some parameters in the Maven build step. You will have to change it in all the pipelines manually.
To avoid pipeline code duplication, we can write a shared library for Maven build, and in all the pipelines we just have to refer to the Maven build library code. In the future for any Maven build changes, you just have to update the shared library code. It will be applied to all the pipelines using the Maven build library.
Shared Library Github Repo
The Jenkins shared library examples used in this guide are hosted on a GitHub Repository.
Clone the repository to follow along with the guide.
Getting Started With Shared Library
A shared library is a collection of Groovy files (DSLs + Groovy). All the Groovy files should be present in a git repo.
In this example, we will be using Github as our Git repo.
You can clone this repo to get the basic structure of the shared library.
The shared library repo has the following folder structure.
Let’s understand what each folder means.
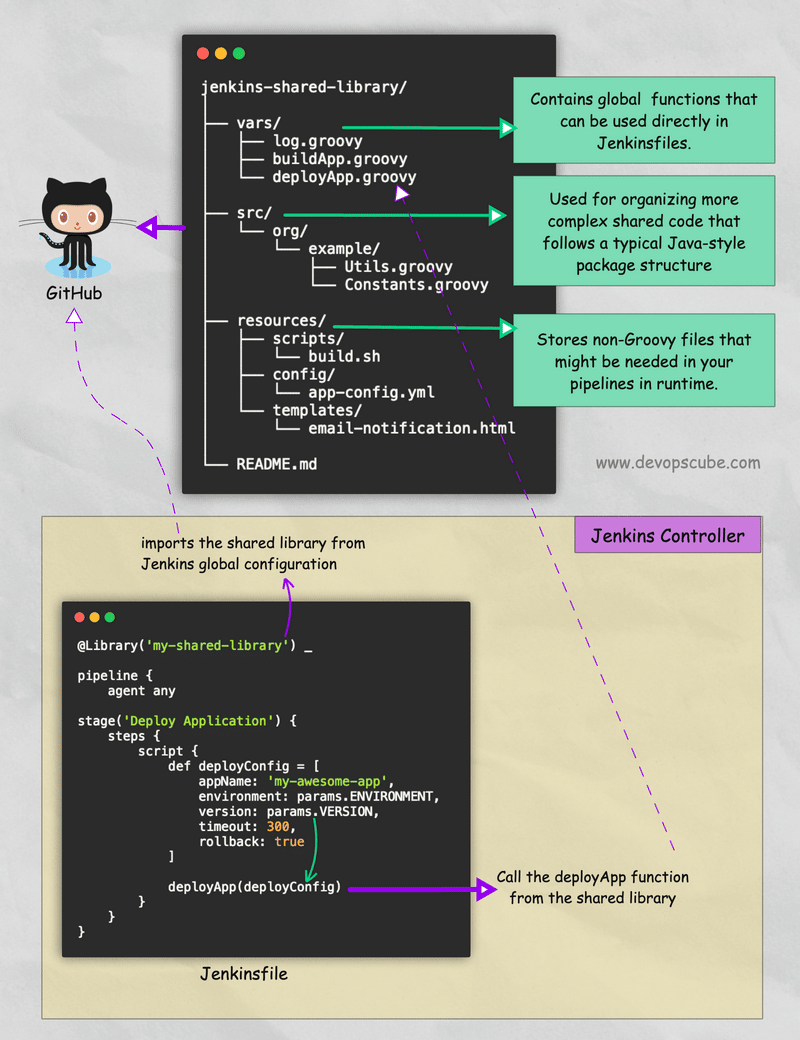
1. vars
This directory holds all the global shared library code that can be called from a Jenkins pipeline, including all the library files with a .groovy extension.
The name of each Groovy file in the vars directory corresponds to a function name in the pipeline.
For example, if you have a file named deployApp.groovy in the vars directory, you can call deployApp() directly in your Jenkins pipeline.
Here is a simple shared library code for Git checkout.
So how we come to know about the syntax?
Don’t worry about the syntax. We can generate it using the Jenkins pipeline generator. In the upcoming lessons, we will look at it practically.
The vars directory also supports .txt files for the documentation of shared library code.
For example, if you have a file named maven-build.groovy, you can have a helper file named maven-groovy.txt. You can write the respective shared library function help documentation in markdown format in this file. The help file can be viewed from <your-jenkins-url>/pipeline-syntax/globals page.
2. src
Used for organizing more complex pipeline code. It follows a typical Java-style package structure.
Here, you can add custom structured and object-oriented code Groovy code to extend your shared library code. Also, you can import core Jenkins and its plugin classes using an import statement.
You might ask, when we have a vars directory, what is the need for src?
There are scenarios where the groovy DSLs will not be flexible enough to achieve some complex functionalities. In this case, you can write custom Groovy functions in src and call them in your shared library code.
The src directory is added to the classpath during every script compilation. So we can directly use the classes defined in the src directory in Jenkinsfiles.
3. resources
All the non-groovy files (e.g., text files, templates) required for your pipelines can be managed in this folder. Typically files.
One such
example is that you might need a common JSON template to make an API
call during the build. This JSON template can be stored in the resources
folder and can be accessed in the shared library using the libraryResource function.
Or You can use a HTML file as a template for sending HTML-formatted email notifications from your Jenkins pipelines. In your pipeline script or shared library function, you can load this template and replace the placeholders with actual values.
Real World Example
In larger enterprises, it’s common to have central platform teams that play a key role in standardizing and optimizing CI/CD workflows.
When Jenkins is used within these organizations, these platform teams typically develop shared Jenkins libraries in collaboration with applcation teams to manage application and infrastructure deployment.
By utilizing shared libraries, platform teams ensure that all application teams adhere to consistent security practices and standards in their pipelines. This approach eliminates the need for each application team to write and maintain similar pipeline code, allowing them to leverage the shared library instead.
New projects can quickly set up their CI/CD pipelines by importing the shared library, reducing the time to get started.
These libraries are also designed to be extensible, so if the standard libraries don’t fully meet the specific needs of a project, they can be easily customized.
Platform teams usually provide comprehensive documentation and support for the shared library, making it easier for application teams to use it effectively.
Also, it’s also common for teams to contribute to these shared libraries, enabling collaboration and ensuring that the organization maintains efficient and streamlined pipeline libraries over time.
In the next lesson we will get our hands-dirty by creating and implementing a shared library.
Create Jenkins Shared Library
In the last lesson, we learned about the concepts of Jenkins Shared Library, and in this lesson, you will learn how to create and integrate a basic shared library in Jenkins and use it in a sample pipeline
We will look into the following four things to get your hands dirty with the shared library.
- Creating a Shared Library Structure
- Creating Custom Shared Library Code
- Configuring Jenkins to Use the Shared Library
- Using the Shared Library in a Pipeline Stage.
- Executing a Declarative Pipeline with a Shared Library.
Let's look at each one in detail.
Create a Shared Library Structure
Jenkins shared library has the following structure. You can get the basic structure and code used in this article from Github -> jenkins-shared-library
All the files under the vars directory are global functions and variables. The file name is the function name. We will be using the filename in our declarative pipeline.
Create Custom Shared Library Code
In this section, we will create the shared library code for Git Checkout functionality.
Generating Pipeline Syntax Using Snippet Generator:
You can create code snippets that can be used in the shared library function using the Pipeline Syntax Generator available in Jenkins. This will make our lives easier when creating custom DSL libraries. All the supported pipeline functionality can be generated from the snippet generator.
You can access the syntax generator from your Jenkins on /pipeline-syntax/ path. For example,
Here is the screenshot, which shows creating a git checkout pipeline snippet using the pipeline syntax generator.

After giving every detail, click on the Generate Pipeline Script button to generate pipeline syntax
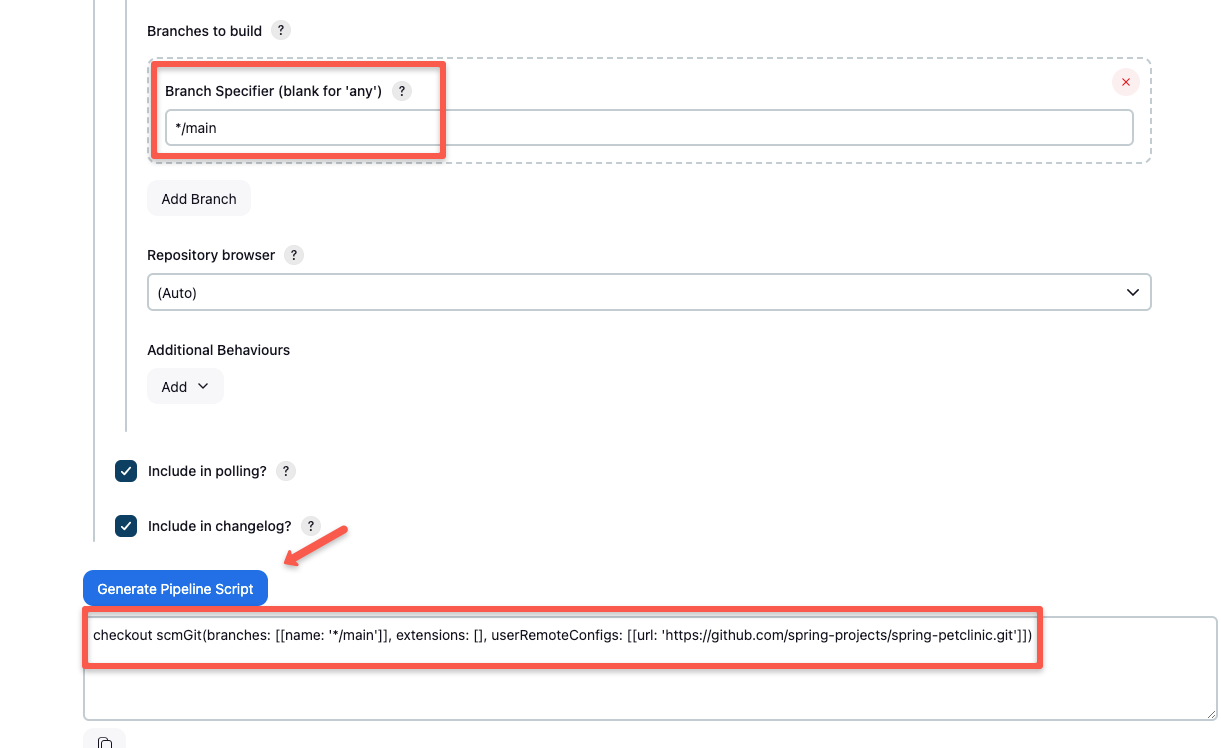
Here is the properly formatted checkout snippet.
Create a Shared Library For Git Checkout
Let's convert the checkout snippet we generated in the above step to a shared library.
Create a file named gitCheckout.groovy under the vars folder as shown below
jenkins-shared-library
  |____vars
  |      |____ gitCheckout.groovy
  |
  |____src
  |____resources
Here is our shared library code for Git Checkout. We have removed all the empty checkout parameters that were generated by default.
Here is the code explanation,
def call(Map stageParams)- A simple call function that accepts a Map as an argument. From the pipeline stage, we will pass multiple arguments, which will be passed as a map to the shared library.stageParams.branch- it's the branch parameter that comes from the pipeline stage, and we usestageParamsto access that variable in the shared library.
Commit the changes and push it to your repository.
Configuring Jenkins to Use the Shared Library
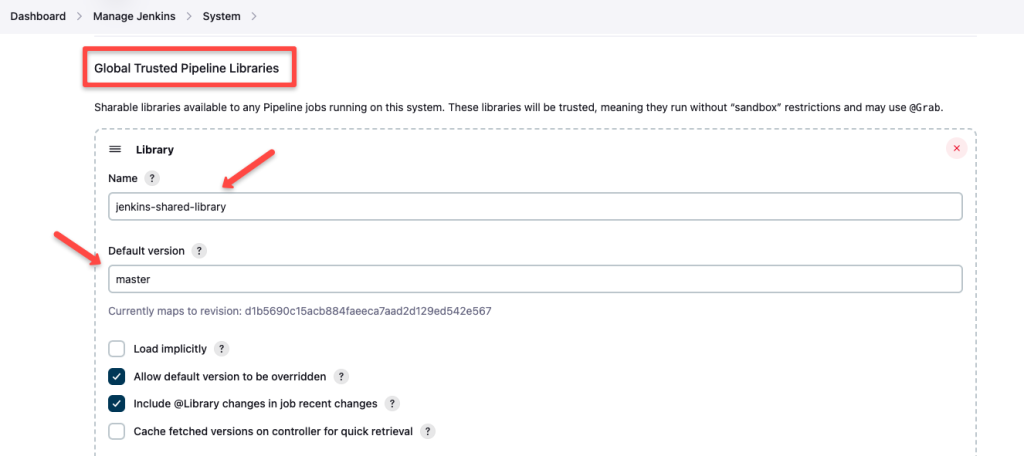
Now that we have a basic git checkout library ready, let's add it to Jenkins configurations.
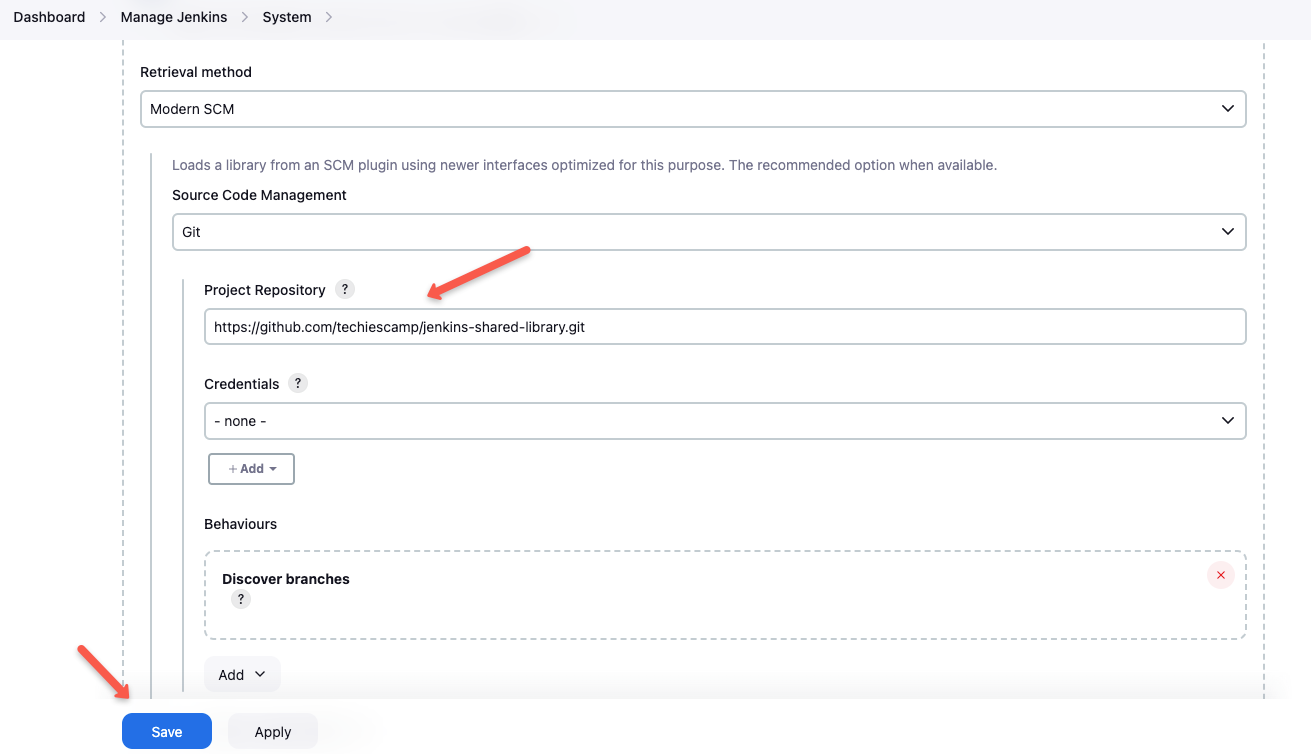
Step 1: Go to Manage Jenkins --> System
Step 2: Find the Global Trusted Pipeline Libraries section and add your repo details and configurations as shown below.
Using the Shared Library in a Pipeline Stage
We always call the library using the filename under vars. In this case, gitCheckout is the filename created under vars.
This is how we call the gitCheckout library from the pipeline or Jenkinsfile
stage('Git Checkout') {
    gitCheckout(
        branch: "main",
        url: "https://github.com/spring-projects/spring-petclinic.git"
    )
}
As you can see, we are passing branch and url parameter to the Checkout function.
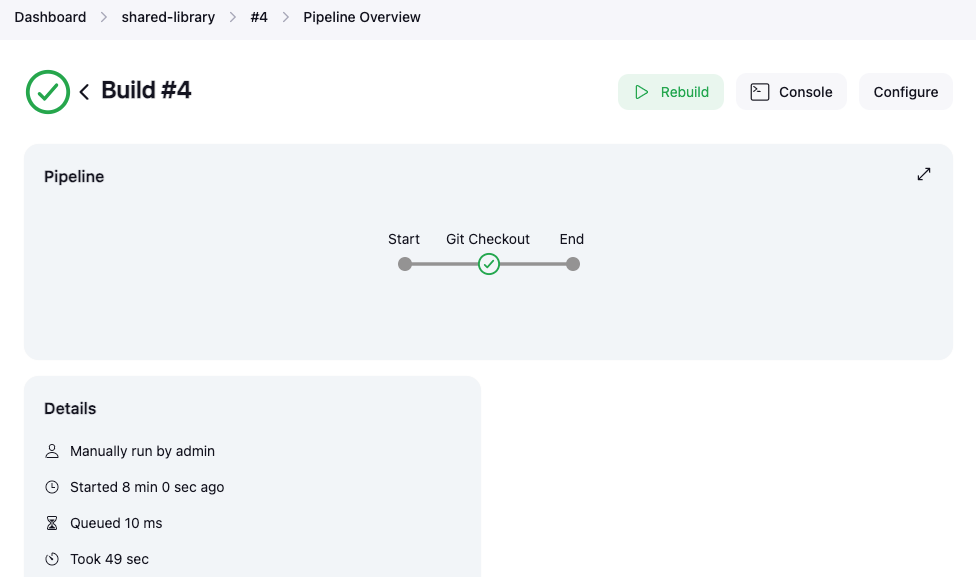
Executing a Declarative Pipeline with a Shared Library
Given below is an example of how the shared library can be used in a pipeline.
Create a new pipeline and run the above pipeline code in it, once the build is finished, you can get an overview of your pipeline build as shown below
Like gitCheckout, you can create all your pipeline steps a shared library and you don’t have to repeat your common functionalities in all your pipelines.
Introduction to Jenkins Multibranch Pipeline
If you are looking for a well-automated Pull Request-based or branch-based Jenkins Continuous Integration & Delivery (CI/CD) pipeline, this lesson will help you get the overall picture of how to achieve it using the Jenkins multibranch pipeline.
Jenkins’s multi-branch pipeline is one of the best ways to design CI/CD workflows as it is entirely a git-based (source control) pipeline as code.
This lesson will discuss all the key concepts involved in a Jenkins multi-branch pipeline setup.
What is a Multi-branch Pipeline?
A multi-branch pipeline is a concept that automatically creates Jenkins pipelines based on Git branches. It can automatically discover new branches in the source control (Github) and automatically create a pipeline for that branch. When the pipeline build starts, Jenkins uses the Jenkinsfile in that branch for build stages.
SCM (Source Control) can be Github, Bitbucket, or a Gitlab repo.
You can choose to exclude selected branches if you don’t want them to be in the automated pipeline with Java regular expressions.
The multi-branch pipeline supports PR-based branch discovery. This means that branches get discovered automatically in the pipeline if someone raises a PR (pull request) from a branch. If this configuration is enabled, builds will be triggered only if a PR is raised. So, if you are looking for a PR-based Jenkins build workflow, this is a great option.
You can add conditional logic to the Jenkinsfile to build jobs based on the branch requirement.
For example, if you want the feature branch to run only unit testing and sonar analysis, you can have a condition to skip the deployment stage with a when condition, as shown below.
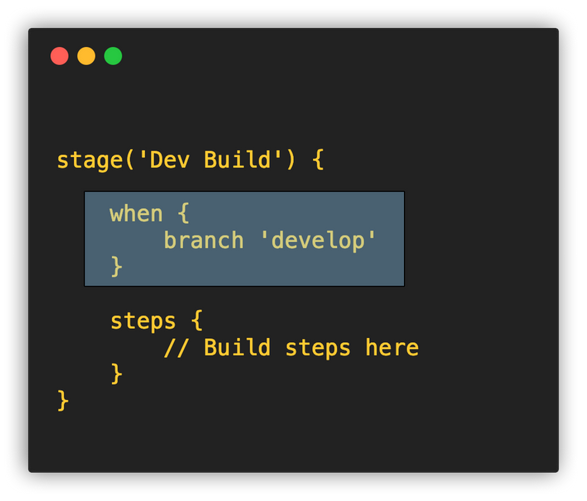
So whenever the code is merged develop branch, the pipeline will run the unit testing and sonar analysis stages skipping the deployment stage.
Also, multi-branch pipelines are not limited to the continuous delivery of applications. You can use it to manage your infrastructure code as well.
One such example is having a continuous delivery pipeline for Docker image or a VM image patching, building, and upgrade process.
GitFlow-style branching strategy
We will walk you through a basic build and deployment workflow to understand how a multi-branch pipeline works.
Let’s say I want a Jenkins pipeline to build and deploy an application with the following GitFlow-style branching strategy.
Note: The branching strategy explained here is for demonstration purposes. It may vary depending on an organization's specific design and standards.
- Development starts with a feature branch, where developers commit code to the feature branch.
- Whenever a developer raises a PR (Pull Request) from the feature branch to the develop branch, a Jenkins pipeline should trigger to run unit tests and static code analysis.
- After successfully testing the code in the feature branch, the developer merges the PR to the develop branch.
- Now, a pipeline should trigger from the develop branch and deploy the application to the dev environment.
- When the code is ready for release, developers raise a PR from the develop branch to the main branch. This should trigger a build pipeline that will run the unit test cases and code analysis, and create the release artifact.
- Once the PR is merged to main, the release artifact should be deployed to pre-prod or staging environment, depending on the requirements.
From the above conditions, you can see that there is no manual trigger of Jenkins jobs, and whenever there is a pull request for a branch, the pipeline needs to be triggered automatically and run the required steps for that branch.
This workflow builds a great feedback loop for engineers and avoids dependence on the DevOps team to build and deploy in non-prod environments.
Developers can check the build status on GitHub and make decisions on what to do next.
This workflow can be achieved easily through a Jenkins multi-branch pipeline.
Note: We are not considering automated deployment to production, as most organizations require manual approvals before deploying to production environments, which are typically handled through dedicated production deployment pipelines.
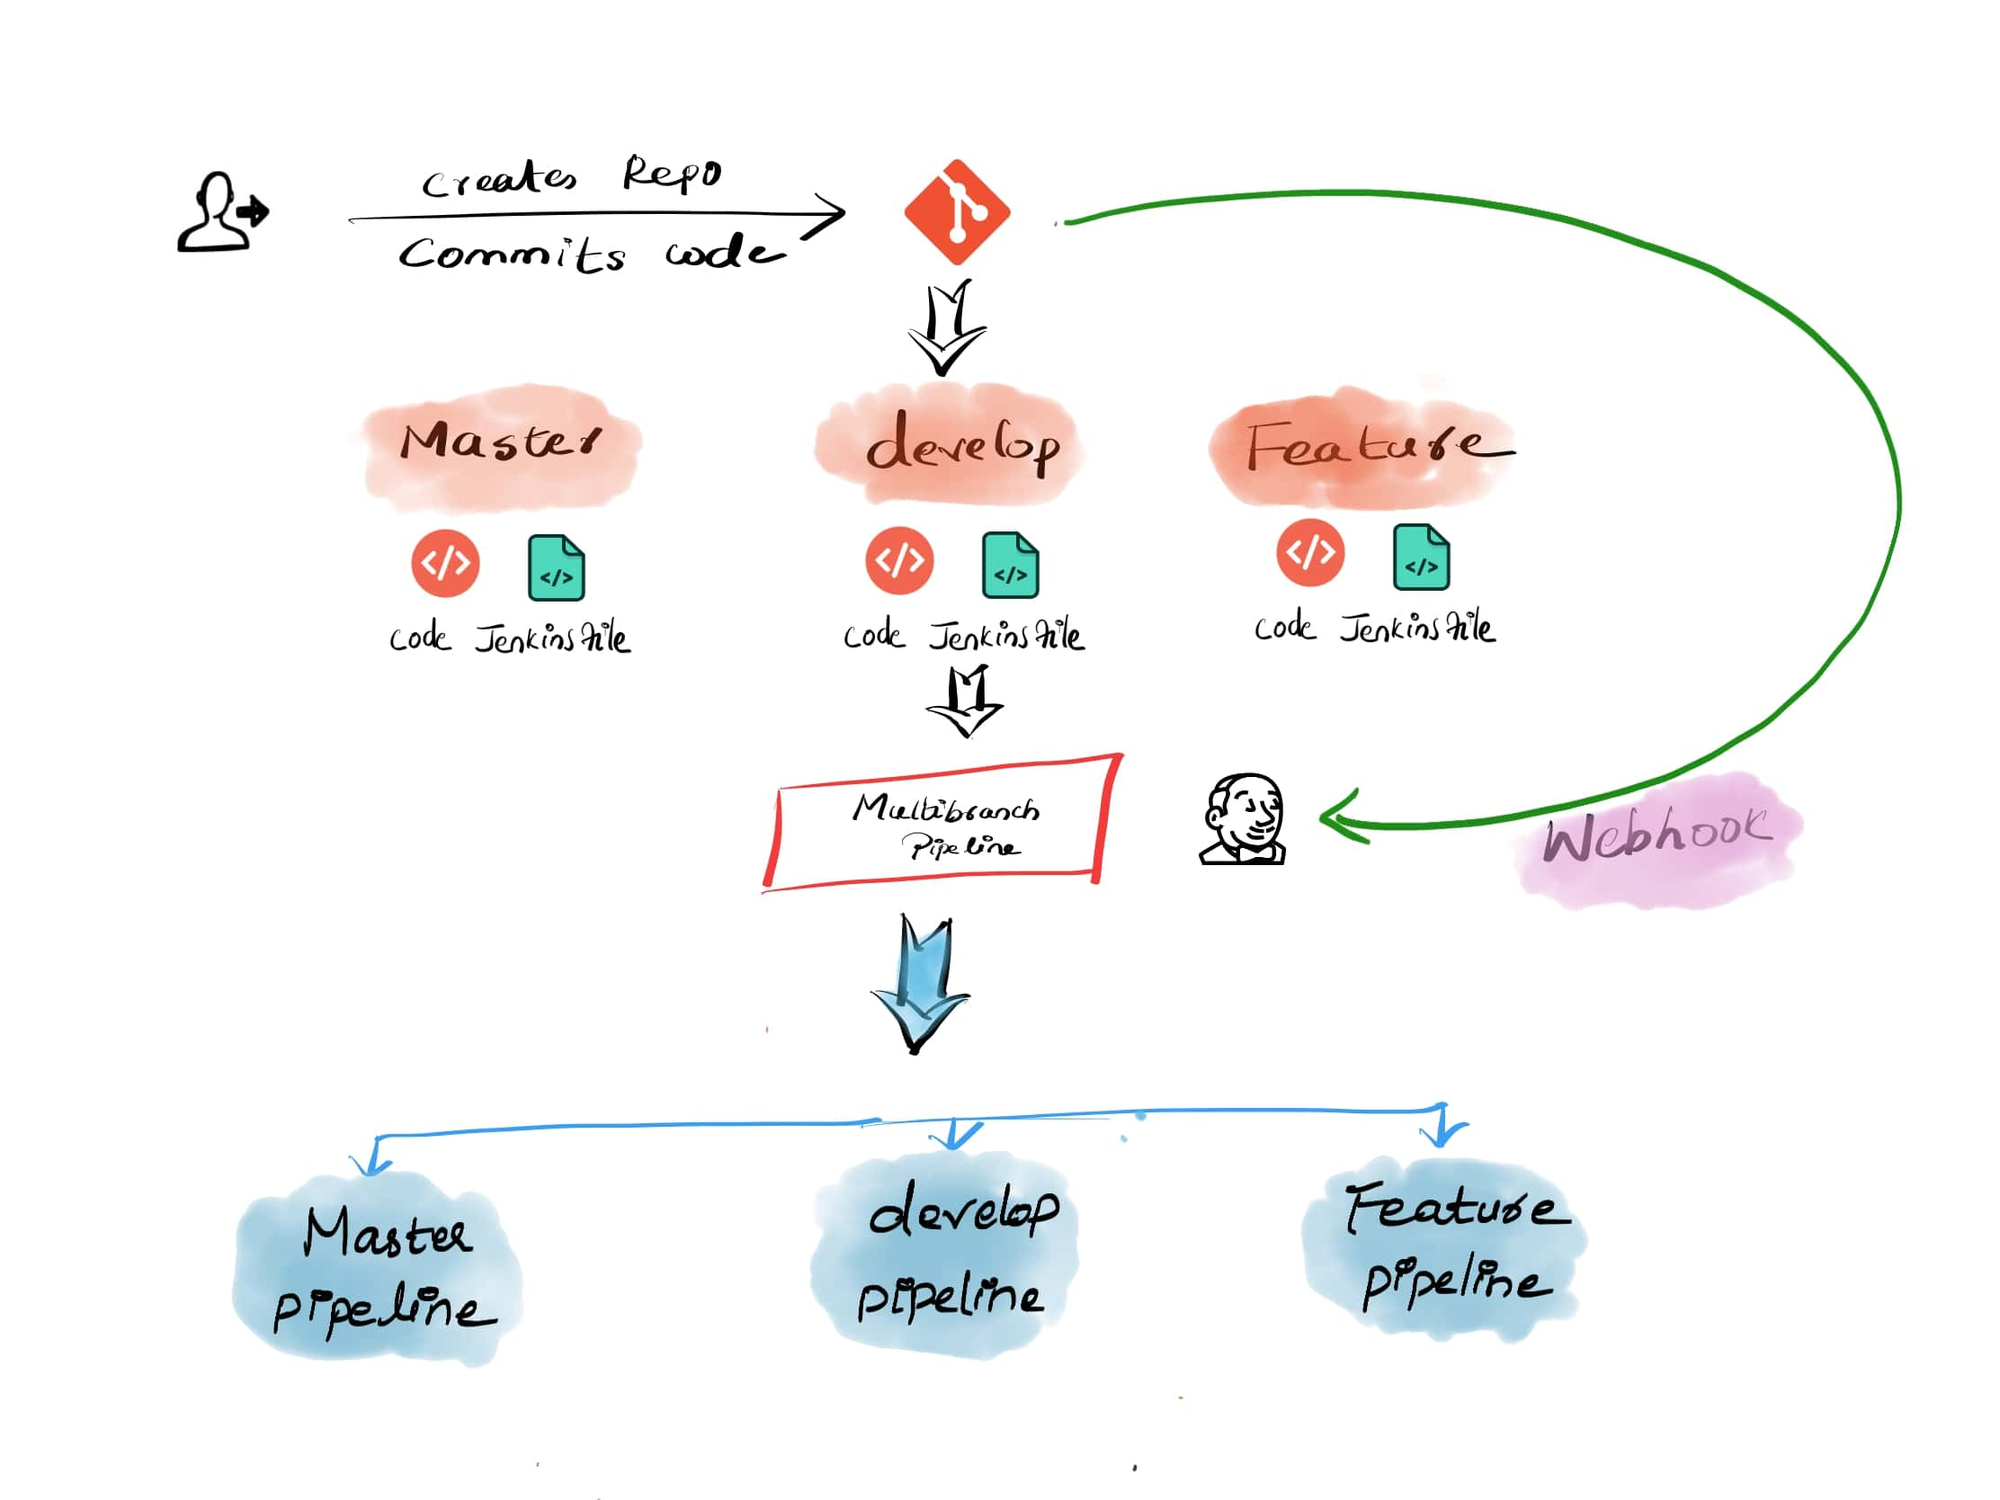
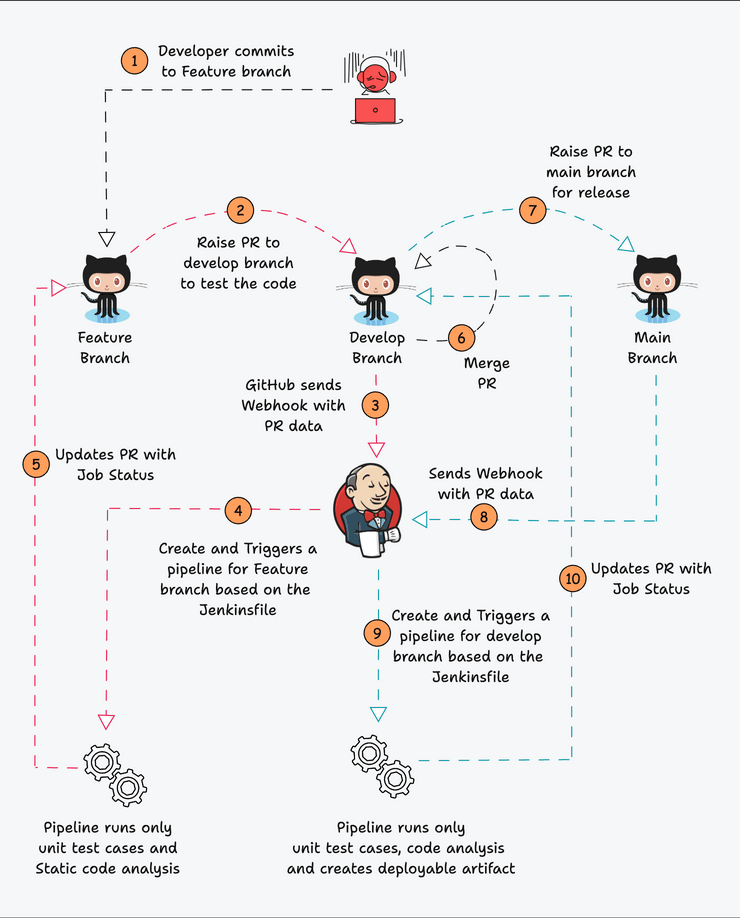
Multi Branch Pipeline Workflow
Here is how the multi-branch pipeline works for the GitFlow-style branching strategy we discussed above.
- When a developer creates a PR (pull request) from a feature branch to develop a branch, GitHub sends a webhook with the PR information to Jenkins.
- Jenkins receives the PR, finds the relevant multibranch
pipeline, and automatically creates a feature branch pipeline. It then
runs the jobs with the steps mentioned in the
Jenkinsfilefrom the feature branch. - During checkout, the source and target branches in the PR merge. The PR merge will be blocked on Github until Jenkins returns the build status (Impleted using staus checks and branch rulesets).
- Once the build finishes, Jenkins will update the status to GitHub PR. Now you will be able to merge the code.
This process continues for all the PRs.
The following image shows the high level multi-branch pipeline workflow.
Multi-Branch Pipeline Best Practices
Let’s have a look at some of the best practices for a multibranch pipeline.
1. Repo Branching – Have a Standard Structure
It is essential to have a standard branching structure for your repositories. Whether it is your application or infra code, having a standard branch will reduce the inconsistent configurations across different pipelines.
2. Shared Libraries – Reusable Pipeline Code
Make use of shared libraries for all your multi-branch pipelines. Reusable libraries make it easy to manage all the pipeline stages in a single place.
Pull Request Vs Commit Triggers
Try to use a PR-based pipeline rather than a commit-based pipeline. If a code repo gets continuous commits, it might overwhelm Jenkins with many builds.
Commit-based triggers are also supported in PR-based discovery. Here, the commit trigger happens only when the PR is still open.
Regular Pipeline Vs. Multibranch Pipeline
A regular pipeline job is meant to build a single branch from the SCM and deploy it to a single environment.
A multibranch pipeline is meant for building multiple branches from a repository and deploy to multiple environments if required.
A pipeline job supports both pipeline steps to be added in Jenkins configuration and form SCM.
Use pipeline jobs for AD-Hoc jobs, parameterized job executions, and debug pipelines as code.
Do not use a multibranch pipeline if you do not have a standard branching and CI/CD strategy.
Create GitHub App For Jenkins Status Checks
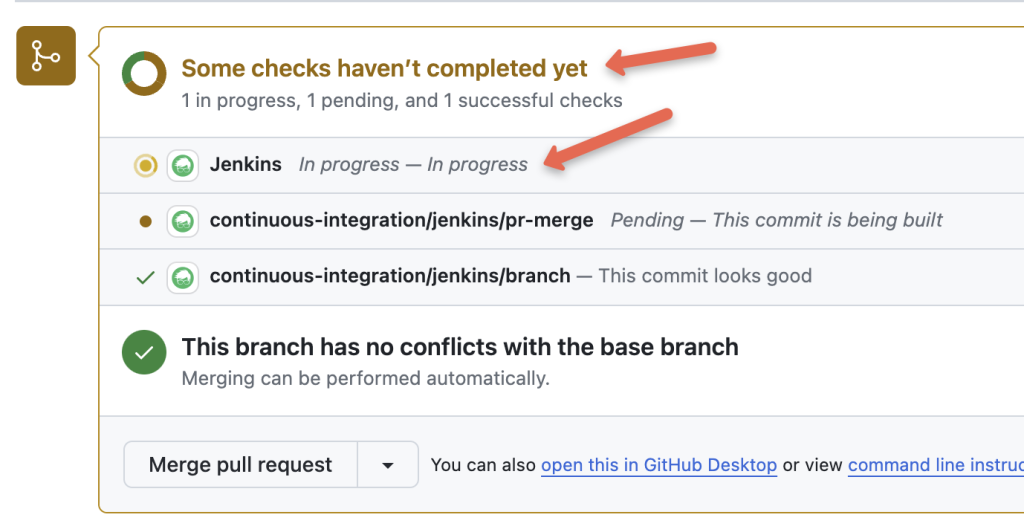
In CI/CD workflows, developers need an efficient way to verify the build status without diving into the pipeline details. This is where Jenkins status checks come into play.
By integrating Jenkins status checks with GitHub PRs, developers can easily view the build status directly within the pull request. They can also access detailed stage information on GitHub and follow a direct link to the Jenkins job log.
Here is an example of status checks.

This setup mirrors how PR-based builds are typically configured in real-world projects.
To enable this integration, a GitHub App must be created for Jenkins.
In this lesson, we’ll walk through a step-by-step guide on creating the GitHub App and the necessary credentials.
In the next lesson when we create Jenkins multi-branch pipelines, we can integrate status checks with GitHub Pull Requests.
Creating Github App
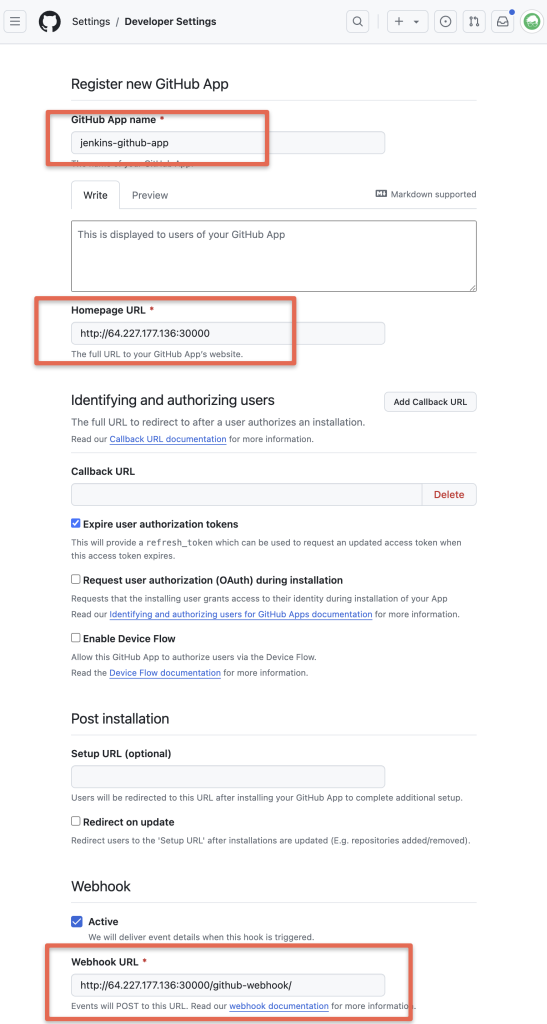
To create a GitHub App, select your GitHub profile and go to Settings as shown below.
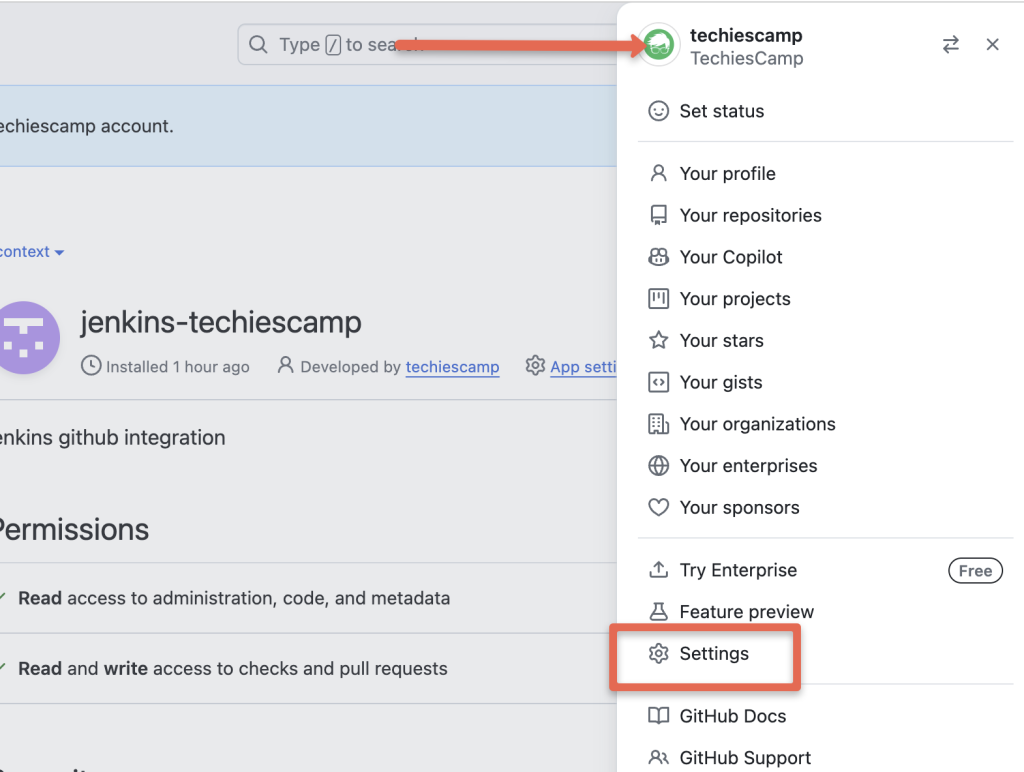
Scroll down and select the Developer settings
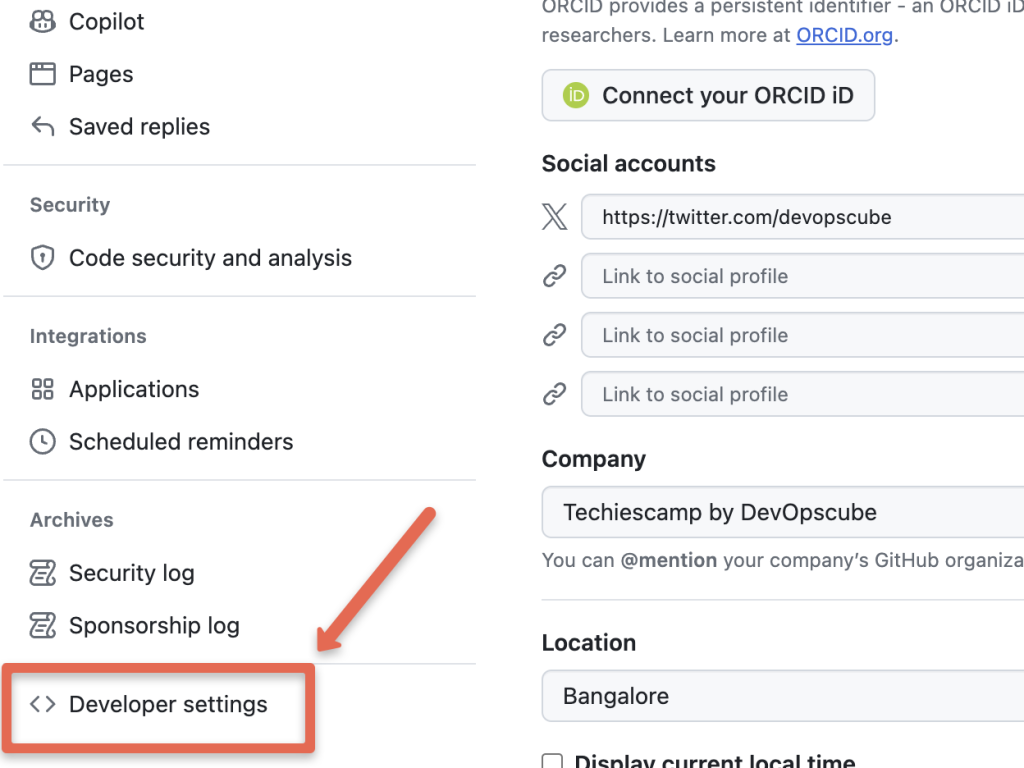
Then click the New GitHub App button to create a new GitHub app
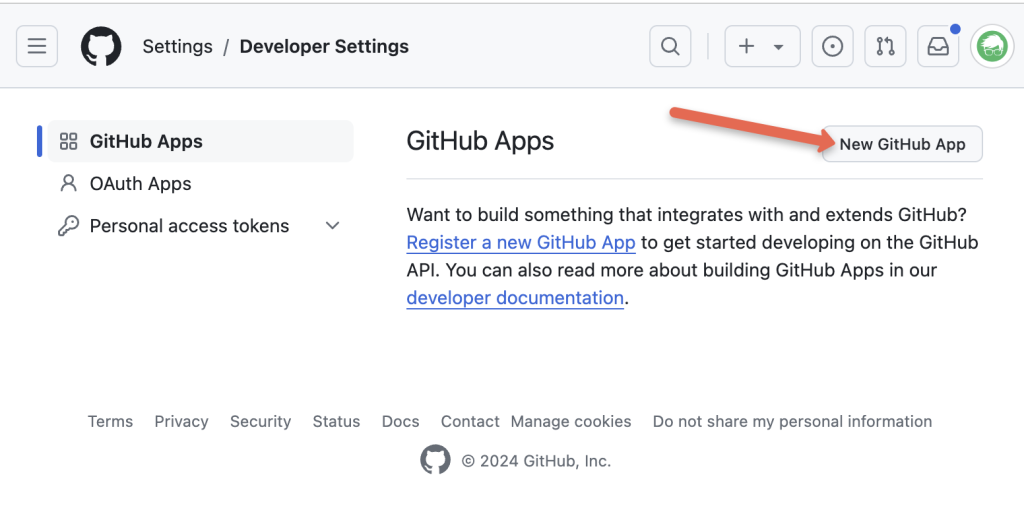
You need to fill out the following details in the configurations.
- GitHub App name: This name has to be unique. For example, jenkins-techiescamp-app. Replace it with the required name.
- Homepage URL: Enter your Jenkins URL.
- Webhook URL: Jenkins URLs with the webhook path (http://64.227.177.136:30000/github-webhook/)
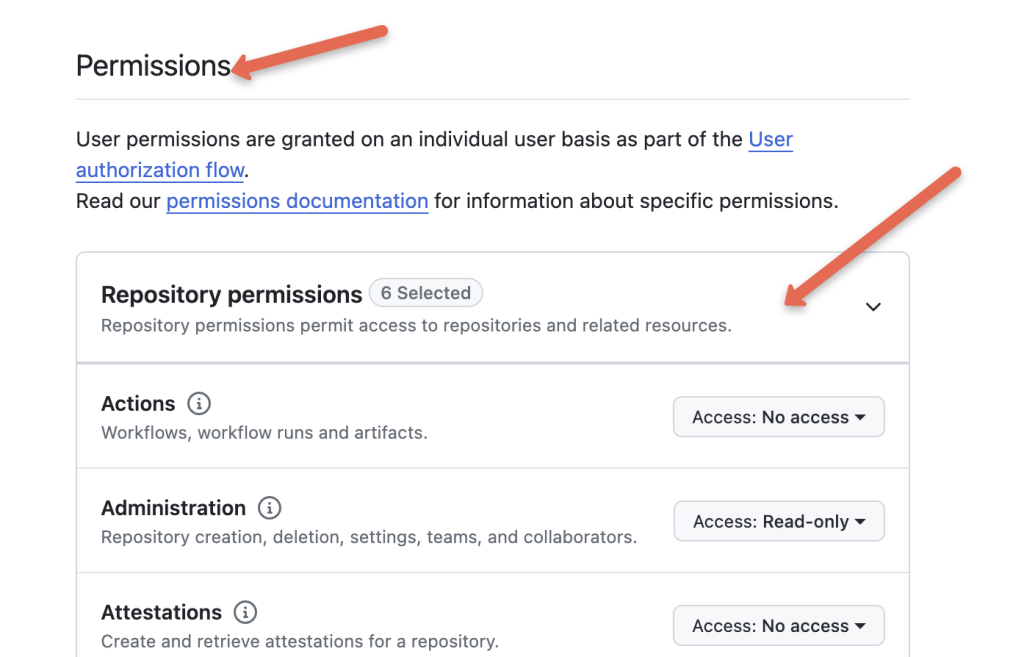
Under Repository permissions, choose the following permissions from the drop-down menu.
- Administration: Read-only
- Checks: Read & write
- Commit statuses: Read & write
- Contents: Read-only (to read the
Jenkinsfileand the repository content duringgit fetch). - Metadata: Read-only
- Pull requests: Read-only
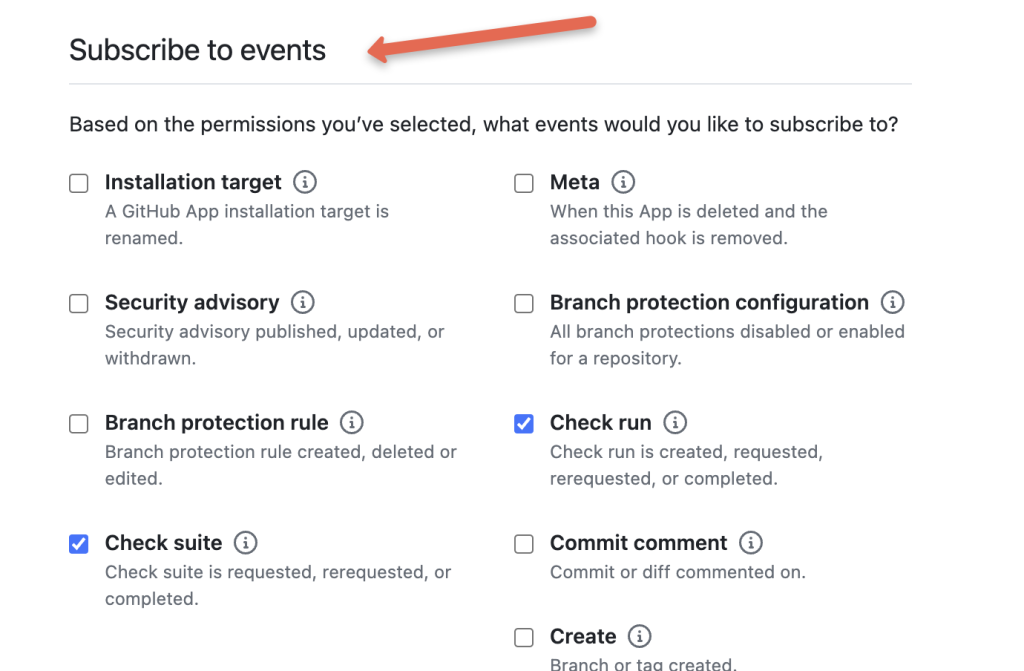
Under Subscribe to events, select the following events:
- Check run
- Check suite
- Pull request
- Push
- Repository
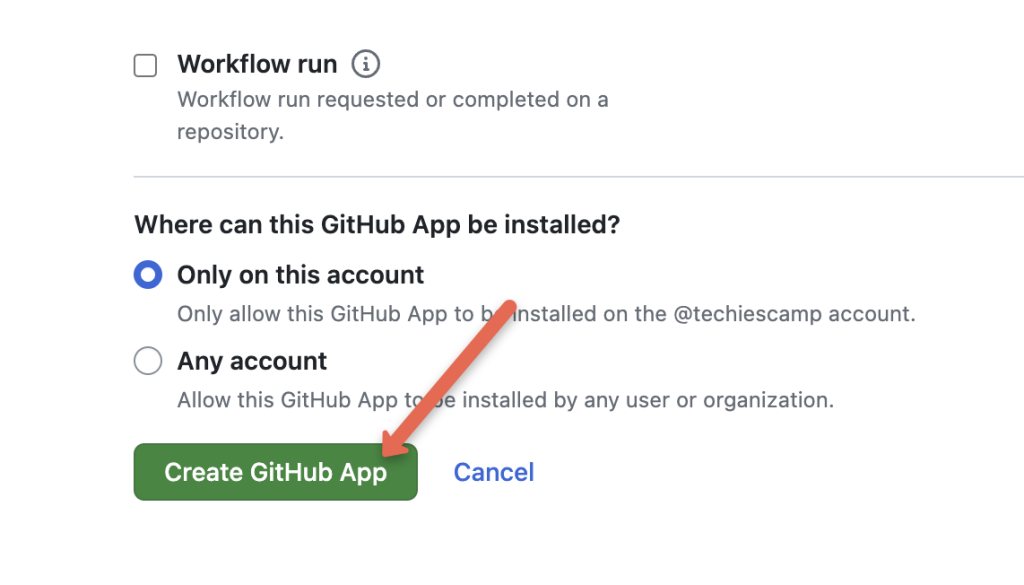
Now, click the Create Github app button.
After creating the app, you will see a notification to generate the private key as shown below.
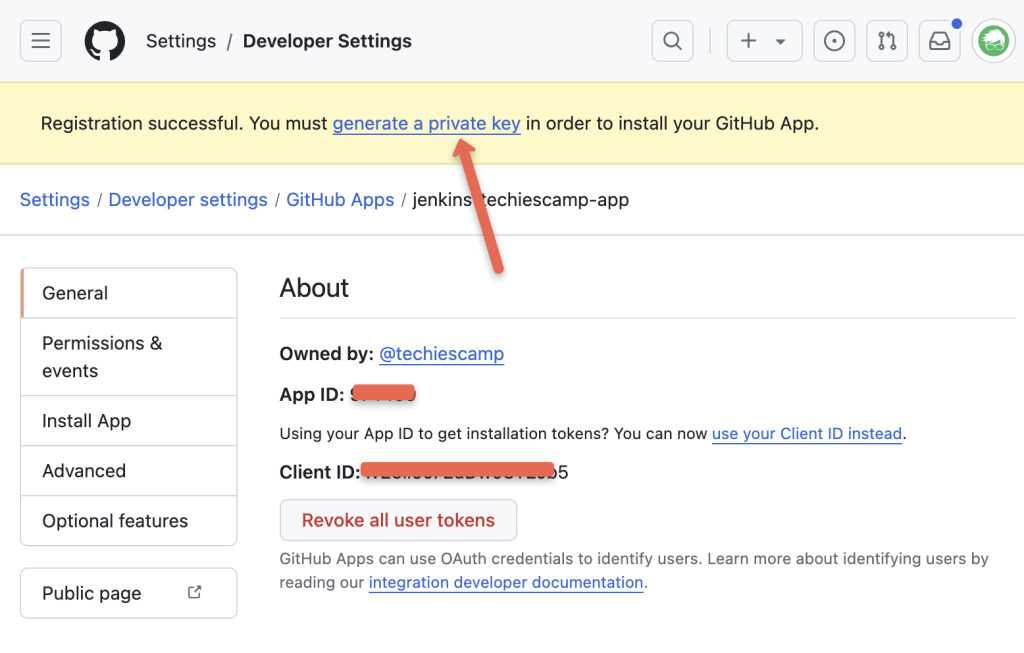
Click on the generate the private key option and click Generate a private key button as given below.

It will download a private key.
Now, you need to convert the key to a format that can be used with Jenkins using the following command. Replace key-in-your-downloads-folder.pem with your downloaded private key.
openssl pkcs8 -topk8 -inform PEM -outform PEM -in key-in-your-downloads-folder.pem -out converted-github-app.pem -nocryptWe need to add the converted key to Jenkins credentials.
Install Github App
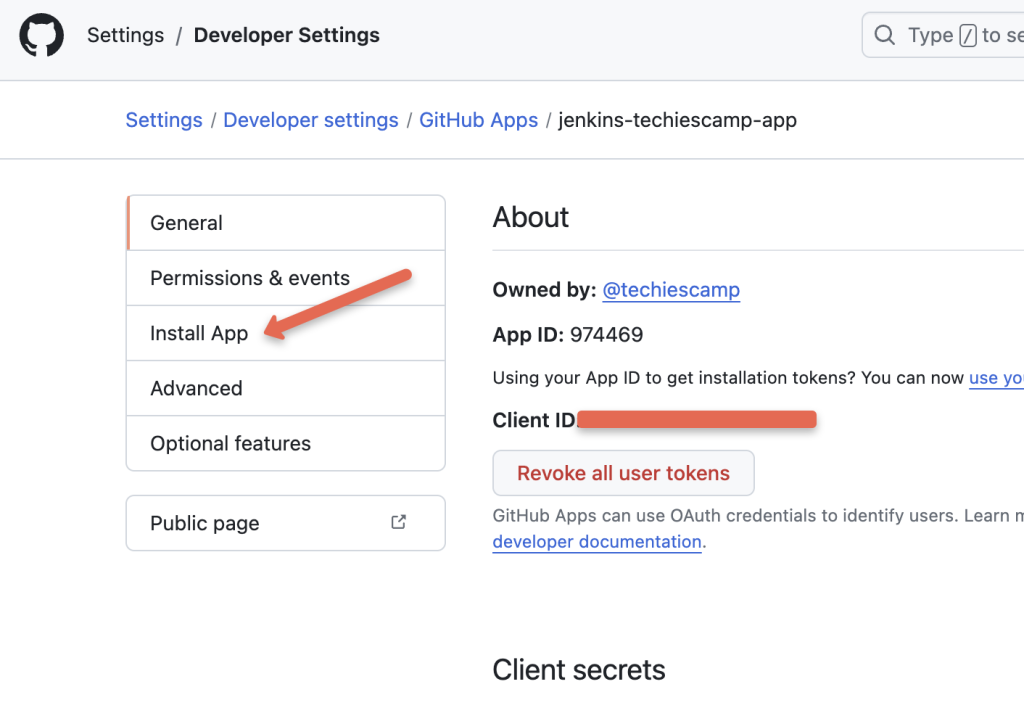
Now, on the app configuration page, you will see an option called Install app, as given below. Click that option to enable this app for all the repositories.
Click Install
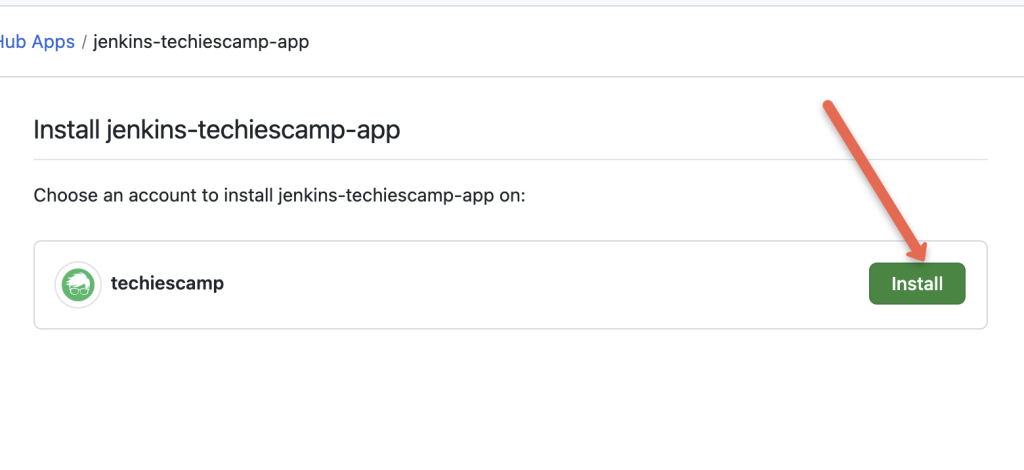
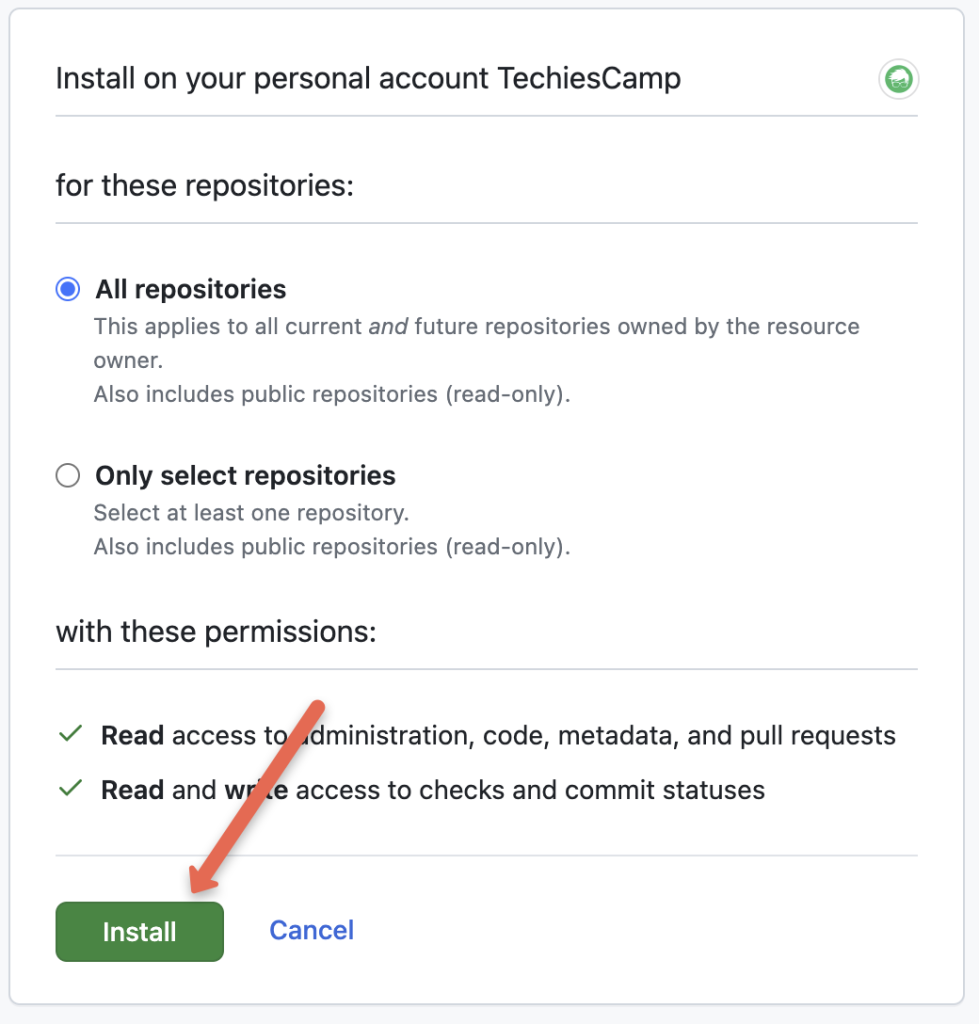
You can choose all or individual repositories you need and then click Install.
Add Private Key to Jenkins Credentials
Now, we need to add the converted PEM key to the Jenkins credentials.
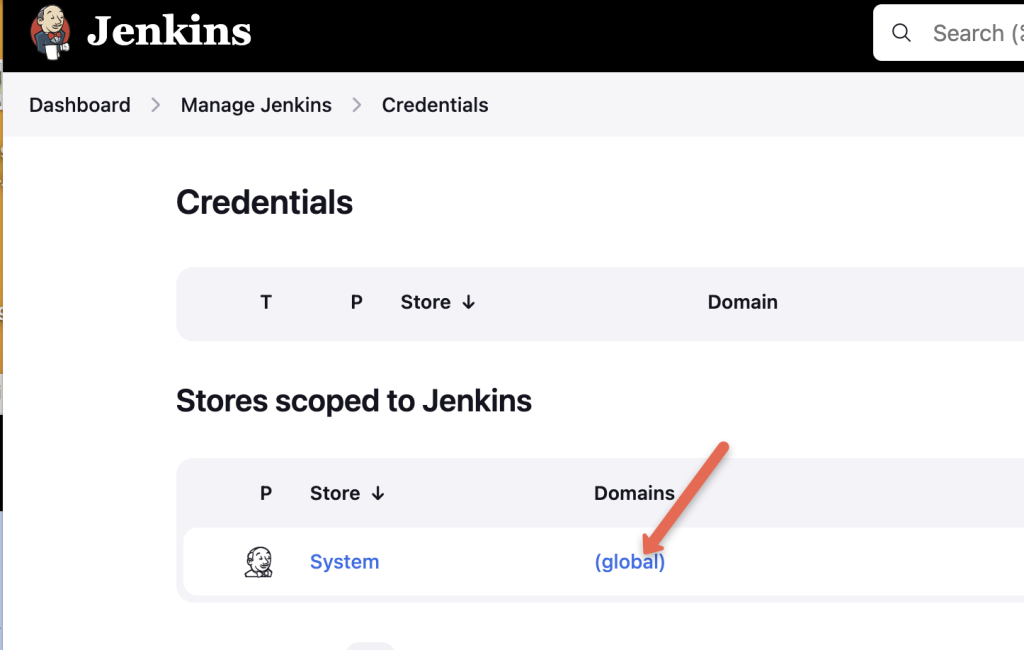
Go to Jenkins Home –> manage jenkins –> Credentials.
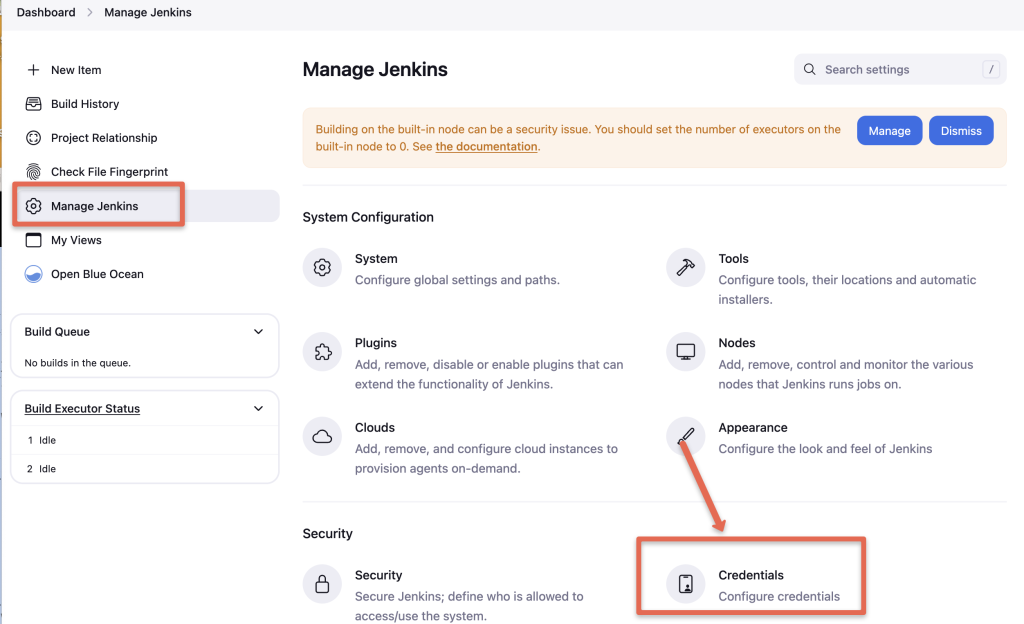
Under credentials, select the global option.
Then, choose the Add Credentials Option to add a new credential.

Now you need to choose the Kind as GitHub App.
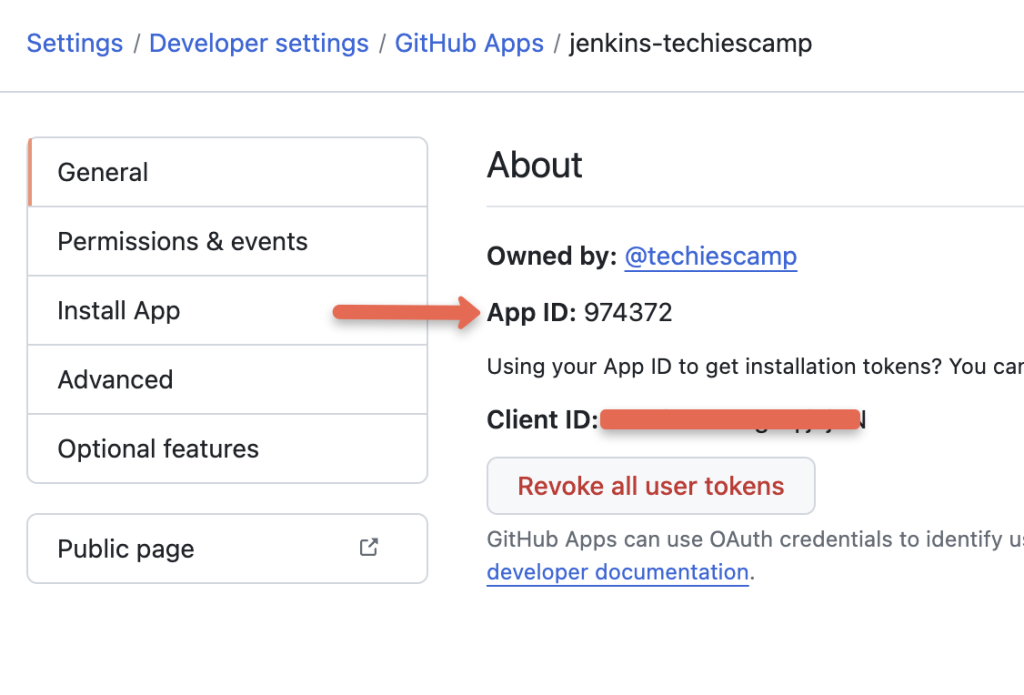
Also we need the Github App ID. You can get it from the Github App configuration as shown below.
In the key field, add the converted-github-app.pem private file contents we converted before, and then click the Create button as shown below.

That’s pretty much it.
In the next lesson we will look at how to use Github App integration with multi-branch pipeline to enable status checks on Pull requests.
Multi Branch Pipeline Setup
In this lesson, you will learn about setting up a multi-branch pipleine on Jenkins.
Before jumping into implementation, let’s look at multibranch pipeline Jenkins example Jenkinsfile that can be used in the pipeline.
For the multibranch pipeline to function, the Jenkinsfile must be present in the SCM repository.
If you're learning or testing, you can use the multibranch pipeline Jenkinsfile provided below. This Jenkinsfile includes a checkout stage and several dummy stages that echo messages.
Also, you can clone and use this Github repo, which has this Jenkinsfile
pipeline {
    agent {
        kubernetes {
            yaml '''
                apiVersion: v1
                kind: Pod
                spec:
                  containers:
                  - name: maven
                    image: maven:3.8.4-openjdk-17
                    command:
                    - cat
                    tty: true
            '''
        }
    }
    options {
        buildDiscarder logRotator(
            daysToKeepStr: '16',
            numToKeepStr: '10'
        )
    }

    stages {

        stage('Cleanup Workspace') {
            steps {
                cleanWs()
                sh """
                echo "Cleaned Up Workspace For Project"
                """
            }
        }

        stage('Code Checkout') {
            steps {
                checkout([
                    $class: 'GitSCM',
                    branches: [[name: '*/main']],
                    userRemoteConfigs: [[url: 'https://github.com/spring-projects/spring-petclinic.git']]
                ])
            }
        }

        stage('Unit Testing') {
            steps {
                sh """
                echo "Running Unit Tests"
                """
            }
        }

        stage('Code Analysis') {
            steps {
                sh """
                echo "Running Code Analysis"
                """
            }
        }

        stage('Deploy Code To Dev & QA') {
            when {
                branch 'develop'
            }
            steps {
                sh """
                echo "Building Artifact for Dev Environment"
                """
                sh """
                echo "Deploying to Dev Environment"
                """
                sh """
                echo "Deploying to QA Environment"
                """
            }
        }

        stage('Deploy Code to Staging and Pre-Prod') {
            when {
                branch 'main'
            }
            steps {
                sh """
                echo "Building Artifact for Staging and Pre-Prod Environments"
                """
                sh """
                echo "Deploying to Staging Environment"
                """
                sh """
                echo "Deploying to Pre-Prod Environment"
                """
            }
        }

    }
}
Setup Jenkins Multi-branch Pipeline
This section will guide you through the step-by-step process of setting up a multibranch pipeline on Jenkins.
This setup is based on GitHub and the latest Jenkins version, but you can also use Bitbucket or GitLab as your SCM source for a multibranch pipeline.
Create a Multibranch Pipeline on Jenkins
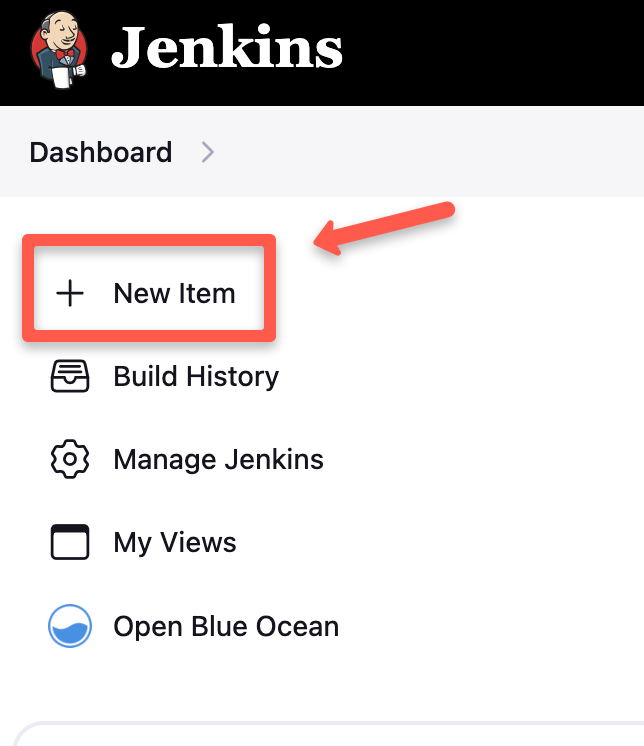
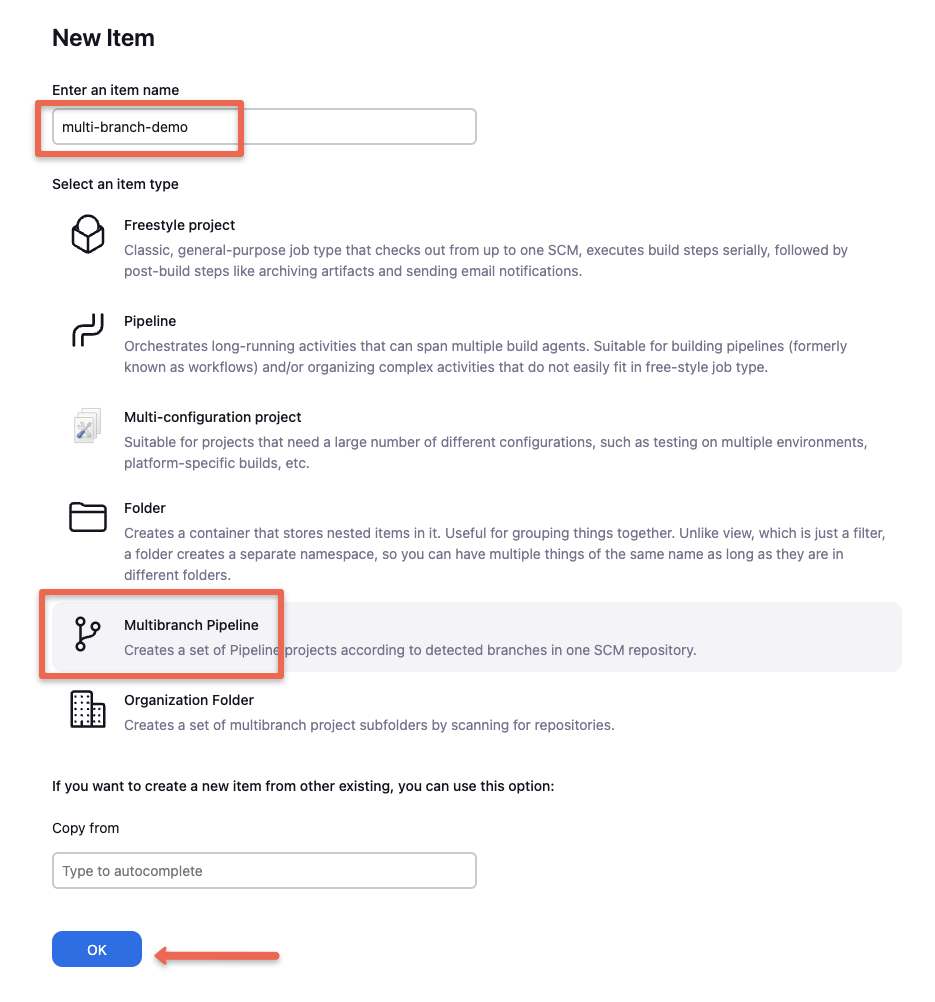
Step 1: From the Jenkins home page create a “new item”.
Step 2: Select the “Multibranch pipeline” from the option and click ok.
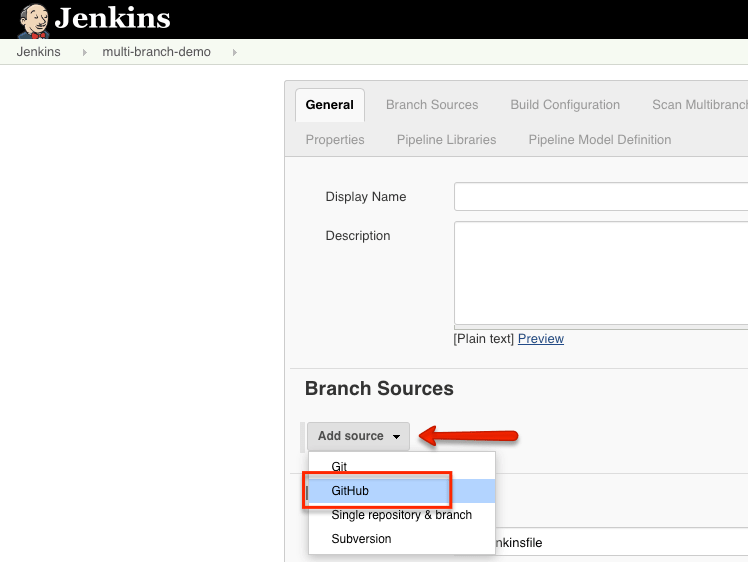
Step 3: Click “Add a Source” and select GitHub.
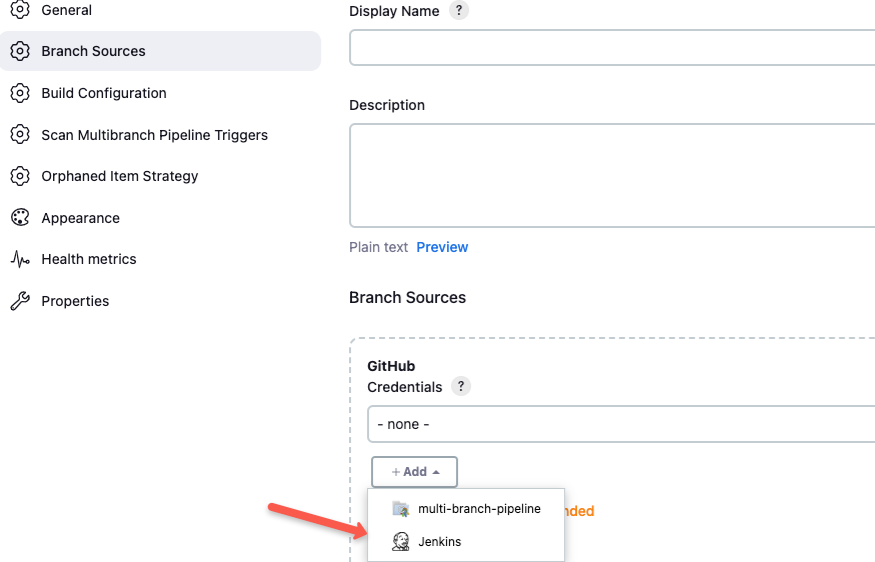
Step 4: Under the credentials field, select Jenkins and create a credential with your GitHub username and password.
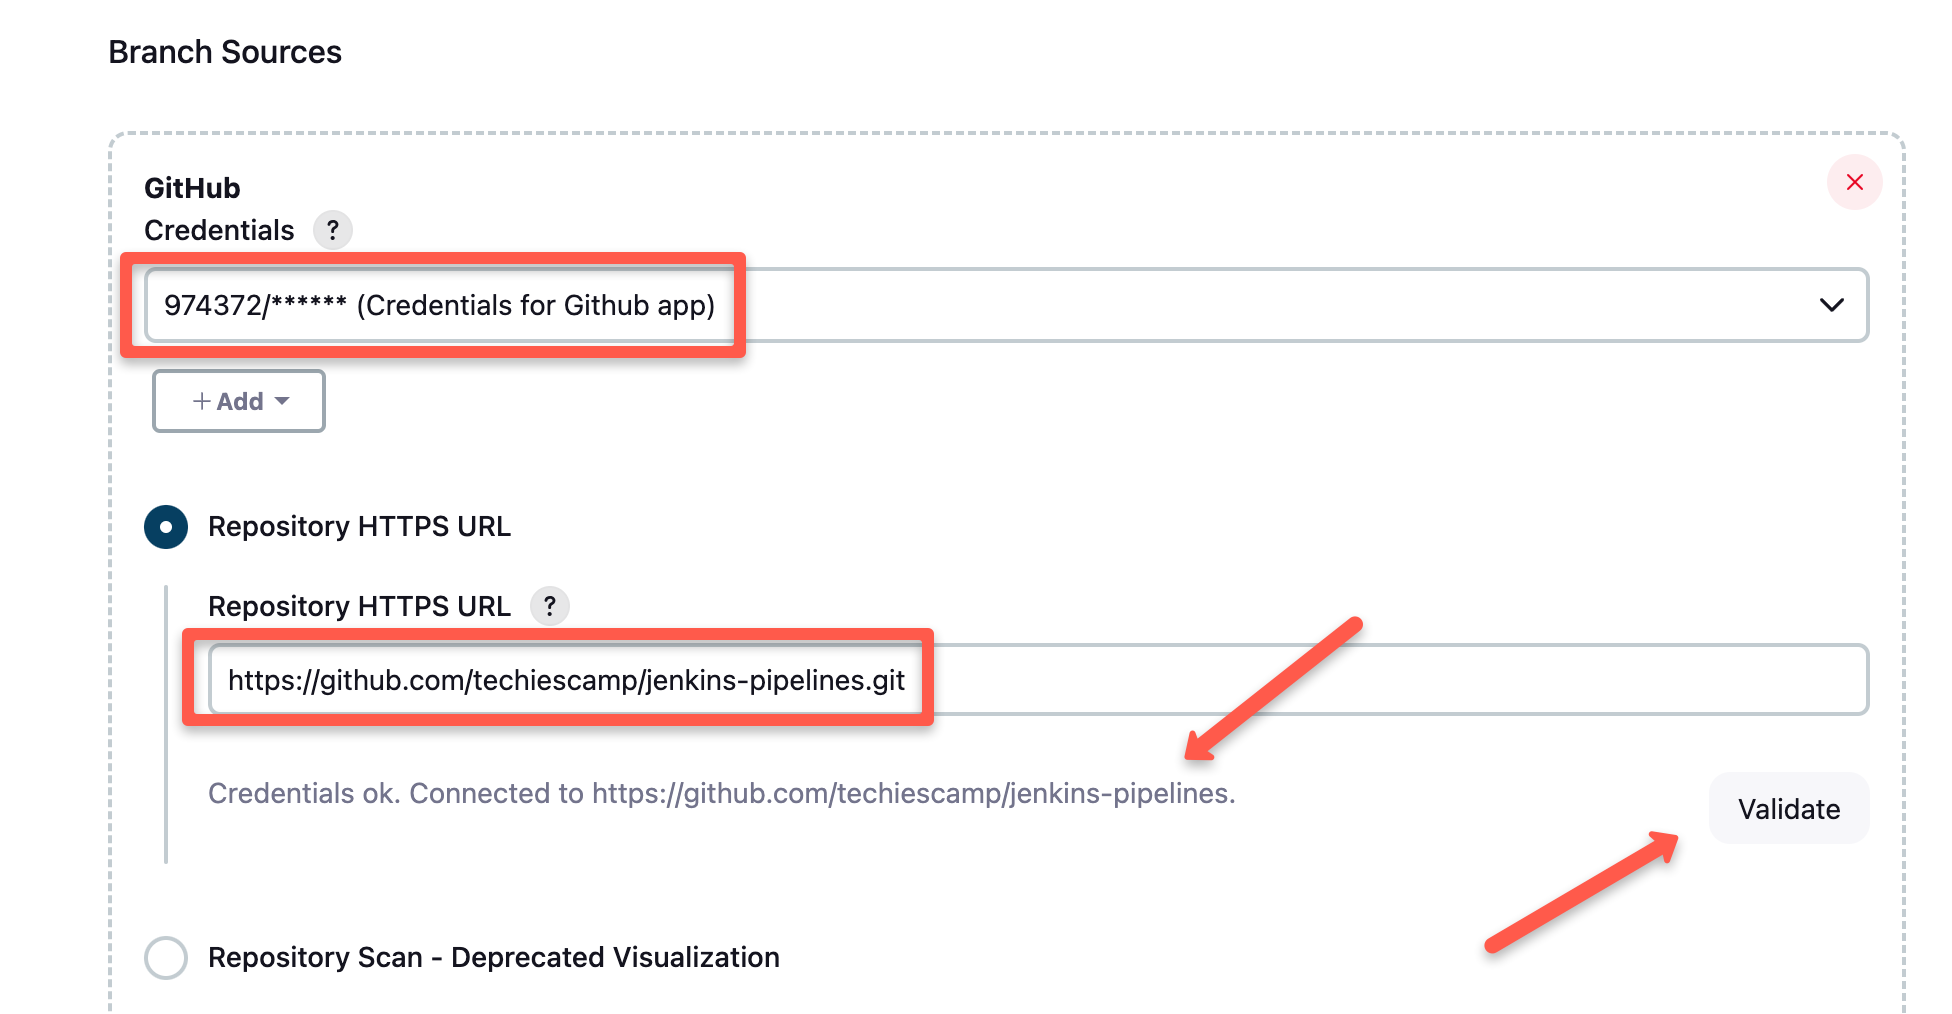
Step 5: Select the credentials you created in previous lesson and provide your Github repo to validate the credentials as shown below.
If you are testing a multi-branch pipeline, you can clone and use the demo GitHub repo.
Step 6: Under “Behaviours,” select the option that matches your requirements. You can either choose to discover all the branches in the repo or only branches with a Pull Request.
The pipeline can discover branches with a PR from a forked repo as well.
Choosing these options depends on your required workflow.
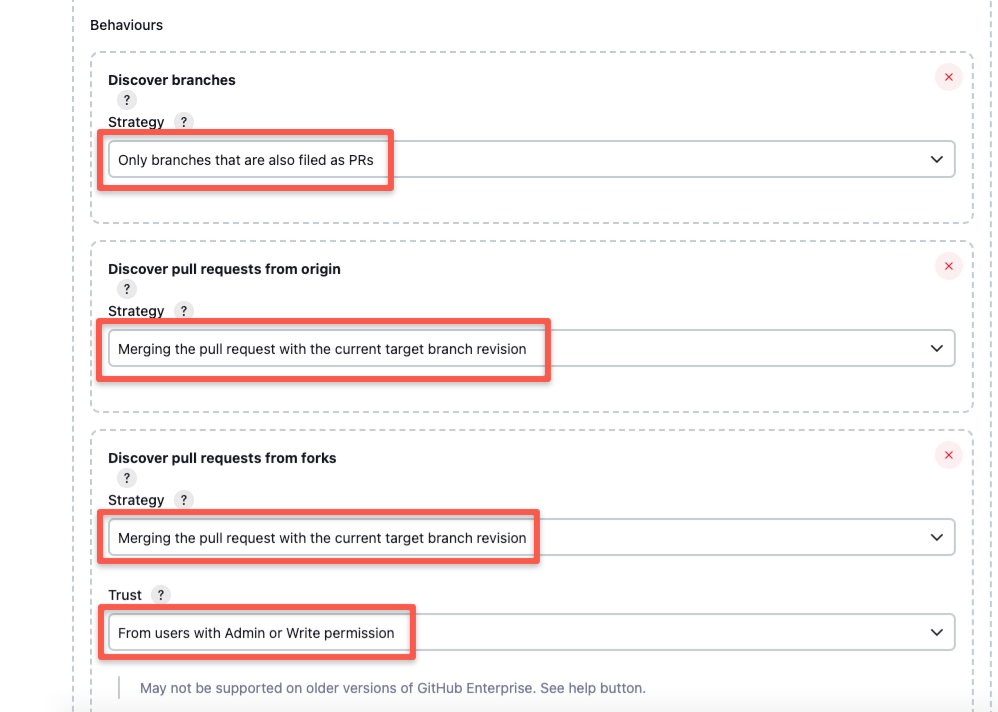
And if you want to trigger the pipeline build on commits, select the below appropriate option under the Discover Branches section below
There are additional behaviors you can choose from the “add” button. (Optional)
For example, if you choose not to discover all the branches from the repo, you can use a regular expression or wildcard method to find specific branches from the repo, as shown below.
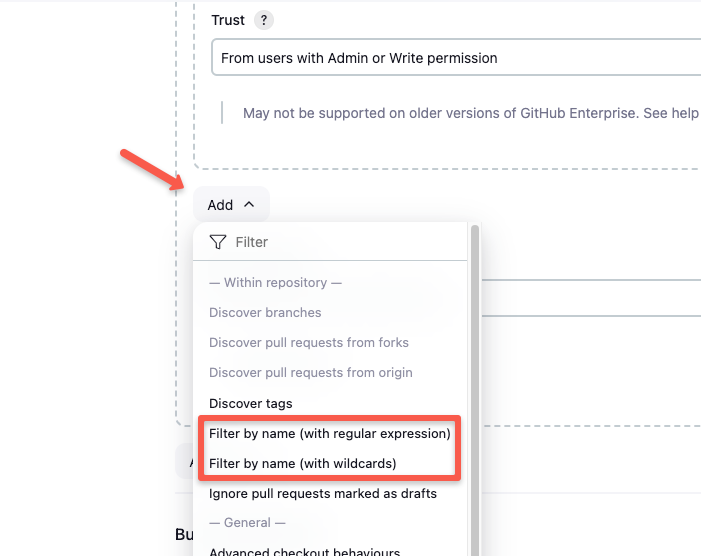
Here is an example of a regular expression and wildcard usage
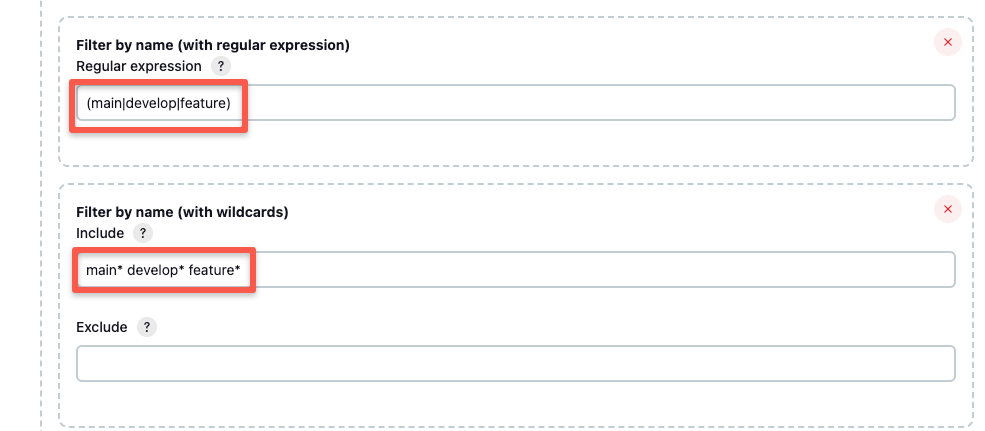
In the configuration above, I have included all the branches.
Step 7: If you choose to have a different name for Jenkinsfile, you can specify it in the build configuration. You can provide the required name in the “Script Path” option. Ensure the Jenkinsfile is present in the repo with the same name you provide in the pipeline configuration.
Also, Enable “Discard old builds” to keep only required build logs as shown below.
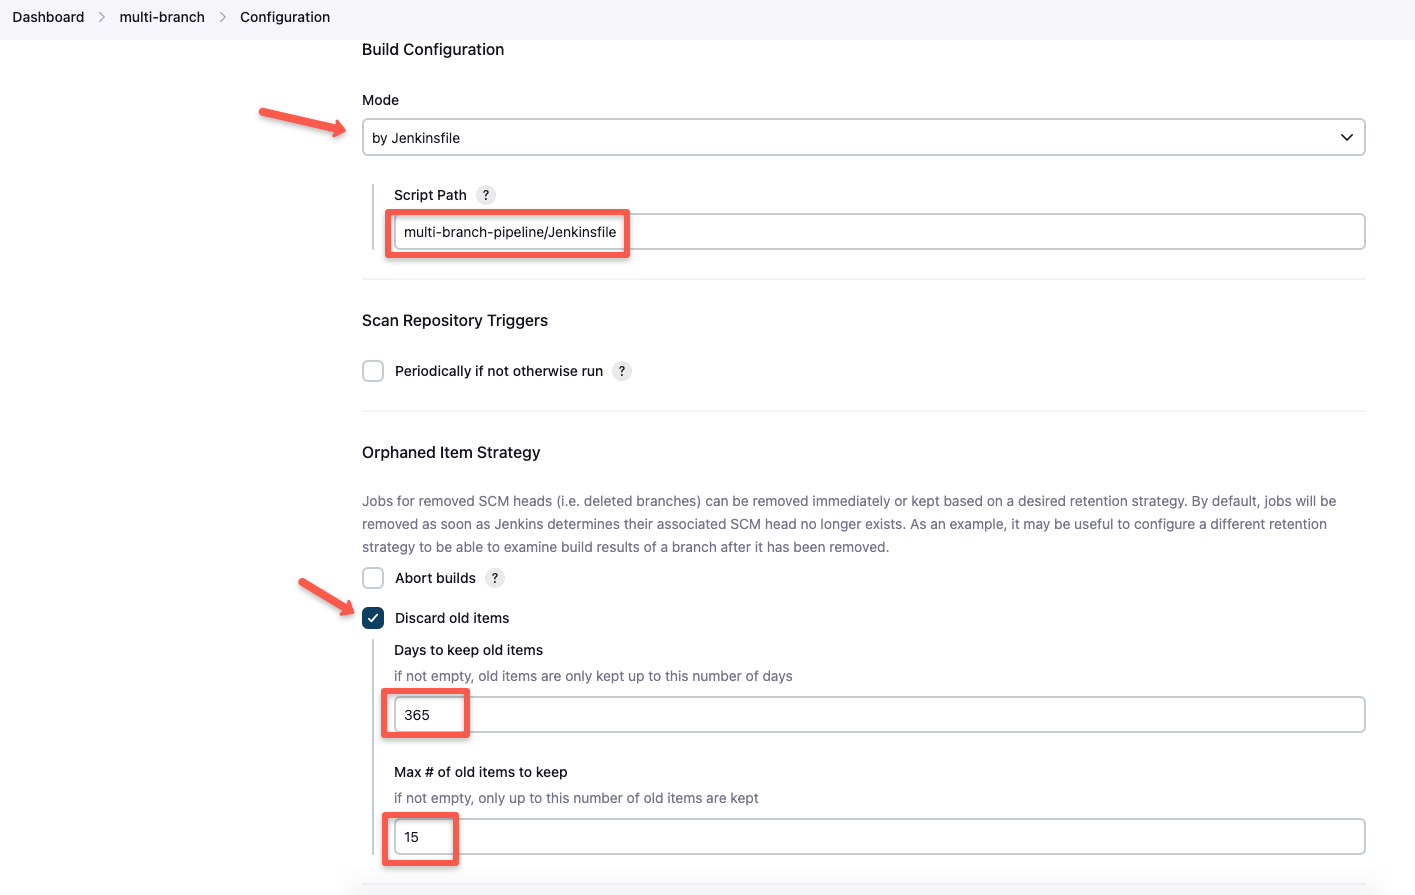
If your Jenkinsfile is in the root directory of the GitHub repo, simply enter Jenkinsfile as the script path.
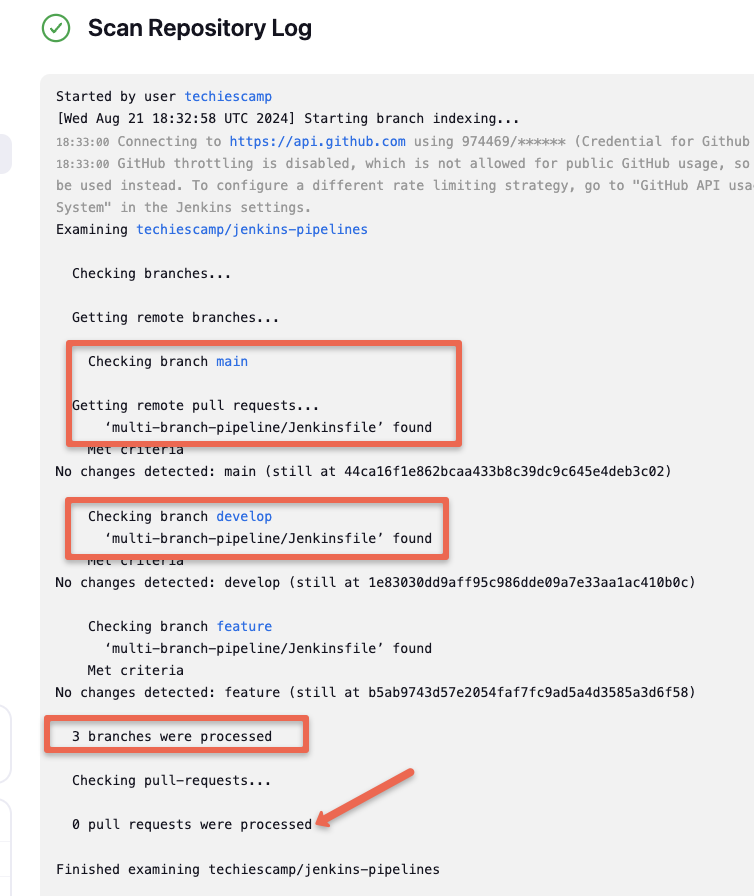
Step 8: Save all the job configurations. Jenkins scans the configured Github repo for all the branches with a PR raised.
The following image shows the job scanning the three branches.
Now that all configurations are completed, let's test the multibranch pipelines.
Test Multi-branch Pipeline
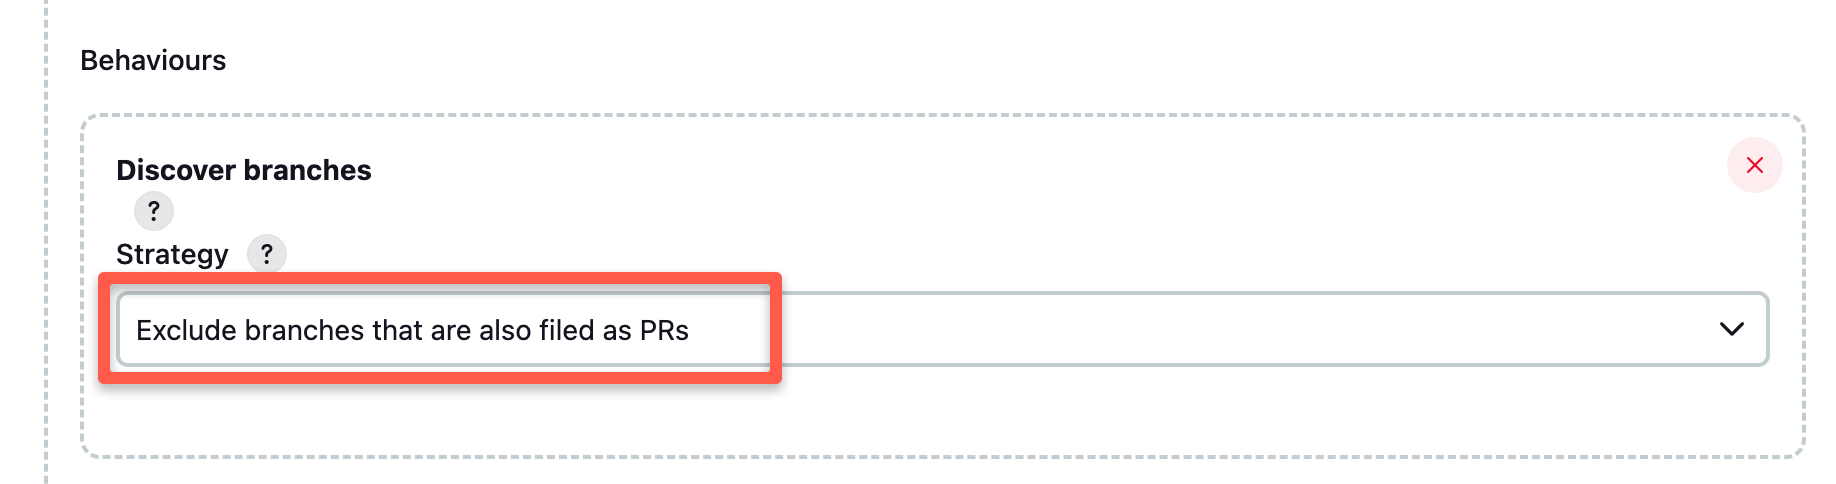
For demo purposes, I have chosen the option “Exclude branches that are also files as PRs" With this option, the build will get triggered for PRs and PR merges.
To experiment with a multibranch pipeline, you can use this repo with a sample Jenkinsfile.
Update some content in the readme file in the develop branch and raise a PR to main. This will send a webhook to Jenkins, which will send back the Jenkins job details, as shown below.
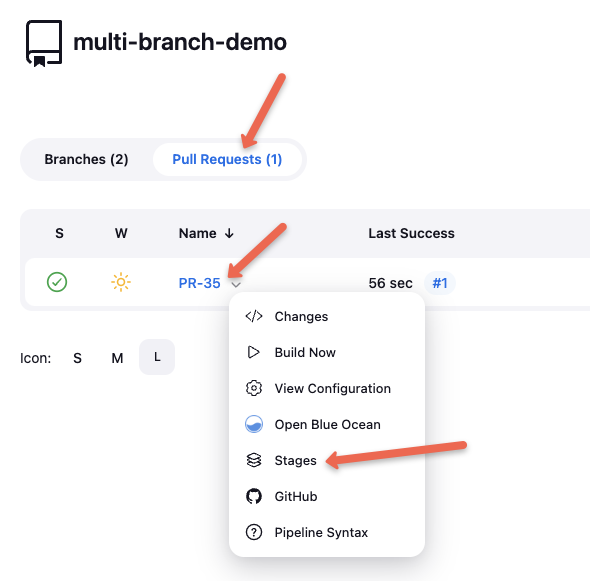
Now, go to your Jenkins multi-branch pipeline and click on Pull Requests.
You can see a new build has been triggered because of the PR.
If the build fails, you can commit changes to the develop branch. As long as the PR remains open, this will automatically trigger the PR pipeline.
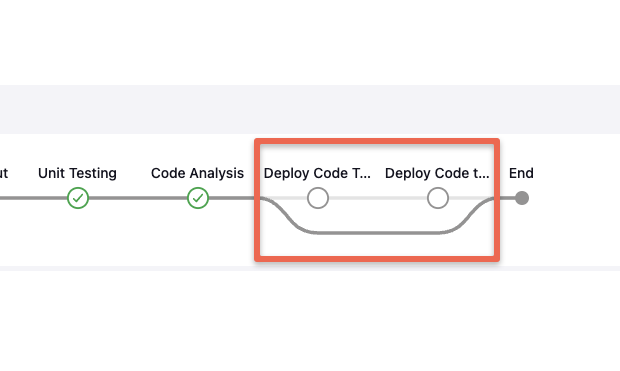
In the Jenkinsfile, I've included a condition to skip the deployment stage for the develop and main branches if it's a PR build. You can verify this in the Jenkins build stages, where the skipped deployment stages will be clearly visible, as shown below.
After the build is successfully completed, merge the PR.
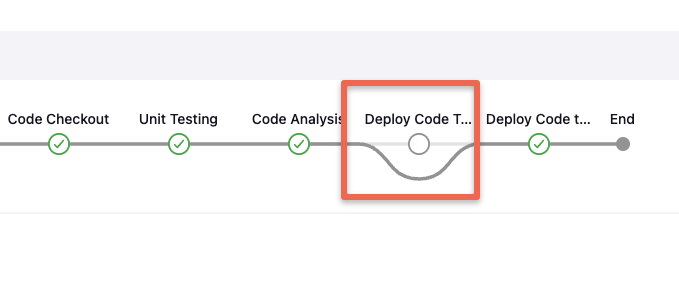
Once you merge the PR, Jenkins will trigger the main branch pipeline and execute all the deployment stages specified in the Jenkinsfile for the main branch.
For example, in our pipeline, we skip the dev and QA deployments if the branch is main. You can observe this in the stages output.
Troubleshooting Multibranch Pipelines
In this section, we'll cover common issues you may encounter with multibranch pipelines and how to troubleshoot them.
Branch Discovery Issues
If new branches created in the SCM aren't appearing in the Jenkins pipeline, try running the "Scan Repository Now" option to rescan the repository. Additionally, review the repository scan configurations within the pipeline settings.
PR Webhooks Not Triggering Pipelines
If a webhook isn't triggering the pipeline, check the webhook delivery status in GitHub for the status code and any errors. Also, ensure the Jenkins URL is correctly configured. You can inspect Jenkins logs under Manage Jenkins > System Logs > All Jenkins Logs to see if Jenkins is receiving the webhook. The logs should indicate why jobs aren't being triggered if the webhook is successfully received.
Commits Not Triggering the Pipeline
To ensure that each commit triggers the branch pipeline, make sure to select the "Discover All Branches" option in the branch discovery configuration. This setting ensures that any commits to discoverable branches or pull requests automatically trigger the pipeline.
Setup Jenkins Email Notification
In Jenkins, email notifications are an essential feature that helps teams stay informed about the status of their builds and pipelines.
Configuring email notifications ensures that developers and stakeholders receive timely updates about successes, failures, and other important events in the CI/CD pipeline.
This lesson will guide you through the steps to set up and configure email notifications in Jenkins.
Prerequisites
For this email notification setup, you need a valid SMTP server to send Emails.
Usually in organisations, the respective SMTP details can be obtained from the organizations network team.
You can also create you own SMTP server using services like AWS SES. You can follow this guide for SES setup.
Step 1: Create Credentials with SMTP Username and Password
To securely manage your SMTP credentials, it's best to store them in Jenkins' credentials store. Here’s how to create SMTP credentials:
Go to Manage Jenkins -> Credentials and create a global credential.
Select the kind as Username with password, enter your SMTP server's username and password, and create the credentials.
Step 2: Configure SMTP Server for Jenkins
To send emails, Jenkins needs to be configured with the SMTP server settings. Here's how to do it:
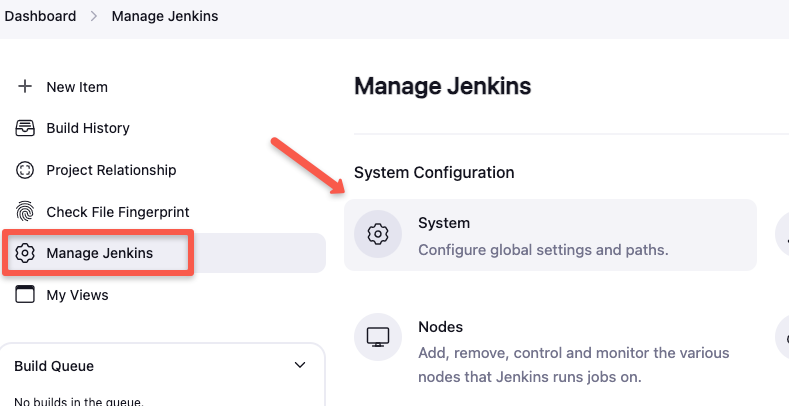
First, go to Manage Jenkins -> System
Then scroll down to the Jenkins Location section and enter your from address, which is your SMTP server's name.
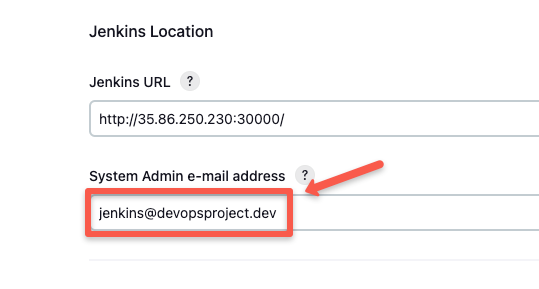
You have to specify the from address in the following format
example@<smtp-server-name>
For example, my SMTP server's name is devopsprojects.dev, and I have given it as jenkins@devopsproject.dev.
Now, scroll further down to the Extended E-mail Notification section and specify your SMTP server address, port, select SSL and select the credentials you created in the previous step.
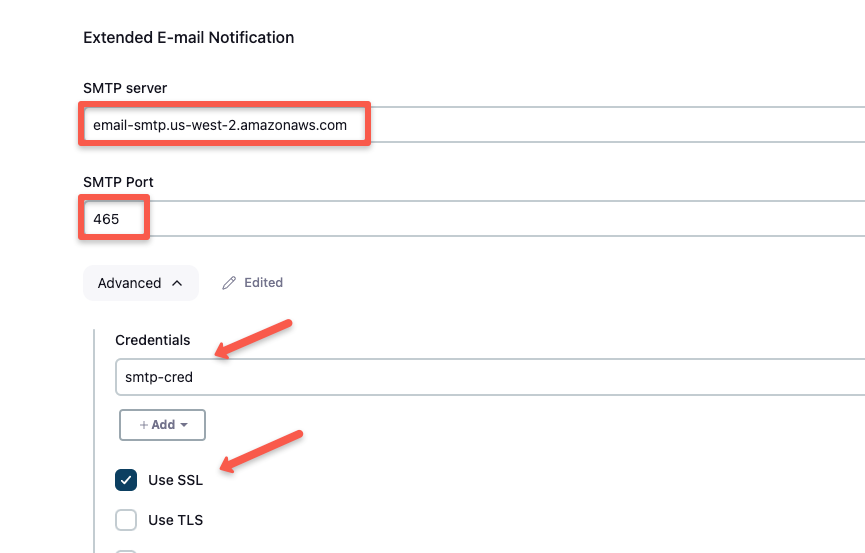
Ensure you have given your SMTP server's address and click the Save button to save the configurations.
Step 3: Test Email Notification on a Job
Once the SMTP server is configured, you can add email notifications to individual Jenkins jobs.
Given below is the example pipeline code for email notification.
@Library('jenkins-shared-library@master') _
pipeline {
    agent {
        kubernetes {
            yaml '''
                apiVersion: v1
                kind: Pod
                spec:
                  containers:
                  - name: maven
                    image: maven:3.8.4-openjdk-17
                    command:
                    - cat
                    tty: true
            '''
        }
    }

    stages {
        stage('Git Checkout') {
            steps {
                gitCheckout(
                    branch: "main",
                    url: "https://github.com/pet-clinic-project/jenkins-shared-libraries.git"
                )
            }
        }
        stage('Build') {
            steps {
                sh "echo 'Build Completed'"
            }
        }
    }
    post {
        always {
            script {
                emailNotification("aswin@crunchops.com")
            }
        }
    }
}
Make sure to update the Email ID before starting the build.
The groovy script and notification template is placed in the following structure in the shared library code.
├── resources
│       └── notify.tpl
├── src
└── vars
      └── emailNotification.groovy
The groovy script uses the notify.tpl template in the resource folder.
You can get the directory structure and code used in this lesson from Github.
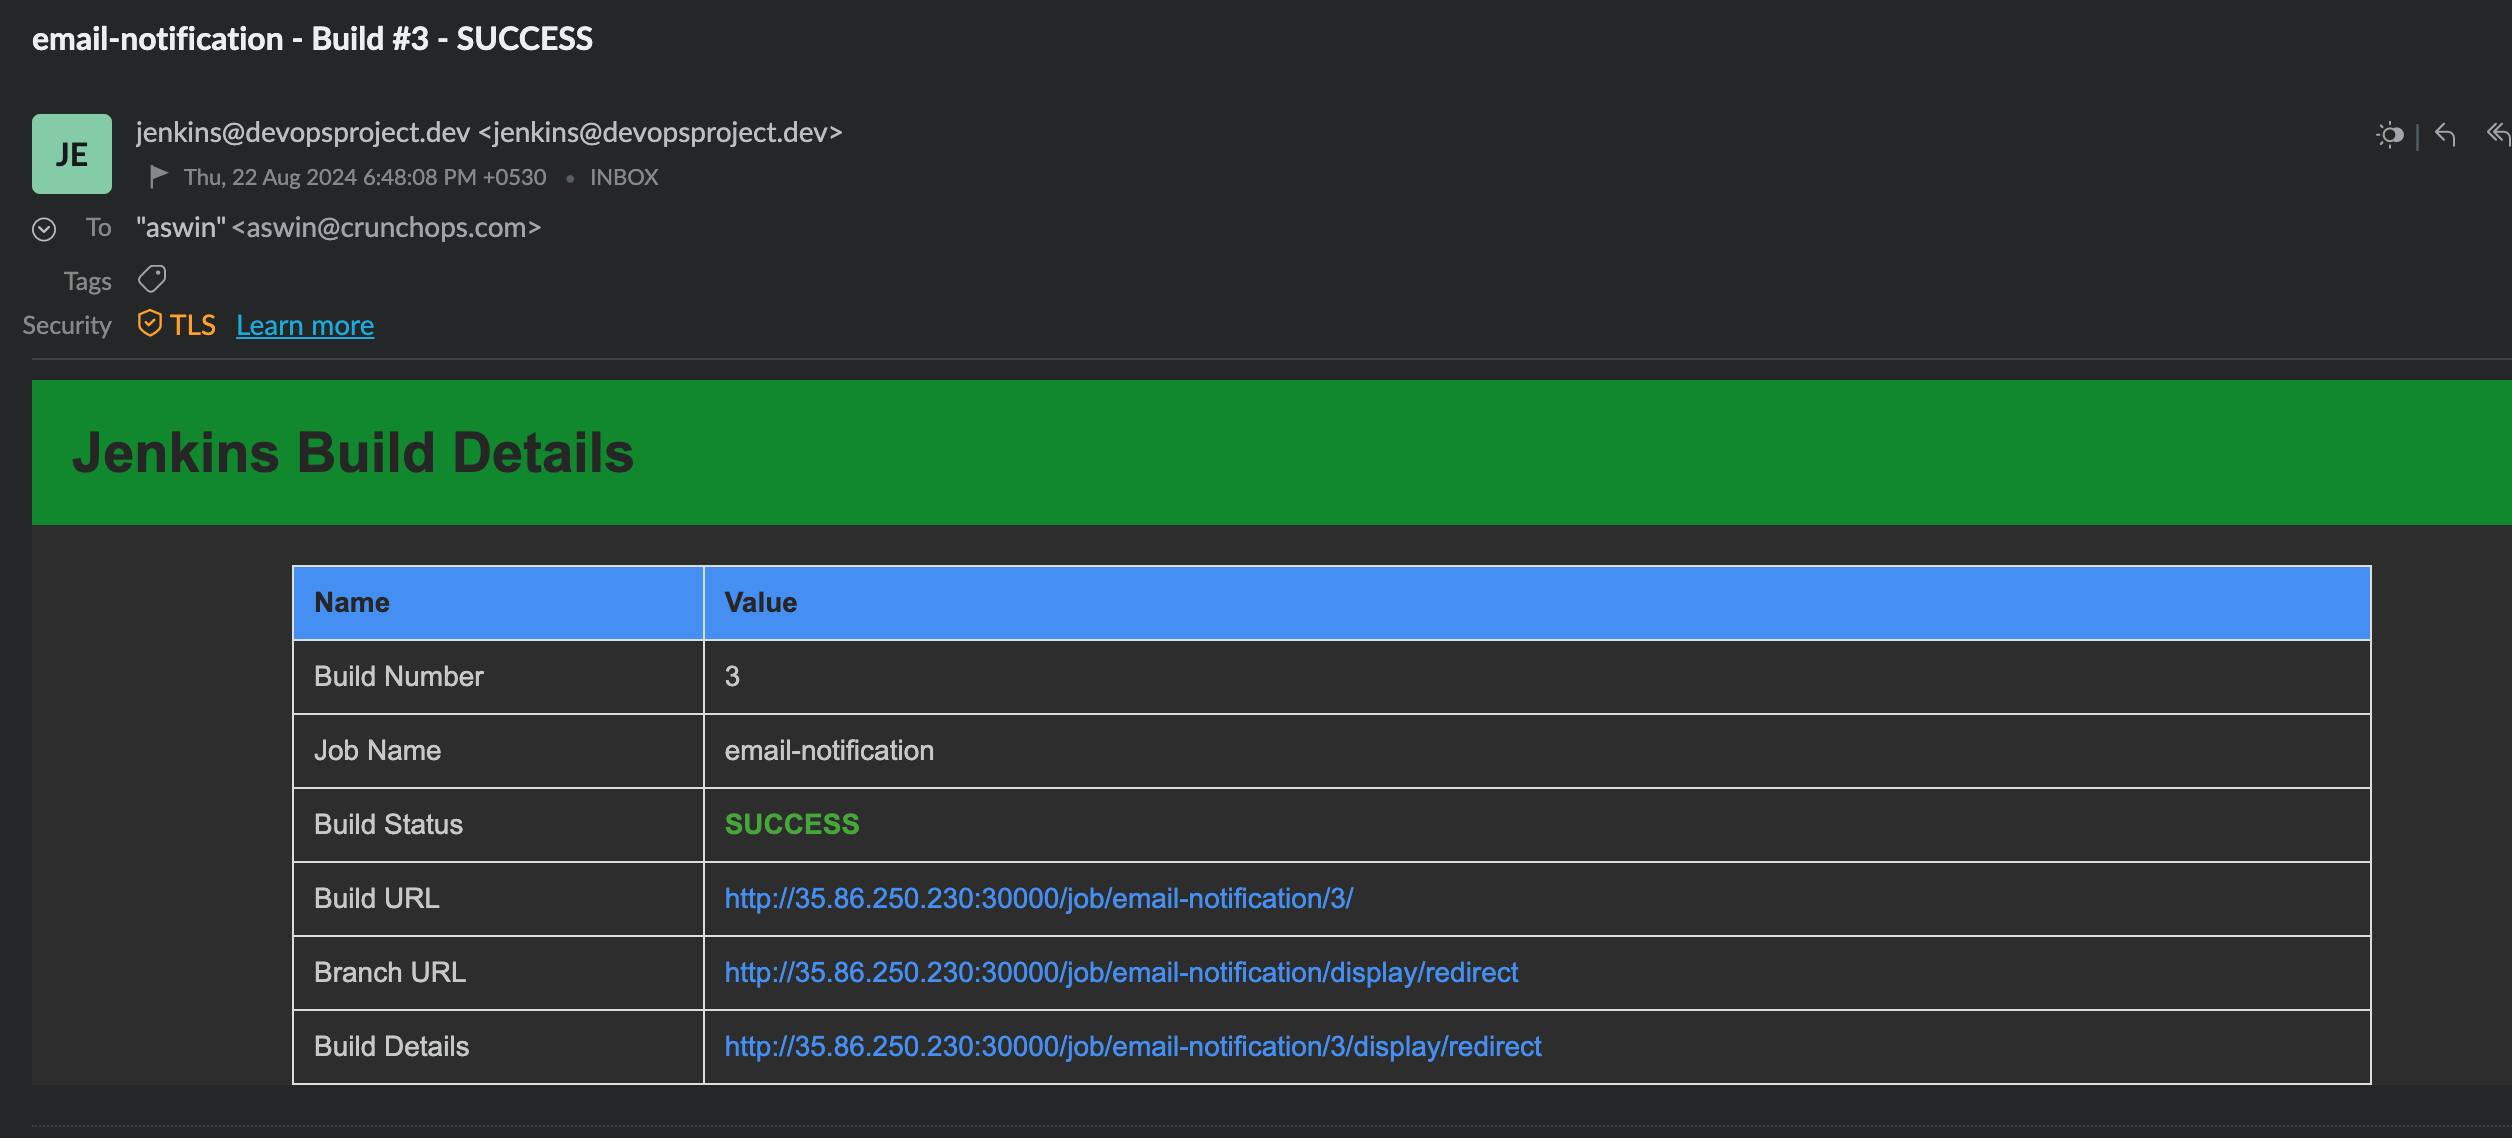
Create and run a new pipeline using the above pipeline code.
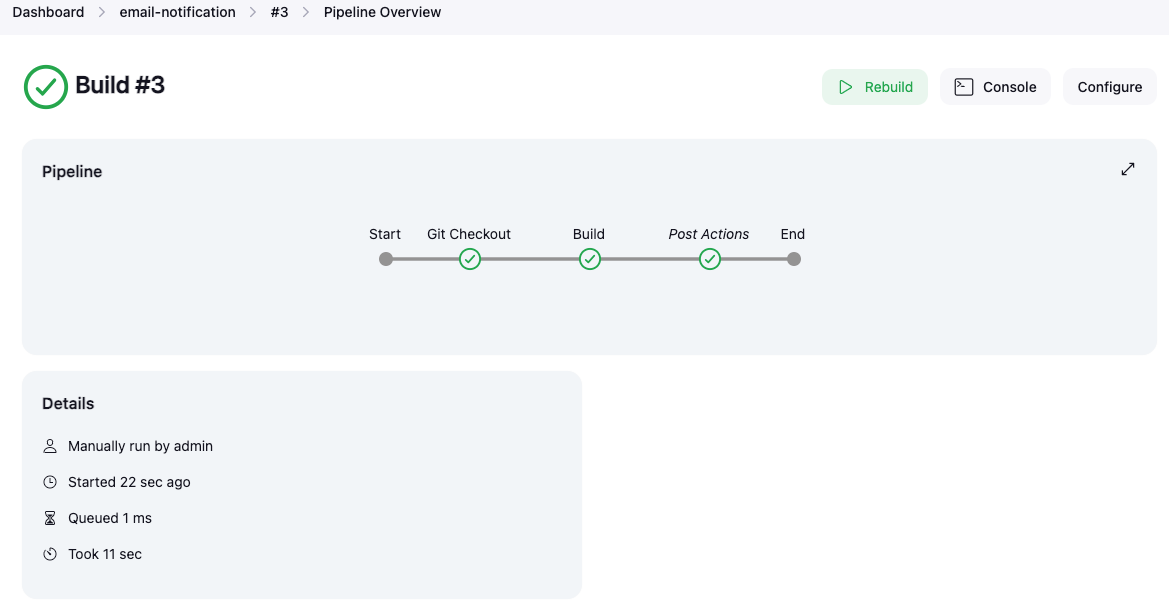
You can see the build is successful and you will receive a notification in your Email as shown below
Now, let's see what happens if the build gets failed.
I added the following stage in the pipeline to fail the build.
stage('Test') {
    steps {
        sh "exit 1"
    }
}
And, this is the notification I got in the mail.
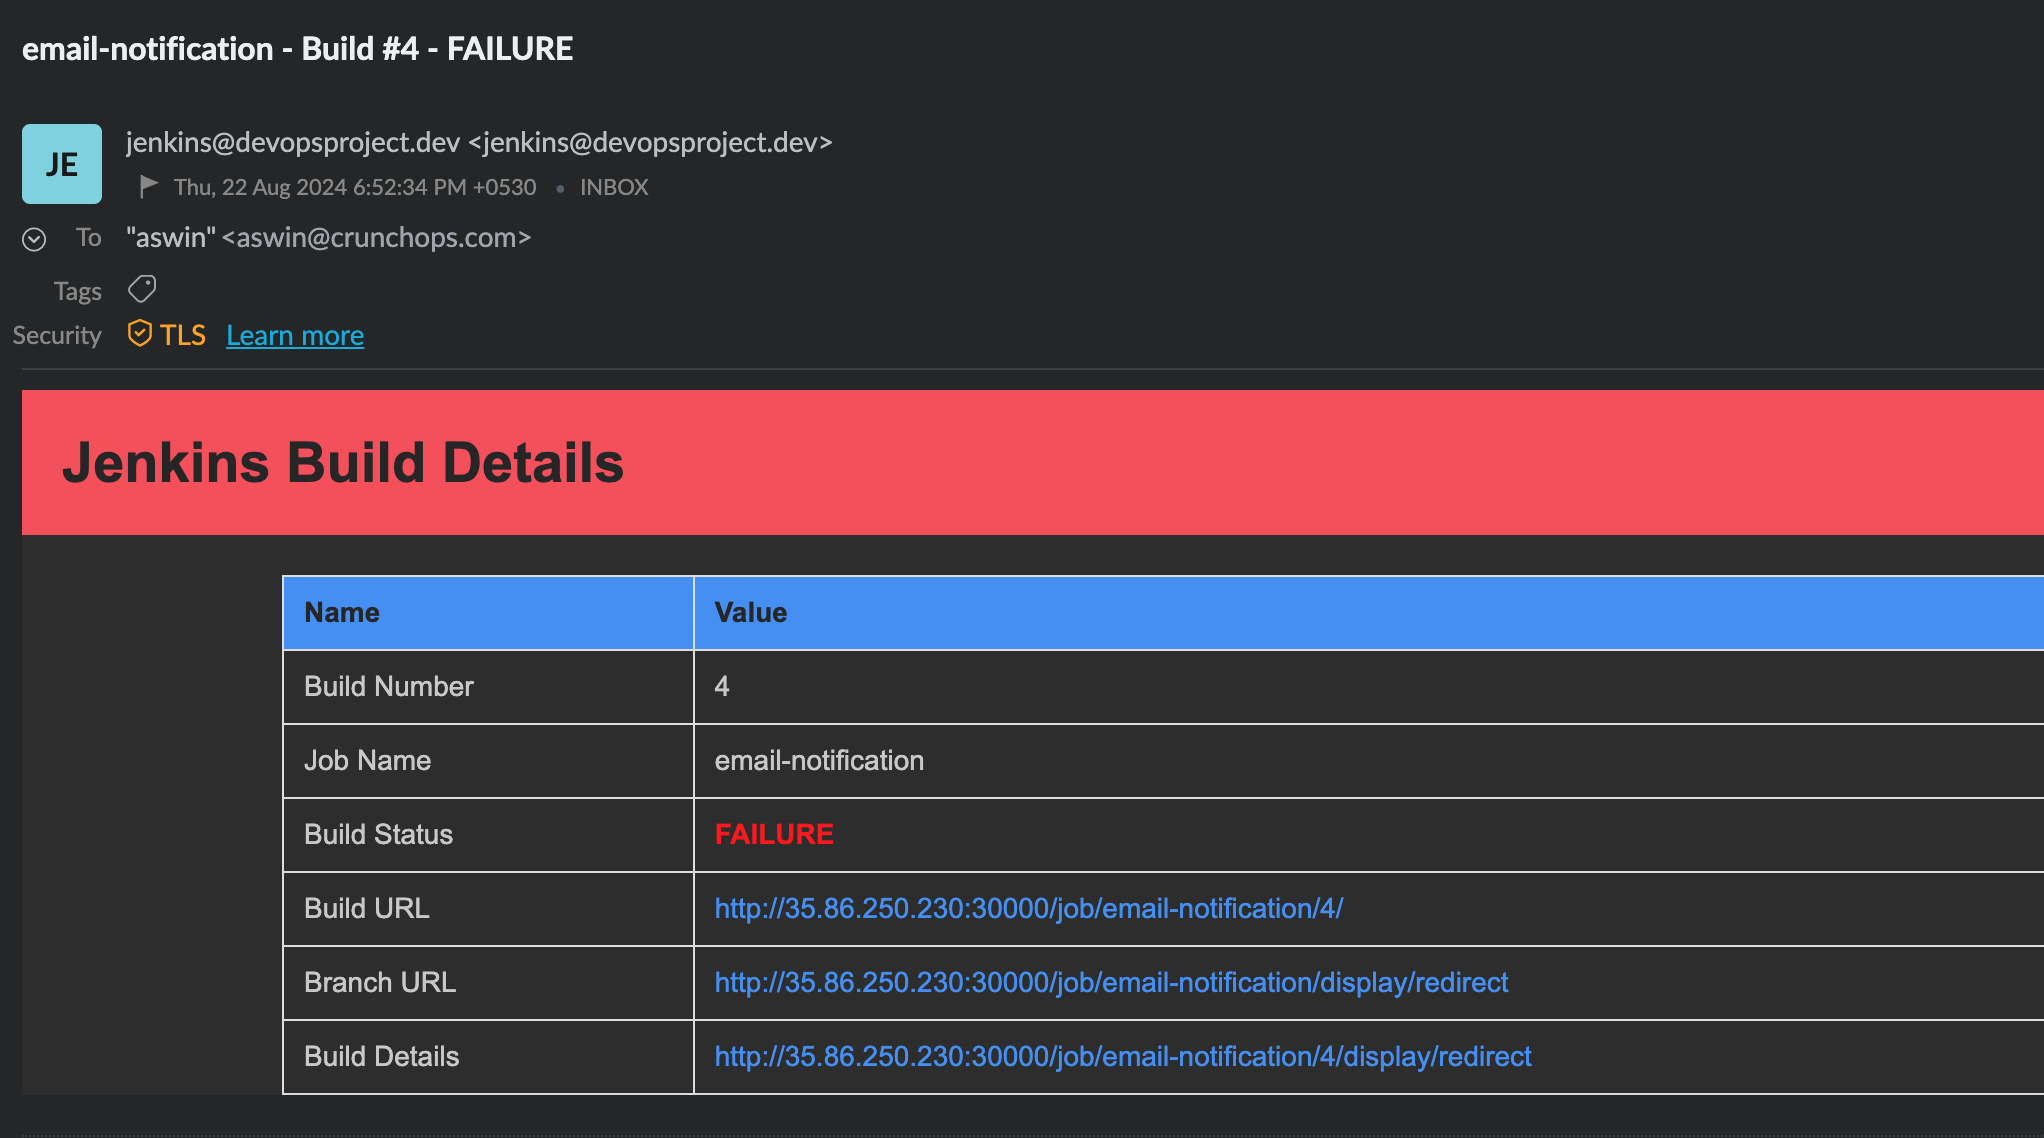
You can see that the URL for the build, the branch, and the build details are given directly in the email notification itself.