Monday, 2 January 2017

GPGKeyOnUSBDrive

Storing GPG Keys on an Encrypted USB Flash Drive

It is often desirable to be able to use a GPG key on more than one computer, for instance at home and at work, or on a desktop and a laptop. Unfortunately, storing encryption keys where you don't have physical control is generally a bad idea. Even storing keys on a laptop can be troublesome--if the laptop gets stolen, so does your GPG key. Luckily, you can probably revoke the key before anybody is able to decrypt it because GPG keys are stored encrypted at all times by default, but that's a hassle. What if you could securely store the key on a device that you always have on your person?
(Note from another reader:Although using your key on a computer that you don't have physical control of is still dangerous, and although your key is already encrypted with a well respected and highly secure encryption algorithm, you may prefer the extreme security of double encryption. There may be a huge number of other things to spend your time on that would increase your security more, but here's how you can encrypt your already encrypted key again, if you so desire. This Howto is very useful just for learning how to set up an encrypted storage area on a USB drive for general usage though.)

IMPORTANT: Make sure you make a backup copy of your ~/.gnupg directory before you do this. The last thing you want to happen is to lose your keyring because something went wrong.

dm-crypt

From the dm-crypt website: " Device-mapper is a new infrastructure in the Linux 2.6 kernel that provides a generic way to create virtual layers of block devices that can do different things on top of real block devices like striping, concatenation, mirroring, snapshotting, etc... The device-mapper is used by the LVM2 and EVMS 2.x tools. dm-crypt is such a device-mapper target that provides transparent encryption of block devices using the new Linux 2.6 cryptoapi. The user can basically specify one of the symmetric ciphers, a key (of any allowed size), an iv generation mode and then he can create a new block device in /dev. Writes to this device will be encrypted and reads decrypted. You can mount your filesystem on it as usual. But without the key you can't access your data."
This is perfect for our needs. We will create an encrypted filesystem inside of a regular file on the USB flash drive, where we will store sensitive data like GnuPG keys.

Installing the Software

First, you will need to install cryptsetup:
sudo apt-get install cryptsetup
This will also pull in some other necessary dependencies.

Setting Up the Encrypted Filesystem

I store my GPG keys on a cheap, tiny USB flash drive that fits comfortably on my keyring. When I plug it in, it is automatically mounted as /media/usbdisk. The following sections will assume a similar setup.
I decided to make my encrypted filesystem live in a regular file rather than its own partition. This requires less tweaking of the disk, and makes mounting and unmounting the encrypted filesystem easier, as you will see later. However, many of the steps in this tutorial can be adapted to use a real partition instead of a regular file.

Creating the File

Before we can make a filesystem, we need a file that is large enough to hold it. This can be accomplished with dd:
dd if=/dev/zero of=/media/usbdisk/disk.img bs=1M count=16
The above command will make a 16 MB file containing only zeros. Modify the count option to get your desired encrypted filesystem size.

Setting up the Encrypted Loop Device

Before we can actually create the filesystem on our new file, we need to attach it to a loop device and set up a device-mapper target with encryption. losetup -f will find the first free loop device, so we will set its output to a variable called loopdev and use it for several commands:
sudo modprobe cryptoloop
sudo modprobe dm-crypt
sudo modprobe aes_generic
export loopdev=$(sudo losetup -f)
sudo losetup $loopdev /media/usbdisk/disk.img
sudo cryptsetup -c aes -s 256 -h sha256 -y create usbkey $loopdev
This will set up the file with 256-bit AES encryption, hashing the passphrase you issue through SHA-256.
After it's set up, it's a good idea to remove the usbkey device-mapper device and re-run cryptsetup to make sure that you didn't mistype the initial password (I say this from experience...):
sudo cryptsetup remove usbkey
sudo cryptsetup -c aes -s 256 -h sha256 create usbkey $loopdev
If all goes well, we're ready for the next step!

Creating the Actual Filesystem

This is the easiest step of all. I chose the ext3 filesystem for its journaling capability, just in case the USB drive gets removed before the filesystem is unmounted. The cryptsetup command above created the device /dev/mapper/usbkey, which is a map through dm-crypt to the encrypted filesystem. So, this device appears to the system as a regular old block device, like a hard disk or partition. The following command will create an ext3 filesystem on the encrypted file:
sudo mkfs.ext3 /dev/mapper/usbkey
Now, try mounting the filesystem:
sudo mkdir -p /media/encrypted
sudo mount -t ext3 /dev/mapper/usbkey /media/encrypted

Setting up GnuPG on the Encrypted Filesystem

Now, make a .gnupg directory in /media/encrypted, make it owned by your user, and link it to your own ~/.gnupg (if you already have a .gnupg directory, move it out of the way first):
sudo mkdir /media/encrypted/.gnupg
sudo chown $UID.$UID /media/encrypted/.gnupg
chmod 0700 /media/encrypted/.gnupg
ln -s /media/encrypted/.gnupg ~/.gnupg
Now, create a GnuPG key as described in GPGKey or, if you already have a key, move the files in your old .gnupg directory into the new one, possibly using shred or wipe to securely remove the old files.

Making Things Easier

Simplifying the Mount Process

It's not really fun to type three or four commands each time you want to mount your encrypted filesystem. So, I wrote two really simple scripts for mounting and unmounting. Before using these, you should unmount your filesystem and detach the loop device:
sudo umount /media/encrypted
sudo cryptsetup remove usbkey
sudo losetup -d $loopdev
Now, save the following as mount.sh in the root of your USB drive (not in the encrypted filesystem!):
dir=`dirname $0`
loopdev=$(sudo losetup -f)

sudo -p "Password (sudo): " modprobe cryptoloop && \
sudo modprobe dm-crypt && \
sudo modprobe aes_generic && \
sudo mkdir -p /media/encrypted && \
sudo losetup $loopdev $dir/disk.img && \
sudo cryptsetup -c aes -s 256 -h sha256 create usbkey $loopdev && \
sudo mount -t ext3 /dev/mapper/usbkey /media/encrypted && \
sudo chown -R $UID.$UID /media/encrypted/
Then, save the following as umount.sh in the same place:
loopdev=$(sudo cryptsetup status usbkey | grep device | sed -e "s/ *device:[ \t]*//")

sync
sudo umount /media/encrypted
sudo cryptsetup remove usbkey
sudo losetup -d $loopdev
You may not be able to execute these scripts directly, since the default auto-mounting options prohibit running executables. But, since they are shell scripts, you can simply pass them on to sh. So, once the USB drive has been mounted, you can simply type:
sh /media/usbdisk/mount.sh
and all the work will be done for you! (Of course, you will need the encryption password, and you may be asked for a password for sudo.)

Verifying PGP Signatures Without the Encrypted Filesystem

You might want to be able to verify a signed message without needing to mount the encrypted filesystem. To facilitate this, simply copy the public keyring and the trust database file to the "real" .gnupg directory:
cp /media/encrypted/.gnupg/{pubring,trustdb}.gpg /tmp
sh /media/usbdisk/umount.sh
sudo mv /tmp/{pubring,trustdb}.gpg ~/.gnupg
Now, when the encrypted filesystem is not mounted, you will see those files in your .gnupg directory, so that gpg --verify will work. But when it is mounted, you will see the files that are actually in the encrypted filesystem.

Friday, 23 December 2016

Build your own Router with Raspberry Pi 3

Build your own Router with Raspberry Pi 3

This project aims at developing a simple Router device using Raspberry Pi 3. Most of the people don't feel like going out and buying a new router and want something that just fits in your pocket. The process here is actually pretty simple and after installing a few bits of software you'll be ready to go. This setup uses the Raspberry Pi 3. After it's all set up, you can use your Pi as a headless machine so you don't need to deal with a monitor, keyboard and mouse.

How it works

The process is very simple. Raspberry pi 3 is already have Wifi chip on the board so after configuring and installing procedure you just need two things LAN cable and 2-Amps micro Usb power adapter for Raspberry Pi 3.
The Application of Building Raspberry Pi 3 Router include:
  1. Raspberry Pi 3.
  2. SD card with latest Raspbian OS installed.
  3. Power Adapter (5Volts, 2.5 Amps).
  4. Mouse.
  5. Keyboard.
  6. HDMI to VGA adapter.
  7. Standard PC monitor.
Setup:
To setup please follow the steps mentioned bellow:
Prepare the Raspberry Pi-3:
Connect the monitor to Raspberry Pi 3 Via VGA to HDMI converter and also plug in the Usb mouse and keyboard.
Boot up Raspberry Pi 3 you will see Raspberry Pi desktop (assuming you have already installed Raspbian OS) like below fig 1, fig 2, fig 3.

Fig 1:
Fig 2:
​Fig 3:

In order to act Raspberry Pi as Wifi router or access point you need to check weather Raspberry PI is up to date and all the new packages are available for download/installation just open the terminal (fig 4)
and type below commands:
$ sudo apt-get update
$ sudo apt-get upgrade


​Fig 4:

Install and Configure the router softwares:
The first thing you need to do is to configure your wlan0 interface with a static IP.
Note: For this, Raspberry Pi 3 should be connected to Local LAN cable.
In newer Raspian versions, interface configuration is handled by dhcpcd by default. We need to tell to ignore wlan0, as we will configure it with a static IP address. So open the dhcpcd configuration file with
$ sudo nano /etc/dhcpcd.conf
and add the following line to the bottom of the file:
denyinterfaces wlan0

Note:
This must be ABOVE any interface lines you may have added!
allow-hotplug wlan0  
iface wlan0 inet static  
    address 172.24.1.1
    netmask 255.255.255.0
    network 172.24.1.0
    broadcast 172.24.1.255
#    wpa-conf /etc/wpa_supplicant/wpa_supplicant.conf

Restart dhcpcd with

$ sudo service dhcpcd restart

and then reload the configuration for wlan0 with 

$ sudo ifdown wlan0; sudo ifup wlan0

ISC-DHCP-SERVER:

isc-dhcp-server is the Internet System Consortium’s implementation of a DHCP server. A DHCP server is responsible for assigning addresses to computers/devices connection to the WiFi access point.
To install the DHCP software run the following command:
$ sudo apt-get install hostapd isc-dhcp-server
Note: Hostapd is explained in next steps.
Next file to edit is /etc/default/isc-dhcp-serveryou can open it in nano using this command:
$ sudo nano /etc/default/isc-dhcp-server
Scroll down to the line saying interfaces and update the line to say:
INTERFACES="wlan0"
This will make the DHCP server hand out network addresses on the wireless interface. Save the file and exit nano.

DHCP server:

Be wise and always make a backup of the default config
$ sudo cp /etc/dhcp/dhcpd.conf /etc/dhcp/dhcpd.conf"

Edit the default config file
$ sudo nano /etc/dhcp/dhcpd.conf

Comment the following lines:
option domain-name "example.org";
option domain-name-servers ns1.example.org, ns2.example.org
And uncomment below line:

authoritative;
Scroll down to bottom of the file and add below lines:
subnet 172.24.1.0 netmask 255.255.255.0 {
        range 172.24.1.10 172.24.1.50;
        option broadcast-address 172.24.1.255;
        option routers 172.24.1.10;
        default-lease-time 600;
        max-lease-time 7200;
        option domain-name "local";
        option domain-name-servers 8.8.8.8, 8.8.4.4;
}

HOSTAPD:


Hostapd is a user space daemon for access point and authentication servers. That means it can turn your Raspberry Pi into a access point that other computers can connect to. It can also handle security such that you can setup a WiFi password.
Next, we need to configure hostapd. Create a new configuration file using:
$ sudo nano /etc/hostapd/hostapd.conf
with the following contents:
# This is the name of the WiFi interface we configured above
interface=wlan0

# Use the nl80211 driver with the brcmfmac driver
driver=nl80211

# This is the name of the network
ssid=RPI3-AP

# Use the 2.4GHz band
hw_mode=g

# Use channel 6
channel=6

# Enable 802.11n
ieee80211n=1

# Enable WMM
wmm_enabled=1

# Enable 40MHz channels with 20ns guard interval
ht_capab=[HT40][SHORT-GI-20][DSSS_CCK-40]

# Accept all MAC addresses
macaddr_acl=0

# Use WPA authentication
auth_algs=1

# Require clients to know the network name
ignore_broadcast_ssid=0

# Use WPA2
wpa=2

# Use a pre-shared key
wpa_key_mgmt=WPA-PSK

# The network passphrase
wpa_passphrase=raspberry

# Use AES, instead of TKIP
rsn_pairwise=CCMP
We can check whether it's working at this stage by running below command:

$ sudo /usr/sbin/hostapd /etc/hostapd/hostapd.conf
If it's all gone well thus far, you should be able to see the network RPI3-AP! If you try to connect it, you will see some output from the Raspberry Pi, but you won't receive any IP address until you set up finish. Use Ctrl+C to stop it.
We aren't quite done yet, because we also need to tell hostapd where to look for the config file when it starts up on boot. Open the default configuration file with:
$ sudo nano /etc/default/hostapd
and find the line

#DAEMON_CONF=""
and replace it with
DAEMON_CONF="/etc/hostapd/hostapd.conf".
Enable the NAT using IPV4 FORWARDING:
One that we need to do before we send traffic anywhere is to enable packet forwarding. To do this, open the sysctl.conf file with:

$ sudo nano /etc/sysctl.conf
and remove the # from the beginning of the line containing "net.ipv4.ip_forward=1" This will enable it on the next reboot. but, as we know everyone is impatient and to activate it immediately with:
$ sudo sh -c "echo 1 > /proc/sys/net/ipv4/ip_forward"
We also need to share our Raspberry Pi's Internet connection to our devices connected over WiFi by configuring a NAT between our wlan0 interface and our eth0 interface. We can do this using the following commands:
$ sudo iptables -t nat -A POSTROUTING -o eth0 -j MASQUERADE  
$ sudo iptables -A FORWARD -i eth0 -o wlan0 -m state --state RELATED,ESTABLISHED -j ACCEPT  
$ sudo iptables -A FORWARD -i wlan0 -o eth0 -j ACCEPT  
However, we need these rules are to be applied every time when we reboot the Raspberry Pi, so run below command to save the rules in a file:
$ sudo sh -c "iptables-save > /etc/iptables.ipv4.nat"
Now we need to run this after each reboot, so open the rc.local file with:
$ sudo nano /etc/rc.local
before "exit 0" add the following line:
iptables-restore < /etc/iptables.ipv4.nat  

Test by Starting your wireless router:

Now you are ready to start the DHCP server and the Hostapd access point application.You can do so by running:
$ sudo service isc-dhcp-server start
$ sudo service hostapd start
At this point you should be able to find your wireless network on your laptop/devices by which you can access the Internet!

Final Steps:

While it is pretty cool, you have your Raspberry Pi running as a wireless access point. You have to login every time when it reboots to start the Hostapd and DHCP software.
To avoid this run the bellow commands, then it will reload even if Raspberry Pi reboots:
$ sudo update-rc.d hostapd enable 
$ sudo update-rc.d isc-dhcp-server enable
At this point try to reboot the raspberry pi just to make sure everything works as intended - you can reboot with the command:
$ sudo reboot

Now you can remove all connections Like keyboard, mouse and also VGA to HDMI converter cable between monitor and Raspberry pi and then restart the Raspberry PI 3 device, and enjoy.

Monday, 19 December 2016

How to Compile Linux Kernel from Source to Build Custom Kernel

Linux kernel is the life force of all Linux family of operating systems including Ubuntu, CentOS, and Fedora.

For most part, you don’t need to compile the kernel, as it is installed by default when you install the OS. Also, when there is a critical update done to the kernel, you can use yum, or apt-get to update the kernel on your Linux system.

However you might encounter certain situation, where you may have to compile kernel from source. The following are few situation where you may have to compile Kernel on your Linux system.
  • To enable experimental features that are not part of the default kernel.
  • To enable support for a new hardware that is not currently supported by the default kernel.
  • To debug the kernel
  • Or, just to learn how kernel works, you might want to explore the kernel source code, and compile it on your own.
In this tutorial, we’ll explain how to compile Linux kernel from source.
Also, please note that if you just want to compile a driver, you don’t need to compile the kernel. You need only the linux-headers package of the kernel.

1. Download the Latest Stable Kernel

The first step is to download the latest stable kernel from kernel.org.
# cd /usr/src/

# wget https://www.kernel.org/pub/linux/kernel/v3.x/linux-3.9.3.tar.xz

2. Untar the Kernel Source

The second step is to untar the kernel source file for compilation.
# tar -xvJf linux-3.9.3.tar.xz

3. Configure the Kernel

The kernel contains nearly 3000 configuration options. To make the kernel used by most people on most hardware, the Linux distro like Ubuntu, Fedora, Debian, RedHat, CentOS, etc, will generally include support for most common hardware. You can take any one of configuration from the distro, and on top of that you can add your own configuration, or you can configure the kernel from scratch, or you can use the default config provided by the kernel.# cd linux-3.9.3
# make menuconfig
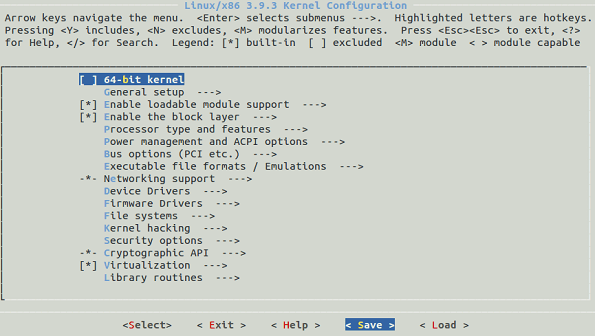
The make menuconfig, will launch a text-based user interface with default configuration options as shown in the figure. You should have installed “libncurses and libncurses-devel” packages for this command to work.

We will use the default config provided by the kernel. So select “Save” and save the config in the file name “.config”.
The following is a sample of the “.config” file:
CONFIG_MMU=y
CONFIG_NEED_DMA_MAP_STATE=y
CONFIG_NEED_SG_DMA_LENGTH=y
CONFIG_GENERIC_ISA_DMA=y
CONFIG_GENERIC_BUG=y
CONFIG_GENERIC_HWEIGHT=y

4. Compile the Linux Kernel

Compile the main kernel:
# make
Compile the kernel modules:
# make modules
Install the kernel modules:
# make modules_install
At this point, you should see a directory named /lib/modules/3.9.3/ in your system.

5. Install the New Kernel

Install the new kernel on the system:
# make install
The make install command will create the following files in the /boot directory.
  • vmlinuz-3.9.3 – The actual kernel
  • System.map-3.9.3 – The symbols exported by the kernel
  • initrd.img-3.9.3 – initrd image is temporary root file system used during boot process
  • config-3.9.3 – The kernel configuration file
The command “make install” will also update the grub.cfg by default. So we don’t need to manually edit the grub.cfg file.

6. Boot Linux to the new Kernel

To use the new kernel that you just compiled, reboot the system.
# reboot
Since, in grub.cfg, the new kernel is added as default boot, the system will boot from the new kernel. Just in case if you have problems with the new kernel, you can select the old kernel from the grub menu during boot and you can use your system as usual.
Once the system is up, use uname command to verify that the new version of Linux kernel is installed.
$ uname -r
3.9.3

ARMKernelCrossCompile

The following instructions show how to properly download, tweak and cross compile an Ubuntu ARM kernel from an x86 Ubuntu host.

Vanilla Ubuntu armhf omap4 kernel compilation

First install the necessary tools for source code management and compilation:
sudo apt-get install fakeroot build-essential kexec-tools kernel-wedge gcc-arm-linux-gnueabihf
sudo apt-get install gcc-arm-linux-gnueabihf libncurses5 libncurses5-dev libelf-dev 
sudo apt-get install asciidoc binutils-dev
sudo apt-get build-dep linux
Then download the code, switch to the omap4 branch and kick a build:
git clone git://kernel.ubuntu.com/ubuntu/ubuntu-precise.git

cd ubuntu-precise
git checkout -b ti-omap4 origin/ti-omap4

export $(dpkg-architecture -aarmhf); export CROSS_COMPILE=arm-linux-gnueabihf-
fakeroot debian/rules clean
fakeroot debian/rules binary-omap4
At the end of the process you will have an header and an image .deb in the upper level directory:
ls ../*.deb
linux-headers-3.2.0-1410-omap4_3.2.0-1410.13_armhf.deb  linux-image-3.2.0-1410-omap4_3.2.0-1410.13_armhf.deb

Config modify an Ubuntu omap4 kernel

Pretty much as above, but between the 'fdr clean' and 'fdr binary-omap4' you issue:
fakeroot debian/rules editconfigs
where 'fdr' stands for 'fakeroot debian/rules'.
Choose the architecture you want to do modifications (armhf in our case):
dh_testdir;
/bin/bash -e debian/scripts/misc/kernelconfig editconfigs
Do you want to edit config: armel/config.flavour.omap4? [Y/n]n
Running splitconfig.pl for armel

Reading config's ...
  processing config.common.armel ... done.
  processing config.flavour.omap4 ... done.

Merging lists ... 
   processing config.common.armel ... done.
   processing config.flavour.omap4 ... done.

Creating common config ... done.

Creating stub configs ...
  processing config.common.armel ... done.
  processing config.flavour.omap4 ... done.
Do you want to edit config: armhf/config.flavour.omap4? [Y/n] Y
do the config changes, save and 'fdr binary-omap4' to start a compilation of the new kernel.

FAQ

1) What's the difference between armel and armhf? And which should i pick?
Armhf requires a cpu with an FPU unit, while armel doesn't strictly enforce it. As a rule of thumb, remember that from Precise onward Ubuntu uses armhf, while Oneiric and previous were armel based.
To create a package for armel, you need the armel toolchain (gcc-arm-linux-gnueabi) and an armel environment:
sudo apt-get install gcc-arm-linux-gnueabi

export $(dpkg-architecture -aarmel); export CROSS_COMPILE=arm-linux-gnueabi-
the rest is identical to the armhf case.
2) How do i mark my custom kernel to distinguish it form the stock one?
It's possible to a add a suffix to kernel name modifying the changelog file. So, in our example, _before_ the 'fdr clean', open debian.ti-omap4/changelog, look for the first line and change it from:
linux-ti-omap4 (3.2.0-1410.13) precise; urgency=low
to
linux-ti-omap4 (3.2.0-1410.13~mycustomkernel) precise; urgency=low
This way the resulting .deb packages will have the custom "~mycustomkernel" suffix in their names. Remember, only letters and numbers are allowed.
3) Ok, but what about my Beagle/XM? How do i compile a kernel for an omap3 board?
Omap3 support is fully present in mainline, so stay in the master branch (do not switch to ti-omap4) and:
fakeroot debian/rules binary-omap
4) So far all the examples were Precise based, what about the other releases?
Feel free to pick the release you prefer from http://kernel.ubuntu.com/git (see http://wiki.ubuntu.com/Kernel/Dev/KernelGitGuide for more info).
5) After export $(dpkg-architecture -aarmhf) i get a warning, what's that?
Yes, it's something like dpkg-architecture: warning: Specified GNU system type arm-linux-gnueabi does not match gcc system type i686-linux-gnu and it's harmless. Forget about it.
6) How do i compile a vanilla/upstream arm kernel that works with an Ubuntu userspace?
i assume your cwd is a checkout of Linus git tree and we are compiling an armhf kernel for an omap3 board.
a) make ARCH=arm omap2plus_defconfig
b) edit .config and modify the following options:
CONFIG_DEVTMPFS=y
CONFIG_DEVTMPFS_MOUNT=y
CONFIG_EXT4_FS=y
CONFIG_EXT4_FS_XATTR=y
Since 3.5 EHCI is broken for omap3 and was disabled upstream, to enable it again:
CONFIG_USB_EHCI_HCD=y
CONFIG_MFD_OMAP_USB_HOST=y
CONFIG_USB_EHCI_TT_NEWSCHED=y
CONFIG_USB_EHCI_HCD_OMAP=y
CONFIG_TWL4030_USB=y
c) make ARCH=arm CROSS_COMPILE=/usr/bin/arm-linux-gnueabihf- uImage
d) copy arch/arm/boot/uImage to the sd card first partition overwriting ubuntu stock uImage
e) insert the sd card, and reboot

Saturday, 17 December 2016

How to Install and Configure IPFire Firewall

IP Fire is an open source firewall distribution. It can be used as a firewall, a proxy server or a VPN gateway.It has following features.

  • Easily configurable
  • Support true random generator
  • High availability
  • Hardware accelerator for cryptography algorithm (AES-NI)
IPFire is forked from IPCop and Endian firewall distro's. Installation and basic configuration of firewall is given in following section.

Installation

In this tutorial, IPfire firewall will be installed on the VM, created on the Virtual Box software. The detail of our VM is given below.
VM details
After clicking on start button, following window appears for IPfire installation.
installation using iso
Press "Enter" button to start installation procedure.  Select the desired language from the given list.
language selection
Press "Enter" button to start installation and accept GPL license.
start installation
GPL license acceptance is shown following.
accept gpl lincese
After GPL license acceptance, windows appear for the partition of  hard disk and filesystem. Ext4 file system is selected in this installation of IPfire.
disk setup
File system selection is shown below.
file system selection
IPfire installation progress is shown in the below figure.
installation of the system
IPfire firewall successfully  installed on the VM.
successfully installed

Configuration

After reboot, basic configuration of IPfire firewall will be done. First of all, keyboard layout and time zone  are selected.
keyboard selection
time zone
Host name and local domain setting for IPfire firewall.
setting hostname
setting local domainPassword setting for root user which is used for CLI access of IPfire.
setting root user password
Password setting for admin user which is used for web access of IPfire.
admin user setting
Network configuration of IPfire is shown below. As shown in the figure that the default network configuration isGREEN RED zones . However, it supports BLUE and ORANGE zones as well
networking creation greenandred
IPfire supported zones are shown in the following figure.
networking configuration types
In a standard IPfire  firewall installation, Green Red means 2 Networks. Green network for home or LAN side and  Red network for  internet/external connection.
Usage of each zone is given in the following table.
zone
Assignment of available NICs to GREEN and RED zone is shown in the following snapshots.
GREEN zone
assinging cards
RED zone
red selection
Interfaces assigned to both GREEN and RED zones are shown in the below figure.
card selected
IP address setting for GREEN zone is shown below.
address selection on green
Assigned IP address and net mask is following IP = 192.168.1.115 , Net mask = 255.255.255.0
 ip address on green
IP address setting for RED zone is shown below.
red ip address setting
Assigned Static IP address and net mask are  following.  However, DHCP and PPP DIALUP (PPPoE) modes are also supported on RED interface for IP assignment.
IP = 192.168.100.1 , Net mask = 255.255.255.0
red ip address
DNS and Gateway setting for  RED interface are shown in the following snapshot.
dns and gateway setting
DHCP configuration on the GREEN interface for automatic IP assignment is given below.
dhcp server on green side configuraiton
After DHCP configuration, basic setting of IPfire are complete.
coplete setup
IPfire will reboot to apply changes and gives CLI access to user "root".
setup complete and restarting
To access CLI , enter password for user "root".
cli login
root login
Web Access of IPfire is required for further configuration. It is also used to configure firewall rules, snort configuration and VPN setting etc.
Enter IP address of GREEN interface along port 444 for web interface access. All web browsers gives exception due to untrusted certificates. Therefore accept the exception  to view the web pages.
web interface access
accept exception
Enter password for "admin" user to access the pages.
web access cred
After correct username and password, following main dashboard appears, which shows the network configuration (IP addresses on RED and GREEN zones).
main dashboard

IPFire Menu

System

This menu is used for basic setting of the  IPFire machine such as enabling ssh access, backup and setting web access password etc. System sub menu is shown in the following figure.
system menu

Status

In this menu, firewall administrator view the status of system resources such as RAM & CPU, internal and external network, entropy for TRNG and statistics for VPN's.
status

Network

As shown in the following figure that network settings such as static routing, webproxy, url filtering and wake on Lan etc is available under this menu
network menu

Services

Services such as VPN which include IPsec & OpenVPN , intrusion detection, QoS , time server etc  are listed under this menu.
services

Firewall

Main feature of IPFire distribution is providing firewall feature. Administrator or user  uses this menu to push  iptables rules on back end.
firewall

IPFire

Pakfire is used to install Addons/packages on the IPFire machine for more feature.
ipfire

Logs

As shown in the following figure that, logs of services such has IDS, firewall, proxy  and system can be view from Logs menu.
logs

Conclusion

In this article, our focus was installation and configuration of another open source firewall, IPFire. It is forked from well-known open source firewalls IPCop and Endian. It provides high availability, usage of TRNG and AES-NI features.