Saturday, 28 April 2018

Friday, 27 April 2018

HOWTO: Virtual Raspbian on Qemu in Ubuntu Linux

Virtualise Raspbian Wheezy 2013-02-09 on Ubuntu Linux
Why?/What do I get?

It's a pretend Raspberry Pi, running completely in software, on your desktop, that you can use as if it is a real one (minus the ports and GPIO obviously). LXDE (Desktop) runs, and the internet/network is connected. You can SSH into it, make copies of it, trash it, start a new one from a previous saved copy, and generally do pretty much anything software-wise with it that you would do with a real one.

Drawbacks:

Using X (the desktop) may be a bit slow depending on your hardware. I ran this on an Intel d525mw dual core Atom board with 4GB of RAM and a fresh install of Ubuntu 12.10, and the desktop was sluggish at best, and sometimes unresponsive. The console was very quick, and was like using the real thing.

Qemu is a typical old-school Linux console app - it's pretty terse with error messages, and has esoteric command line switches. I'm going to check out some Qemu managers in the Ubuntu Software Store.

Needed:

Ubuntu 12.10 Desktop installed and running with up-to-date packages/list
- http://www.ubuntu.com/download/desktop

Raspbian Wheezy 2013-02-09
- http://www.raspberrypi.org/downloads

Linux kernel for Qemu
- http://xecdesign.com/downloads/linux-qemu/kernel-qemu

Internet connection

(Note that a Raspberry Pi is not required for this)

Notes:

These instructions may very well work with Ubuntu 12.04 LTS and earlier, as well as Debian, Mint, and other Linux's/Linuxi/Linuxes. If you have a non-Debian distribution, you will need to use your package managers commands instead of apt-get.

Thanks:

http://xecdesign.com/qemu-emulating-ras ... -easy-way/
http://xecdesign.com/working-with-qemu/
http://www.soslug.org/wiki/raspberry_pi_emulation
http://www.raspberrypi.org/phpBB3/membe ... file&u=356 (ShiftPlusOne)

Steps:

$ mkdir ~/qemu_vms/
Download/copy Raspbian Wheezy to ~/qemu_vms/
Download kernel-qemu to ~/qemu_vms/
$ sudo apt-get install qemu-system
$ file ~/qemu_vms/2013-02-09-wheezy-raspbian.img
From the output of the file command, take the partition 2 'startsector' value an multiply by 512, and use this figure as the offset value in the mount command below.
$ sudo mount ~/qemu_vms/2013-02-09-wheezy-raspbian.img -o offset=62914560 /mnt
$ sudo nano /mnt/etc/ld.so.preload
Comment out the line in the file (use a # as the first character of the line) and save the file (CTRL+X, then "Y" for yes).
$ sudo umount ~/qemu_vms/2013-02-09-wheezy-raspbian.img /mnt
$ cd ~/qemu_vms/
$ qemu-system-arm -kernel kernel-qemu -cpu arm1176 -m 256 -M versatilepb -no-reboot -serial stdio -append "root=/dev/sda2 panic=1" -hda ~/qemu_vms/2013-02-09-wheezy-raspbian.img -redir tcp:5022::22
Qemu gives you a root shell, run:
$ fsck /dev/sda2
$ shutdown -r now
Login as pi
Password raspberry

Done.

Tuesday, 24 April 2018

NXP's Community Yocto BSP for SCM-i.MX


=======================================

To get the BSP you need to have `repo` installed.

Install the `repo` utility: (only need to do this once):
--------------------------------------------------
$: mkdir ~/bin
$: curl http://commondatastorage.googleapis.com/git-repo-downloads/repo  > ~/bin/repo
$: chmod a+x ~/bin/repo
$: PATH=${PATH}:~/bin

Download the BSP Yocto Project Environment into your directory:
-------------------------------------------
$: mkdir fsl-arm-yocto-bsp
$: cd fsl-arm-yocto-bsp
$: repo init -u git://git.freescale.com/imx/fsl-arm-yocto-bsp.git -b scm-imx-3.14.52-1.1.1_ga
$: repo sync

Note this downloads the latest patches on top of the 3.14.52-1.1.1 GA release.

If the GA release was downloaded before just do repo sync to fetch latest updates.

To checkout the GA release without scm patches do the following:
$: cd sources/meta-fsl-bsp-release
$: git checkout scm-imx_3.14.52_1.1.1_ga

Setup for a particular graphical backend.
-----------------------------------------
The examples uses imx6sxscm-1gb-evb MACHINE but substitute with whatever you are using:

Setup for X11.
$: MACHINE=imx6sxscm-1gb-evb DISTRO=fsl-imx-x11 source ./fsl-setup-release.sh -b build-x11

Setup for Wayland.
$: MACHINE=imx6sxscm-1gb-evb DISTRO=fsl-imx-wayland source ./fsl-setup-release.sh -b build-wayland

Setup for Wayland and X11.
$: MACHINE=imx6sxscm-1gb-evb DISTRO=fsl-imx-xwayland source ./fsl-setup-release.sh -b build-xwayland

Setup for Frame Buffer.
$: MACHINE=imx6sxscm-1gb-evb DISTRO=fsl-imx-fb source ./fsl-setup-release.sh -b build-fb

Note if the poky community distro is used then build breaks will happen with some components using
our meta-fsl-bsp-release layer.

Note DirectFB is not supported in this release.

Build an image:
---------------
bitbake <image recipe>

Some image recipes:
fsl-image-gui - full image with demos and tests used for testing with graphics, no QT.
fsl-image-qt5 - fsl-image-gui with QT 5.

Wednesday, 18 April 2018

Developing a Custom Device Driver


After twiddling parallel port bits using port I/O and ppdev, the Project Trailblazer engineers decided that the potential failures due to drawbacks were unacceptable. Port I/O and ppdev approaches were error prone and risky. They needed a custom device driver for their interface circuit.
Armed with their interface circuit, port I/O, and ppdev knowledge, the Project Trailblazer engineers developed a few requirements for their first device driver:
  • The driver should load at startup.
  • When loaded, the driver should enable the latch output to drive the output modules.
  • The driver should shield software developers from interface logic specifics.
  • The driver should offer control of individual pieces of snow-making equipment without requiring the developer to perform bit manipulation.
  • The driver should offer monitoring of individual lift signals without requiring the developer to perform bit manipulation.
The engineers started learning about device driver development by reading. Rubini and Corbet's Linux Device Drivers (published by O'Reilly) offers a complete discussion of driver development. It covers kernel version 2.4 and new kernel additions. Unfortunately, after reading this book, the engineers still didn't know where to start. Then they found the "Linux Kernel Module Programming Guide,"3 which steps through kernel module development, character device files, the /proc filesystem, communications with device files, I/O controls, blocking processes, scheduling tasks, and interrupt handlers. The engineers learned the following about device drivers:
  • Device drivers are accessed through file operations such as read and write.
  • Device drivers run in the kernel space.
  • Device drivers can be written as loadable modules.
  • Device drivers running in the kernel do not have access to glibc.
  • Device drivers that have memory problems (for example, array out of bounds) could crash the kernel.
  • Traditionally, accessing device drivers is performed through file operations in the /dev directory.
  • Device files in the /dev directory require static or dynamic assignment of major numbers, the general class of the device.
  • Static assignment of major numbers creates the potential for device drivers to clash with each other.
  • Dynamic assignment of major numbers introduces a small inconvenience in locating the device driver.
  • Device drivers can exist in the /proc directory.
  • Many Linux processes make available information via files in the /proc directory.
  • /proc directory device files are created on-the-fly and do not clash with other device files and can be found easily by filename.
The "Linux Kernel Module Programming Guide"3 is out of date, and its examples are difficult to compile. The engineers found the "Linux Kernel Procfs Guide,"4 which applies to kernel 2.4 and is up-to-date. They decided to create the lift monitoring and snow-making control device driver, which would be a loadable kernel module that would use the /proc file system. The engineers planned to be extra careful when writing the device driver, to make sure that array-out-of-bounds conditions never occur. They knew they could not rely on glibc functions. They planned to develop their kernel module device driver around the "Linux Kernel Procfs Guide" program procfs_example.c. They began by writing a helloworld device driver module for the /proc directory. After they were confident in their skills at creating device drivers, they would modify helloworld and create the lift monitoring and snow-making control device driver.

Understanding helloworld_proc_module

Most helloworld programs print "Hello World" and terminate. Kernel module versions of helloworld print "Hello World" to the console or to the system log file when loaded and may print "Goodbye World" when they are unloaded. The helloworld_proc_module will print loading and unloading messages, and it will also store a character string that can be read and written with file operations. This character string offers data persistence across the life of the module. helloworld_proc_module will demonstrate the process of creating the /proc directory file, transferring data from userland to the module, transferring data from the module back to userland, and removing the /proc directory file. Here are the basic steps involved in the execution of helloworld_proc_module:

  1. The module is loaded from a script or by hand, with insmod helloworld_proc_module.o.
  2. The kernel calls the module's init function. The source code uses a macro define called module_init that declares which function is init. In this case, the statement is module_init(init_helloworld).
  3. The module's init function executes and creates a /proc directory file entry called helloworld_file, fills its fields, and then prints a message to the system log. The helloworld_file /proc entry structure contains four fields that the kernel requires for read and write file operations:
    • read_proc� The read_proc field should contain a pointer to the file's callback function that executes for a read file operation. For example, if a user ran the cat /proc/helloworld_proc_module command at the bash prompt, the kernel would ultimately call the file's read_proc function to handle this file read operation.
    • write_proc� The write_proc field should contain a pointer to the file's callback function that executes for a write file operation. If a user ran the echo test > /proc/helloworld_proc_module command at the bash prompt, the kernel would call the file's write_proc function to handle this file write operation.
    • data� The data field contains a pointer to the file's data. During module initialization, a data structure is created and populated. When a read or write callback occurs, using read_proc or write_proc, this data pointer is passed as a parameter. This way, the file's read_proc and write_proc functions can find their associated data.
    • owner� Because the /proc file entry is used in a module, the owner field should be set to THIS_MODULE.
  4. The module is unloaded by a script or by hand, with rmmod helloworld_proc_module.
  5. The kernel calls the module's exit function. The source code uses a macro definition called module_exit that declares which function is exit. In this case, the statement is module_exit(cleanup_helloworld);.
  6. The exit routine removes the /proc file entry and prints a message to the system log file.

This is quite a bit different from the standard helloworld.c program that you're used to seeing. This helloworld_proc_module program seems complicated, but after you get it running and you understand how to set the helloworld_file fields and how the data pointer is passed to the read and write callback functions, it's pretty simple. Listing 7.4 shows the complete helloworld_proc_module.c program.
Listing 7.4 The helloworld_proc_module.c Program
/*
 * helloworld_proc_module v1.0 9/25/01
 * www.embeddedlinuxinterfacing.com
 *
 * The original location of this code is
 * http://www.embeddedlinuxinterfacing.com/chapters/07/
 * helloworld_proc_module.c
 *
 * Copyright (C) 2001 by Craig Hollabaugh
 *
 * This program is free software; you can redistribute it and/or modify
 * it under the terms of the GNU Library General Public License as
 * published by the Free Software Foundation; either version 2 of the
 * License, or (at your option) any later version.
 *
 * This program is distributed in the hope that it will be useful, but
 * WITHOUT ANY WARRANTY; without even the implied warranty of
 * MERCHANTABILITY or FITNESS FOR A PARTICULAR PURPOSE. See the GNU
 * Library General Public License for more details.
 *
 * You should have received a copy of the GNU Library General Public
 * License along with this program; if not, write to the
 * Free Software Foundation, Inc.,
 * 59 Temple Place, Suite 330, Boston, MA 02111-1307 USA
 */

/*
 * helloworld_proc_module.c is based on procfs_example.c by Erik Mouw.
 * For more information, please see The Linux Kernel Procfs Guide,
 * http://kernelnewbies.org/documents/kdoc/procfs-guide/lkprocfsguide.html
 */

/* helloworld_proc_module
 * helloworld_proc_module demonstrates the use of a /proc directory entry.
 * The init function, init_helloworld, creates /proc/helloworld and
 * populates its data, read_proc, write_proc and owner fields. The exit
 * function, cleanup_helloworld, removes the /proc/helloworld entry.
 * The proc_read function, proc_read_helloworld, is called whenever
 * a file read operation occurs on /proc/helloworld. The
 * proc_write function, proc_write_helloworld, is called whenever a file
 * file write operation occurs on /proc/helloworld.
 *
 * To demonstrate read and write operations, this module uses data
 * structure called helloworld_data containing a char field called value.
 * Read and write operations on /proc/helloworld manipulate
 * helloworld_data->value. The init function sets value = 'Default'.
 */
/*
gcc -O2 -D__KERNEL__ -DMODULE -I/usr/src/linux/include \
    -c helloworld_proc_module.c -o helloworld_proc_module.o

arm-linux-gcc -O2 -D__KERNEL__ -DMODULE -I/usr/src/arm-linux/include \
    -c helloworld_proc_module.c \
    -o /tftpboot/arm-rootfs/helloworld_proc_module.o
*/


#include <linux/module.h>
#include <linux/kernel.h>
#include <linux/init.h>
#include <linux/proc_fs.h>
#include <asm/uaccess.h>

#define MODULE_VERSION "1.0"
#define MODULE_NAME "helloworld proc module"

/* this is how long our data->value char array can be */
#define HW_LEN 8

struct helloworld_data_t {
  char value[HW_LEN + 1];
};

static struct proc_dir_entry *helloworld_file;

struct helloworld_data_t helloworld_data;

/* proc_read - proc_read_helloworld
 * proc_read_helloworld is the callback function that the kernel calls when
 * there's a read file operation on the /proc file (for example,
 * cat /proc/helloworld). The file's data pointer (&helloworld_data) is
 * passed in the data parameter. You first cast it to the helloworld_data_t
 * structure. This proc_read function then uses the sprintf function to
 * create a string that is pointed to by the page pointer. The function then
 * returns the length of page. Because helloworld_data->value is set to
 * "Default", the command cat /proc/helloworld should return
 * helloworld Default
 */
static int proc_read_helloworld(char *page, char **start, off_t off,
                                int count, int *eof, void *data)
{
  int len;

/* cast the void pointer of data to helloworld_data_t*/
  struct helloworld_data_t *helloworld_data=(struct helloworld_data_t *)data;

/* use sprintf to fill the page array with a string */
  len = sprintf(page, "helloworld %s\n", helloworld_data->value);

  return len;
}


/* proc_write - proc_write_helloworld
 * proc_write_helloworld is the callback function that the kernel calls
 * when there's a write file operation on the /proc file, (for example,
 * echo test > /proc/helloworld). The file's data pointer
 * (&helloworld_data) is passed in the data parameter. You first cast it to
 * the helloworld_data_t structure. The buffer parameter points to the
 * incoming data. You use the copy_from_user function to copy the buffer
 * contents to the data->value field. Before you do that, though, you check
 * the buffer length, which is stored in count to ensure that you don't
 * overrun the length of data->value. This function then returns the length
 * of the data copied.
 */
static int proc_write_helloworld(struct file *file, const char *buffer,
                                 unsigned long count, void *data)
{
  int len;

/* cast the void pointer of data to helloworld_data_t*/
  struct helloworld_data_t *helloworld_data=(struct helloworld_data_t *)data;

/* do a range checking, don't overflow buffers in kernel modules */
  if(count > HW_LEN)
    len = HW_LEN;
  else
    len = count;
/* use the copy_from_user function to copy buffer data to
 * to our helloworld_data->value */
  if(copy_from_user(helloworld_data->value, buffer, len)) {
    return -EFAULT;
  }

/* zero terminate helloworld_data->value */
  helloworld_data->value[len] = '\0';

  return len;
}

/* init - init_helloworld
 * init_helloworld creates the /proc/helloworld entry file and obtains its
 * pointer called helloworld_file. The helloworld_file fields, data,
 * read_proc, write_proc and owner, are filled.  init_helloworld completes
 * by writing an entry to the system log using printk.
 */
static int __init init_helloworld(void)
{
  int rv = 0;

/* Create the proc entry and make it readable and writable by all - 0666 */
  helloworld_file = create_proc_entry("helloworld", 0666, NULL);
  if(helloworld_file == NULL) {
    return -ENOMEM;
  }

/* set the default value of our data to Sam. This way a read operation on
 * /proc/helloworld will return something. */
  strcpy(helloworld_data.value, "Default");

/* Set helloworld_file fields */
  helloworld_file->data = &helloworld_data;
  helloworld_file->read_proc = &proc_read_helloworld;
  helloworld_file->write_proc = &proc_write_helloworld;
  helloworld_file->owner = THIS_MODULE;

/* everything initialize */
  printk(KERN_INFO "%s %s initialized\n",MODULE_NAME, MODULE_VERSION);
  return 0;
}

/* exit - cleanup_helloworld
 * cleanup_helloworld removes the /proc file entry helloworld and
 * prints a message to the system log file.
 */
static void __exit cleanup_helloworld(void)
{
  remove_proc_entry("helloworld", NULL);
  printk(KERN_INFO "%s %s removed\n", MODULE_NAME, MODULE_VERSION);
}

/* here are the compiler macros for module operation */
module_init(init_helloworld);
module_exit(cleanup_helloworld);

MODULE_AUTHOR("Craig Hollabaugh");
MODULE_DESCRIPTION("helloworld proc module");

EXPORT_NO_SYMBOLS;

TIP
You should use the helloworld_proc_module.c source file as a skeleton for interfacing projects. It compiles, loads, and executes correctly on the x86, ARM, and PowerPC target boards. You can simply add hardware initialization code to the init function, interfacing code to the proc_read and proc_write functions, change the names of the /proc entries, and recompile.


Compiling, Inserting, and Testing helloworld_proc_module on the MediaEngine

When it is inserted into the kernel, the helloworld_proc_module creates a /proc directory entry that bash scripts can read from and write to. Here are the steps to compile the module using tbdev1, and then insert and test the operation of the helloworld_proc_module using tbdevarm, the MediaEngine:

  1. Compile helloworld_proc_module.c by using this command:
    root@tbdev1[526]: arm-linux-gcc -O2 -D__KERNEL__ -DMODULE -I/usr/src/arm-linux/include 
    graphics/ccc.gif-c helloworld_proc_module.c -o /tftpboot/arm-rootfs/helloworld_proc_module.o
    root@tbdev1[527]: ls -sh /tftpboot/arm-rootfs/helloworld_proc_module.o
    4.0k /tftpboot/arm-rootfs/helloworld_proc_module.o
    
  2. Boot tbdevarm to gain access using minicom:
    root@tbdev1[528]: minicom
    
    Here's the tbdevarm prompt from minicom:
    bash-2.04#
    
  3. Check for the helloworld_proc_module object file and to see what modules are loaded:
    bash-2.04# ls /
    bin  dev  etc  helloworld_proc_module.o  lib  proc  sbin  tmp  usr
    
    bash-2.04# cat /proc/modules
    bash-2.04#
    
  4. Insert helloworld_proc_module.o, list the current modules and check the /proc directory:
    bash-2.04# insmod helloworld_proc_module.o
    helloworld proc module 1.0 initialized
    
    bash-2.04# cat /proc/modules
    helloworld_proc_module    1056   0 (unused)
    
    bash-2.04# ls /proc
    1   bus          helloworld  locks       stat
    15  cmdline      ide         meminfo     swaps
    2   cpuinfo      interrupts  misc        sys
    28  devices      iomem       modules     sysvipc
    3   dma          ioports     mounts      tty
    4   driver       kcore       net         uptime
    5   execdomains  kmsg        partitions  version
    6   filesystems  ksyms       self
    7   fs           loadavg     slabinfo
    
    The module initialized, /proc/modules contains an entry for it, and the /proc/helloworld file exists.
  5. Check the read_proc function, proc_read_helloworld, by performing a read file operation on the /proc file entry, helloworld:
    bash-2.04# cat /proc/helloworld
    helloworld Default
    
  6. Check the write_proc function, proc_write_helloworld, by performing a write file operation on the /proc file entry, helloworld:
    bash-2.04# echo 1234 > /proc/helloworld
    bash-2.04# cat /proc/helloworld
    helloworld 1234
    
    bash-2.04#
    
    The string 1234 was successfully copied from the proc_write_helloworld function to the data->value field. (You verified that with a read file operation using cat /proc/helloworld.)
  7. Remove the module, check the module list in /proc/modules and /proc directory:
    bash-2.04# rmmod helloworld_proc_module
    helloworld proc module 1.0 removed
    bash-2.04# cat /proc/modules
    bash-2.04# ls /proc/
    1   bus          ide         meminfo     swaps
    15  cmdline      interrupts  misc        sys
    2   cpuinfo      iomem       modules     sysvipc
    3   devices      ioports     mounts      tty
    36  dma          kcore       net         uptime
    4   driver       kmsg        partitions  version
    5   execdomains  ksyms       self
    6   filesystems  loadavg     slabinfo
    7   fs           locks       stat
    bash-2.04#
    

You have just compiled, inserted, and tested helloworld_proc_module. This module dynamically creates a /proc directory entry called helloworld. You can read and write to helloworld, and it stores an eight-character value. This seems simple, but this powerful module is the skeleton that the Project Trailblazer engineers needed to create their lift monitoring and snow-making control device driver.

The Linux Boot Process

A target board booting Linux proceeds through several steps after reset to get to a system prompt. The initial steps, such as ROM startup code and register configuration, are microprocessor hardware dependent. The kernel itself contains microprocessor architecture杁ependent initialization code that is executed first. This initialization code configures the microprocessor registers for protected-mode operation and then invokes the architecture-independent kernel starting point called start_kernel. From this point on, the kernel boot process is identical for all architectures. The Linux boot process involves the following steps:

  1. After a processor is reset, it executes ROM startup code.
  2. The ROM startup code initializes the CPU, memory controller, and on-chip devices, and it configures the memory map. The ROM startup code then executes a bootloader.
  3. The bootloader decompresses the Linux kernel into RAM from Flash memory or a TFTP server transfer. It then executes a jump to the kernel's first instruction. The kernel first configures microprocessor registers and then invokes start_kernel, which is the architecture-independent starting point.
  4. The kernel initializes its caches and various hardware devices.
  5. The kernel mounts the root filesystem.
  6. The kernel executes the init process.
  7. The executing init process loads shared runtime libraries.
  8. init reads its configuration file, /etc/inittab, and executes scripts. Typically, init executes a startup script, /etc/rc.d/rcS, which configures and starts networking and other system services.
  9. init enters a runlevel where system duties can be performed or the login process can start, allowing for user sessions.


The Project Trailblazer engineers learned from the board manufacturers' documentation that steps 1, 2 and 3 are fairly easy to understand, configure, and execute. Step 4 is dependent on kernel compilation configuration. Step 5 presents a wide range of options, including mounting a local disk drive, mounting a network drive, and using a RAM disk. Step 7 requires proper compilation of glibc and other libraries.
The engineers read about replacing the init program with bash directly in step 6. They opted to use init for two reasons. First, init can handle initialization of networking and system services via scripts. Second, in step 9 the engineers will use init to call bash directly instead of using the login process. init can respawn processes that terminate. This means that if bash terminates, init will re-execute it. Use of init fulfills PBR-2. Having bash execute directly instead of login allows console operations without security. The engineers intend to add the login process prior to placing the target board in field operations.

TIP
Having init call bash directly instead of login saves time because you don't have to log in during development. In a secure lab, convenience outweighs security. When you deploy designs, you should modify /etc/inittab so that init calls login, to provide the first level of authentication.


Ref Link:
http://www.embeddedlinux.org.cn/EmbLinux/ch04.htm

Monday, 16 April 2018

Porting RTOS Device Drivers to Embedded Linux

Linux has taken the embedded marketplace by storm. According to industry analysts, one-third to one-half of new embedded 32- and 64-bit designs employ Linux. Embedded Linux already dominates multiple application spaces, including SOHO networking and imaging/multifunction peripherals, and it now is making vast strides in storage (NAS/SAN), digital home entertainment (HDTV/PVR/DVR/STB) and handheld/wireless, especially in digital mobile phones.
New embedded Linux applications do not spring, Minerva-like, from the heads of developers; a majority of projects must accommodate thousands, even millions of lines of legacy source code. Although hundreds of embedded projects have successfully ported existing code from such platforms as Wind River's VxWorks and pSOS, VRTX, Nucleus and other RTOSes to Linux, the exercise is still nontrivial.
To date, the majority of literature on migration from legacy RTOS applications to embedded Linux has focused on RTOS APIs, tasking and scheduling models and how they map to Linux user-space equivalents. Equally important in the I/O-intensive sphere of embedded programming is porting RTOS application hardware interface code to the more formal Linux device driver model.
This article surveys several common approaches to memory-mapped I/O frequently found in legacy embedded applications. These range from ad hoc use of interrupt service routines (ISRs) and user-thread hardware access to the semi-formal driver models found in some RTOS repertoires. It also presents heuristics and methodologies for transforming RTOS code into well-formed Linux device drivers. In particular, the article focuses on memory mapping in RTOS code vs. Linux, porting queue-based I/O schemes and redefining RTOS I/O for native Linux drivers and dæmons.
RTOS I/O Concepts
The word that best describes most I/O in RTOS-based systems is informal. Most RTOSes were designed for older MMU-less CPUs, so they ignore memory management even when an MMU is present and make no distinction between logical and physical addressing. Most RTOSes also execute entirely in privileged state (system mode), ostensibly to enhance performance. As such, all RTOS application and system code has access to the entire machine address space, memory-mapped devices and I/O instructions. Indeed, it is very difficult to distinguish RTOS application code from driver code even when such distinctions exist.
This informal architecture leads to ad hoc implementations of I/O and, in many cases, the complete absence of a recognizable device driver model. In light of this egalitarian non-partitioning of work, it is instructive to review a few key concepts and practices as they apply to RTOS-based software.
In-Line Memory-Mapped Access
When commercial RTOS products became available in the mid-1980s, most embedded software consisted of big mainline loops with polled I/O and ISRs for time-critical operations. Developers designed RTOSes and executives into their projects mostly to enhance concurrency and aid in synchronization of multitasking, but they eschewed any other constructs that got in the way. As such, even when an RTOS offered I/O formalisms, embedded programmers continued to perform I/O in-line:
#define DATA_REGISTER  0xF00000F5

char getchar(void) {
  return (*((char *) DATA_REGISTER));
}


void putchar(char c) {
  *((char *) DATA_REGISTER) = c;
}
More disciplined developers usually segregate all such in-line I/O code from hardware-independent code, but I have encountered plenty of I/O spaghetti as well. When faced with pervasive in-line memory-mapped I/O usage, embedded developers who are new to Linux always face the temptation to port all such code as-is to user space, converting the #define of register addresses to calls to mmap(). This approach works fine for some types of prototyping, but it cannot support interrupt processing, has limited real-time responsiveness, is not particularly secure and is not suitable for commercial deployment.
RTOS ISRs
In Linux, interrupt service is exclusively the domain of the kernel. With an RTOS, ISR code is free-form and often indistinguishable from application code, other than in the return sequence. Many RTOSes offer a system call or macro that lets code detect its own context, such as the Wind River VxWorks intContext(). Common also is the use of standard libraries by ISRs, with accompanying reentrancy and portability challenges.
Most RTOSes support the registration of ISR code and handle interrupt arbitration and ISR dispatch. Some primitive embedded executives, however, support only direct insertion of ISR start addresses into hardware vector tables. Even if you attempt to perform read and write operations in-line in user space, you have to put your Linux ISR into kernel space.
RTOS I/O Subsystems
Most RTOSes ship with a customized standard C run-time library, such as pREPC for pSOS, and selectively patched C libraries (libc) from compiler ISVs. They do the same for glibc. Thus, at a minimum, most RTOSes support a subset of standard C-style I/O, including the system calls open, close, read, write and ioctl. In most cases, these calls and their derivatives resolve to a thin wrapper around I/O primitives. Interestingly, because most RTOSes did not support filesystems, those platforms that do offer file abstractions for Flash or rotating media often use completely different code and/or different APIs, such as pHILE for pSOS. Wind River VxWorks goes further than most RTOS platforms in offering a feature-rich I/O subsystem, principally to overcome hurdles in integration and generalization of networking interfaces/media.
Many RTOSes also support a bottom-half mechanism, that is, some means of deferring I/O processing to an interruptible and/or preemptible context. Others do not but may instead support mechanisms such as interrupt nesting to achieve comparable ends.
Typical RTOS Application I/O Architecture
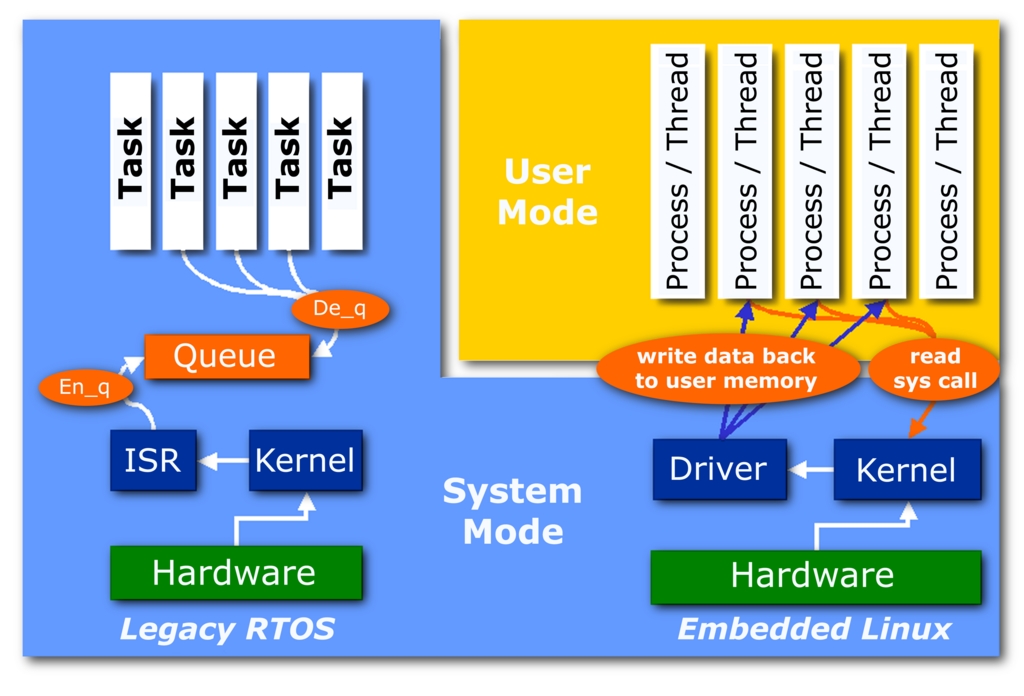
A typical I/O scheme (input only) and the data delivery path to the main application is diagramed in Figure 1. Processing proceeds as follows:
  • A hardware interrupt triggers execution of an ISR.
  • The ISR does basic processing and either completes the input operation locally or lets the RTOS schedule deferred handling. In some cases, deferred processing is handled by what Linux would call a user thread, herein an ordinary RTOS task.
  • Whenever and wherever the data ultimately is acquired (ISR or deferred context), ready data is put into a queue. Yes, RTOS ISRs can access application queue APIs and other IPCs—see the API table.
  • One or more application tasks then read messages from the queue to consume the delivered data.
Figure 1. Comparison between Typical I/O and Data Delivery in a Legacy RTOS and Linux
Output often is accomplished with comparable mechanisms—instead of using write() or comparable system calls, one or more RTOS application tasks put ready data into a queue. The queue then is drained by an I/O routine or ISR that responds to a ready-to-send interrupt, a system timer or another application task that waits pending on queue contents. It then performs I/O directly, either polled or by DMA.
Mapping RTOS I/O to Linux
The queue-based producer/consumer I/O model described above is one of many ad hoc approaches employed in legacy designs. Let us continue to use this straightforward example to discuss several possible (re)implementations under embedded Linux.
Developers who are reticent to learn the particulars of Linux driver design, or who are in a great hurry, likely try to port most of a queue-based design intact to a user-space paradigm. In this driver-mapping scheme, memory-mapped physical I/O occurs in user context by way of a pointer supplied by mmap():
#include <sys/mman.h>

#define REG_SIZE   0x4   /* device register size */
#define REG_OFFSET 0xFA400000
                   /* physical address of device */

void *mem_ptr;
         /* de-reference for memory-mapped access */
int fd;

fd=open("/dev/mem",O_RDWR);
           /* open physical memory (must be root) */

mem_ptr = mmap((void *)0x0,
               REG_AREA_SIZE, PROT_READ+PROT_WRITE,
               MAP_SHARED, fd, REG_OFFSET);
                         /* actual call to mmap() */

A process-based user thread performs the same processing as the RTOS-based ISR or deferred task would. It then uses the SVR4 IPC msgsnd() call to queue a message for receipt by another local thread or by another process by invoking msgrcv().
Although this quick-and-dirty approach is good for prototyping, it presents significant challenges for building deployable code. Foremost is the need to field interrupts in user space. Projects such as DOSEMU offer signal-based interrupt I/O with SIG (the silly interrupt generator), but user-space interrupt processing is quite slow—millisecond latencies instead of tens of microseconds for a kernel-based ISR. Furthermore, user-context scheduling, even with the preemptible Linux kernel and real-time policies in place, cannot guarantee 100% timely execution of user-space I/O threads.
It is highly preferable to bite the bullet and write at least a simple Linux driver to handle interrupt processing at kernel level. A basic character or block driver can field application interrupt data directly in the top half or defer processing to a tasklet, a kernel thread or to the newer work-queue bottom-half mechanism available in the 2.6 kernel. One or more application threads/processes can open the device and then perform synchronous reads, just as the RTOS application made synchronous queue receive calls. This approach will require at least recoding consumer thread I/O to use device reads instead of queue receive operations.
To reduce the impact of porting to embedded Linux, you also could leave a queue-based scheme in place and add an additional thread or dæmon process that waits for I/O on the newly minted device. When data is ready, that thread/dæmon wakes up and queues the received data for use by the consuming application threads or processes.
Porting Approaches
Porting RTOS code to embedded Linux does not differ conceptually from enterprise application migration. After the logistics of porting have been addressed (make/build scripts and methods, compiler compatibility, location of include files and so on), code-level porting challenges turn on the issues of application architecture and API usage.
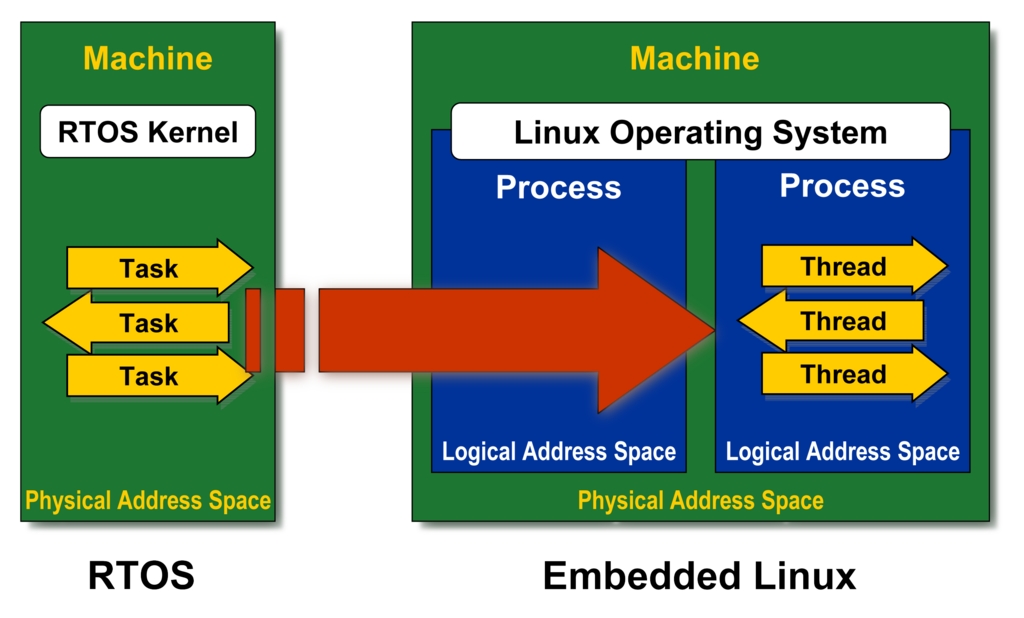
For the purposes of the discussion at hand, let us assume that the application part (everything except I/O-specific code) migrates from the RTOS-based system into a single Linux process. RTOS tasks map to Linux threads and intertask IPCs map to Linux inter-process and inter-thread equivalents.
Figure 2. Mapping RTOS Tasks to Linux Process-Based Threads
Although the basic shape of the port is easy to understand, the devil is in the details. And the most salient details are the RTOS APIs in use and how to accommodate them with Linux constructs.
If your project is not time-constrained, and if your goal is to produce portable code for future project iterations, then you want to spend some time analyzing the current structure of your RTOS application and how/if it fits into the Linux paradigm. For RTOS application code, you want to consider the viability of one-to-one mapping of RTOS tasks onto Linux process-based threads and whether to repartition the RTOS application into multiple Linux processes. Depending on that decision, you should review the RTOS IPCs in use to determine proper intra-process vs. inter-process scope.
On the driver level, you definitely want to convert any informal in-line RTOS code to proper drivers. If your legacy application already is well partitioned, either using RTOS I/O APIs or at least segregated into a distinct layer, your task becomes much easier. If ad hoc I/O code is sprinkled liberally throughout your legacy code base, you've got your work cut out for you.
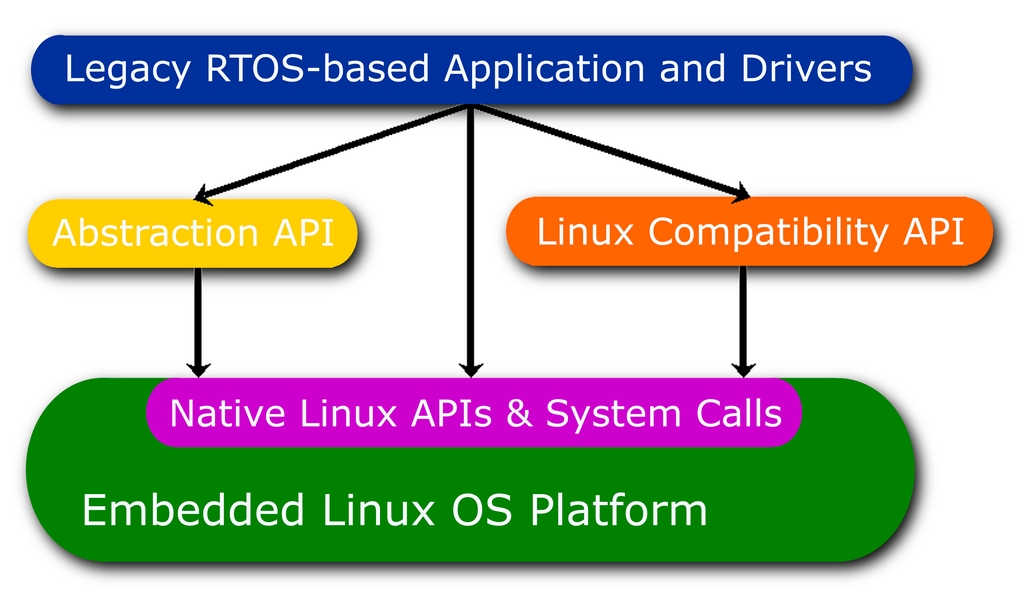
Developers in a hurry to move off a legacy RTOS or those trying to glue together a prototype are more likely to attempt to map or convert as many RTOS APIs to Linux equivalents in situ. Entities in common, such as comparable APIs, IPCs and system data types, port nearly transparently. Others can be addressed with #define redefinition and macros. Those remaining need to be recoded, ideally as part of an abstraction layer.
You can get a head start on API-based porting by using emulation libraries that accompany many embedded Linux distributions (including MontaVista's libraries for Wind River VxWorks and pSOS) or by using third-party API-mapping packages from companies such as MapuSoft.
Figure 3. Multipronged Approach to Porting RTOS Code and APIs to Linux
Most projects take a hybrid approach, mapping all comparable or easily translatable APIs, re-architecting where it doesn't slow things down and playing Whack-a-Mole with the remaining code until it builds and runs.
Available APIs in Kernel and User Space
For both intensive re-architecting and for quicker-and-dirtier API approaches, you still have to (re)partition your RTOS application and I/O code to fit the Linux kernel and user-space paradigm. Table 1 illustrates how Linux is much stricter about privileged operations than a legacy RTOS and helps guide you in the (re)partitioning process.
Table 1. Privileged Operations in Linux and Legacy RTOSes
 IPCsSynchronizationTaskingNamespace
RTOS ApplicationQueues, Signals, Mailboxes Informal Shared MemorySemaphores, MutexesFull RTOS Tasking RepertoireFull Application, Libraries and System (Link-Time)
RTOS DriverQueues, Signals, Mailboxes Informal Shared MemorySemaphores, MutexesFull RTOS Tasking RepertoireFull Application, Libraries and System (Link-Time)
Linux ApplicationQueues, Signals, Pipes Intra-Process Shared Memory Shared System MemorySemaphores, MutexesProcess and Threads APIs Local Process, Static and Shared Libraries
Linux Driver (Static)Shared System Memory Read/Write Process MemoryKernel Semaphores SpinlocksKernel Threads, TaskletsFull Kernel
Linux Module (Dynamic)Shared System Memory Read/Write Process MemoryKernel Semaphores SpinlocksKernel Threads, TaskletsModule-Local and Exported Kernel Symbols
Two important distinctions are called out in Table 1:
  • RTOSes are egalitarian, letting application and I/O code touch any address and perform almost any activity, whereas Linux is much more hierarchical and restrictive.
  • Legacy RTOS code can see every symbol or entry point in the system, at least at link time, whereas Linux user code is isolated from and built separately from kernel code and its accompanying namespace.
The consequences of the Linux hierarchy of privileged access is normally only kernel code (drivers) actually accesses physical memory. User code that also does so must run as root.
In general, user-space code is isolated from the Linux kernel and can see only explicitly exported symbols as they appear in /proc/ksyms. Moreover, visible system calls to the kernel are not invoked directly but by calls to user library code. This segregation is intentional, enhancing stability and security in Linux.
When you write a driver, the opposite is true. Statically linked drivers are privy to the entire kernel namespace, not only exports, but have zero visibility into user-space process-based symbols and entry points. And, when you encapsulate driver code in run-time loadable modules, your program can leverage only those interfaces explicitly exported in the kernel by the *EXPORT_SYMBOL* macro.
Migrating Network Drivers
As indicated above, porting character and block device drivers to Linux is a straightforward if time-consuming activity. Porting network drivers, though, can seem much more daunting.
Remember that while Linux grew up with TCP/IP, most RTOSes had networking grafted onto them in the late 1990s. As such, legacy networking often only presents bare-bones capabilities, such as being able to handle only a single session or instance on a single port or to support only a physical interface on a single network medium. In some cases, networking architecture was generalized after the fact, as with Wind River VxWorks MUX code to allow for multiple interfaces and types of physical connection.
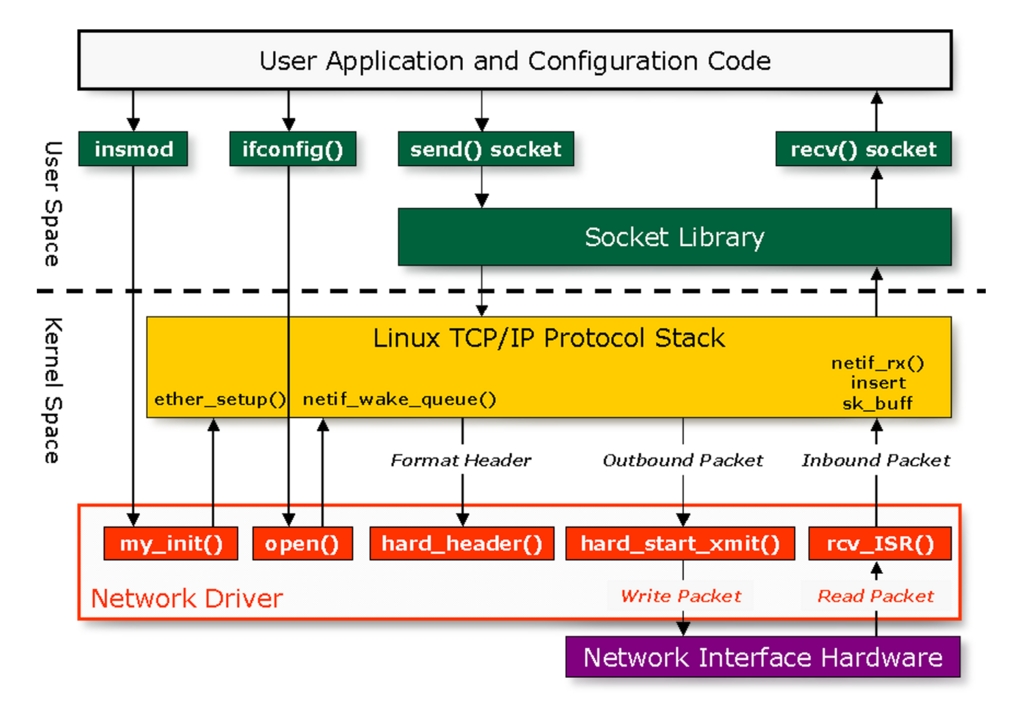
The bad news is that you likely have to rewrite most or all of your existing network interfaces. The good news is that re-partitioning for Linux is not hard and you have dozens of open-source network device driver examples to choose from.
Your porting task is to populate the areas at the bottom of Figure 4 with suitable packet formatting and interface code.
Figure 4. Block Diagram of Linux Network Drivers
Writing network drivers is not for beginners. Because, however, many RTOS network drivers actually were derived from existing GPL Linux interfaces, you might find the process facilitated by the code itself. Moreover, there is a large and still-growing community of integrators and consultants focused on making a business of helping embedded developers move their applications to Linux, for reasonable fees.
Conclusion
The goal of this article has been to give embedded developers some insight into both the challenges they will face and benefits they will realize from moving their entire software stack from a legacy RTOS to Linux. The span of 2,800 words or so is too brief to delve into many of the details of driver porting (driver APIs for bus interfaces, address translation and so on), but the wealth of existing open-source GPL driver code serves as both documentation and a template for your migration efforts. The guidelines presented here should help your team scope the effort involved in a port of RTOS to Linux and provide heuristics for re-partitioning code for the best native fit to embedded Linux.
As Director of Strategic Marketing and Technology Evangelist when he wrote this article, Bill focused his 17+ years of industry experience on advancing MontaVista and embedded Linux in today's dynamic pervasive computing marketplace. His background includes extensive embedded and real-time experience with expertise in OS, tools, software licensing and manufacturing.

by Bill Weinberg