Thursday, 9 April 2020

Top 10 Best Practices for Jenkins Pipeline Plugin

1. Do: Use the real Jenkins Pipeline

Don't use older plugins like Build Pipeline plugin or Buildflow plugin. Instead, use the real Jenkins Pipeline suite of plugins .
  • Why? The Pipeline plugin is a step change improvement in the underlying job itself. Unlike freestyle jobs, Pipeline is resilient to Jenkins master restarts and also has` built-in features that supersede many older plugins previously used to build multi-step, complex delivery pipelines.
More information on getting started is available at https://jenkins.io/solutions/pipeline/ .

2. Do: Develop your pipeline as code

Use the feature to store your Jenkinsfile in SCM then version and test it like you do other software.
  • Why? Treating your pipeline as code enforces good discipline and also opens up a new world of features and capabilities like multi-branch, pull request detection and organization scanning for GitHub and BitBucket.
You should also call your Pipeline script the default name: Jenkinsfile and start the following script header, so your IDE, GitHub and other tooling recognize it as Groovy and enable code highlighting:
#!groovy​

​3. Do: All work within a stage

Any non-setup work within your pipeline should occur within a stage block.
  • Why? Stages are the logical segmentation of a pipeline. Separating work into stages allows separating your pipeline into distinct segments of work.

Example:

stage 'build'
//build
stage 'test'
//test
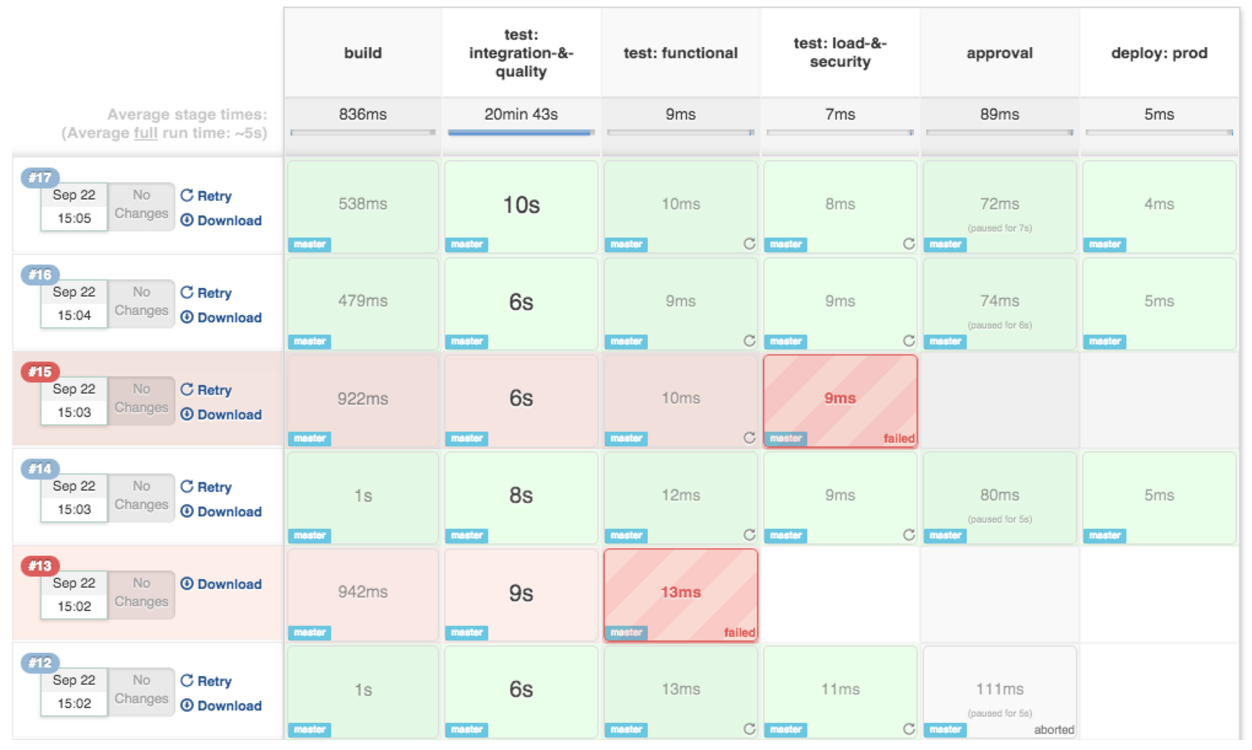
And better still: the Pipeline Stage View plugin visualizes stages as unique segments of the pipeline:
Jenkins pipeline example

4. Do: All material work within a node

Any material work within a pipeline should occur within a node block.
  • Why? By default, the Jenkinsfile script itself runs on the Jenkins master, using a lightweight executor expected to use very few resources. Any material work, like cloning code from a Git server or compiling a Java application, should leverage Jenkins distributed builds capability and run an agent node.

Example:

stage 'build'
node{
    checkout scm
    sh 'mvn clean install'
}

5. Do: Work you can within a parallel step

Pipeline offers a straight-forward syntax for branching your pipeline into parallel steps. Use it!
  • Why? Branching work in parallel will allow your pipeline to run faster, shifting your pipeline steps to the left, and getting feedback to developers and the rest of your team faster.

Example:

parallel 'shifting':{
    //everything
}, 'left':{
    //I can
}
Bonus tip: use the Parallel Test Executor plugin to have Jenkins automatically determine how to run your xUnit compatible tests in optimally parallel buckets! Read more information on Parallel Test Execution on the CloudBees Blog .

6. Do: Acquire nodes within parallel steps

Why? One of the main benefits of parallelism in a pipeline is: to do more material work (see Best Practice #4)! You should generally aim to acquire a node within the parallel branches of your pipeline.

Example:

parallel 'integration-tests':{
    node('mvn-3.3'){ ... }
}, 'functional-tests':{
    node('selenium'){ ... }
}

7. Don't: Use input within a node block

While you can put an input statement within a node block, you definitely shouldn't.
  • Why? The input element pauses pipeline execution to wait for an approval - either automated or manual. Naturally these approvals could take some time. The node element, on the other hand, acquires and holds a lock on a workspace and heavy weight Jenkins executor - an expensive resource to hold onto while pausing for input.
So, create your inputs outside your nodes.

Example:

stage 'deployment'
input 'Do you approve deployment?'
node{
    //deploy the things
}

8. Do: Wrap your inputs in a timeout

Pipeline has an easy mechanism for timing out any given step of your pipeline. As a best practice, you should always plan for timeouts around your inputs.
  • Why? For healthy cleanup of the pipeline, that's why. Wrapping your inputs in a timeout will allow them to be cleaned-up (i.e., aborted) if approvals don't occur within a given window.

Example:

timeout(time:5, unit:'DAYS') {
    input message:'Approve deployment?', submitter: 'it-ops'
}

9. Don't: Set environment variables with env global variable

While you can edit some settings in the env global variable, you should use the withEnv syntax instead.
  • Why? because the env variable is global, changing it directly is discouraged as it changes the environment globally, so the withEnv syntax is recommended.

Example:

withEnv(["PATH+MAVEN=${tool 'm3'}/bin"]) {
    sh "mvn clean verify"
}

10. Do: Prefer stashing files to archiving

Before the stash capability was added to Pipeline DSL, archives were the best way to share files between nodes or stages in a pipeline. If you just need to share files between stages and nodes of your pipeline, you should use stash/unstash instead of archive.
  • Why? Stash and unstash are designed for sharing files, for example your application's source code, between stages and nodes. Archives, on the other hand, are designed for longer term file storage (e.g., intermediate binaries from your builds).

Example:

stash excludes: 'target/', name: 'source'
unstash 'source'

Summary

Thanks for reading! The new Jenkins Pipeline plugin is gaining more and more traction, especially with the launch of Jenkins 2.0 . I'm sure there will be more and more best practices to come as developers across the world develop their DevOps pipelines with Jenkins. We will post follow-up blogs and more examples soon!

Friday, 21 February 2020

Shared groovy library in Jenkins jobs

How to use a shared library in Jenkins, to allow you to share common code and steps across multiple pipelines. Includes a demo Git repo that you can fork.

you're getting up to speed with Jenkins now and you’re mastering the art of the pipeline. But now you’ve got a few projects up and running, how do you avoid repeating the same common code across different pipelines?
I often write code that I know will be reused across several different pipelines in Jenkins. Copying and pasting the same code into different pipelines can quickly become a maintenance headache.
So to avoid this, you store your “reusable bits” (technical term!) in a Shared Library in Jenkins. You only need to write some code once, and then you can reference the same code in all of your pipelines.
This Jenkins pipeline shared library tutorial will tell you the basics of setting up a shared pipeline, how to load the library, and how to use it in your pipelines.

What to reuse in Jenkins

If you’re already writing code in your pipelines to do anything like this:
  • verify the deployment environment
  • perform a deployment
  • read a configuration file (e.g. a Maven POM file)
  • perform a code review of the application (e.g. using a tool like SonarQube)
…then you’ll probably be better off putting the code for these into a shared library so that lots of different projects can use them.
Over time, you’ll build up a collection of these reusable functions in your Library.

What is a Shared Library

A shared library is a collection of independent Groovy scripts that you pull into your Jenkinsfile at runtime.
The best part is, the Library can be stored, like everything else, in a Git repository. This means you can version, tag, and do all the cool stuff you’re used to with Git.
  1. First, you create your Groovy scripts (see below for details on this), and add them into your Git repository.
  2. Then, you add your Shared Library into Jenkins from the Manage Jenkins screen.
  3. Finally, you pull the Shared Library into your pipeline using this annotation (usually at the top of your Jenkinsfile):
    @Library('your-library-name')

What’s inside a Shared Library

Inside your Library, you’ll probably have two types of common code.
  • Steps: These are called Global Variables in Jenkins terminology, but these are the custom steps that you want to be available to all your Jenkins pipelines.
    For example, you might write a standard step to deploy an application or perform a code review. To do this, add your code into vars/YourStepName.groovy and then implement a def call function:
    #!/usr/bin/env groovy
    // vars/YourStepName.groovy
    
    def call() {
      // Do something here...
    }
    
  • Other common code: This might include helper classes or common code that you might want to include inside pipeline steps themselves (meta!). You could also use it as a place to store static constants that you use throughout your pipelines.
    Code like this needs to go in the src/your/package/name directory, and then you can use normal Groovy syntax, e.g.:
    #!/usr/bin/env groovy
    // com/cleverbuilder/GlobalVars.groovy
    package com.cleverbuilder
    
    class GlobalVars {
       static String foo = "bar"
    }
    
    You can then import this class into your Jenkinsfile and reference the static variable like GlobalVars.foo:

Example: Creating and using a Jenkins shared library

Setting up a shared library is fairly easy, and in this section, I’ll show you how, with a quick example.
  1. Create the shared library
    First, you need to create a Git repository that will contain your library of functions (steps). You can also use Subversion.
    In your repository, create a directory called vars. This will hold your custom steps. Each of them will be a different .groovy file underneath your vars directory, e.g.:
    vars/
        deployApplication.groovy
        parseFile.groovy
        sayHello.groovy
        readSystemCredentials.groovy
        doCodeReview.groovy
    
    I’m using Git to store my repository. I’ve created a sample repo on GitHub, which includes one function, the sayHello example from the official Jenkins documentation.
  1. Add your custom steps
    Each of your custom steps is a different .groovy file inside your vars/ directory. In Jenkins terminology, these are called Global Variables, which is why they are located inside vars/.
    Create a file for your custom step, and fill in the code. For example, a simple greeting function would look like this:
    #!/usr/bin/env groovy
    
    def call(String name = 'human') {
      echo "Hello, ${name}."
    }
    
    Notice how the Groovy script must implement the method. Then you should write your custom code within the braces { }. You can also add parameters to your method - the example above has one parameter- name, with a default value of human.
  2. Set up the library in Jenkins
    Now you’ve created your library with custom steps, you need to tell Jenkins about it.
    You can define a shared library within a Jenkinsfile, or you can configure the library using the Jenkins web console. I think it’s better to add from the web console because you then you can share the library across all of your build jobs.
    To add your shared library (I’m using my demo on GitHub as an example):
    In Jenkins, go to Manage Jenkins → Configure System. Under Global Pipeline Libraries, add a library with the following settings:
    • Name: pipeline-library-demo
    • Default version: Specify a Git reference (branch or commit SHA), e.g. master
    • Retrieval method: Modern SCM
    • Select the Git type
    • Project repository: https://github.com/monodot/pipeline-library-demo.git
  3. Use the library in a pipeline
    To use the shared library in a pipeline, you just add @Library('your-library-name') to the top of your pipeline definition, or Jenkinsfile. Then call your step by name, e.g. sayHello:
    @Library('pipeline-library-demo')_
    
    stage('Demo') {
        echo 'Hello world'
        sayHello 'Dave'
    }
    
    NOTE: The underscore (_) is not a typo! You need this underscore if the line immediately after the @Library annotation is not an import statement.
    If you’re using declarative pipeline syntax….
    libraries {
      lib('pipeline-library-demo')
    }
    
    pipeline {
    
    }
    
    
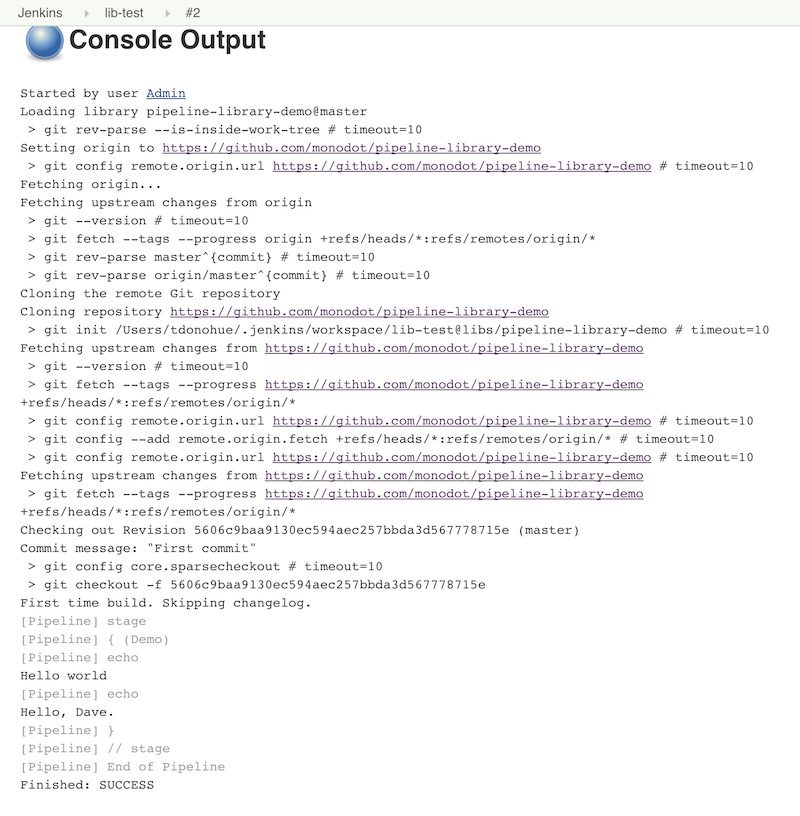
  4. Run the pipeline above, and the output should look something like this:
Jenkins job output
That’s it for my intro to Shared Libraries in Jenkins! As you can see they’re a useful way to share common code that you might use across different Jenkinsfiles.
Here are the important things to remember:
  • You need to use Groovy to write your custom functions or steps
  • To write pipeline steps that you can call from your pipelines (e.g. deployApplication, readConfigFile, etc.):
    • Create a file in the vars/ directory in your repository, with the name of your custom step
    • The file should implement the def call() method; you can also define parameters to your step
  • To write other common Groovy code, add it into src/
  • Add your Shared Library in Jenkins using the Configure System screen
Thanks for reading! 


Thursday, 2 January 2020

Installing Py-Mql and phpmyadmin on Raspberry pi 3

Getting Started

As always you will need to have Raspbian installed or a similar operating system installed before we can get started. Be sure to head over to my page on installing Raspbian if you haven’t yet learned how to do this.
I have broken this tutorial down into two steps. First, we will install the web server software and also MYSQL. In the second step, we will take a look at installing the PHPMyAdmin. If you have come from the Raspberry Pi web server tutorial, then you can skip the first step as you would have already done this.

 Installing Raspberry Pi MySQL

1. Firstly let’s install the MySQL server onto the Raspberry Pi.
sudo apt-get install mysql-server
2. You will be prompted to enter a password for the root user. Make sure you write this down as we will need to use this to access the MYSQL server and connect PHPMyAdmin to it.
mysql setup
3. If you’re not prompted to enter a password, you will need to enter the following command. Answer all the questions so it will be set up to match your security requirements.
sudo mysql_secure_installation
4. Now if you want to access and start making changes to the database, enter the following command:
sudo mysql -u root -p
5. It will now prompt you to enter the password we just created.
6. You can now enter MYSQL commands to create, alter, delete databases.
7. You’re able to leave the MYSQL command line by simply entering quit.
If you want to be able to interact with MYSQL in Python, you will need to install the Python bindings as well. You can do this by entering the following command.
sudo apt-get install python-mysqldb
Now we’re done installing the Raspberry Pi MYSQL you may want to install PHPMyAdmin, so you have a nice clean interface to work with.

Creating an MySQL Database User

1. By default, PHPMyAdmin will disallow you to log in using the root login. Instead, you will need to create a new user if you wish to create and access data tables within PHPMyAdmin. To do this first login as root with the password you selected.
sudo mysql -u root -p
2. Now run the following command, replacing username with the username of your choice. Also, replace password with a secure password of your choice.
GRANT ALL PRIVILEGES ON mydb.* TO 'username'@'localhost' IDENTIFIED BY 'password';
3. You can exit by entering quit. Once done you can proceed to install PHPMyAdmin.

 Installing Raspberry Pi PHPMyAdmin

You will find that installing Raspberry Pi PHPMyAdmin is very easy to do and won’t take long at all. If you haven’t already installed a web server, you can learn from our guide on installing Apache or our guide to installing NGINX.
1. I will go on the assumption you have already set up your web server and setup PHP for it. Please note that these steps will differ a bit if you are using Apache or NGINX.
Now let’s install the PHPMyAdmin package, you can do this by entering the following command on your Raspberry Pi.
sudo apt-get install phpmyadmin
2. It will now begin to install. You will be presented with a screen asking the type of web server you want it to run off. Select apache2 even if you are using NGINX since this doesn’t hugely matter for us.
3. Next, we will need to configure PHPMyAdmin to connect to our SQL database server. (The one we set up previously in installing the Raspberry Pi MYSQL step or the web server). To do this select yes at the next prompt.
PHPMyAdmin setup

4. The setup tool will now ask for a password, enter the one you set for root when setting up your SQL Server, this is needed for phpMyAdmin to talk with the SQL Server and manage your databases.
5. Next, it will ask you to set a password for PHPMyAdmin itself. It is best to set this password to something different to your root SQL password. Make sure you remember it as this is the password you will need to access the interface.
6. With that done we can now proceed to configure our web servers for use with phpMyAdmin. These steps differ for both Apache and NGINX so make sure you follow the correct list of steps.

Configuring Apache for phpMyAdmin

7a. To begin setting up Apache for use with phpMyAdmin enter the following command into the terminal:
sudo nano /etc/apache2/apache2.conf
7b. Now at the bottom of this file enter the following line:
Include /etc/phpmyadmin/apache.conf
Once done save & exit by pressing CTRL +X and then y.
7c. Now restart the Apache service by entering the following command:
sudo /etc/init.d/apache2 restart

Configuring NGINX for phpMyAdmin

7a. To setup NGINX to work with phpMyAdmin all, we need to do is create a link between the phpmyadmin folder and our root html directory. To do this, we simply need to run the following command:
sudo ln -s /usr/share/phpmyadmin /var/www/html
8. Now you should be able to access the PHPMyAdmin from a browser. To test this out, go to the following address in your browser. (Replace the IP with your IP. If you don’t have it run the command hostname –I on your Pi)
http://192.168.1.108/phpmyadmin
Raspberry Pi PHPMyAdmin
9. If it’s all working, then you’re good to go. You will need to log in using a user other than root as this is disabled for security purposes. Further up in this tutorial I show you how to make a database user quickly.
Assuming you’re looking to learn how to setup WordPress on the Raspberry Pi, then you can find that in my web server tutorial linked towards the top of this page.
If you want to enable external access to the either PHPMyAdmin or MYSQL, then you will need to setup port forwarding. To learn how to do this check out my guide on port forwarding. The ports you will need to forward is 80 for PHPMyAdmin and MYSQL is 3306. You will also need to make sure you have enabled outside access to SQL.
If you want to learn more about MYSQL and the commands, you can use to view & edit data then I recommend heading over to w3schools or at codecademy. They have some great beginner tutorials to help bring you up to speed on using MYSQL.
I hope you can get both the Raspberry Pi MYSQL & PHPMyAdmin working from this tutorial. If you do come across something or feel that I have missed some important steps, then please feel free to leave us feedback on the forum.

Wednesday, 27 November 2019

Yocto Linux build for RPI


#To Check supported Boards

  •  ls meta/conf/machine/*.conf
Add this layer to bblayers.conf and the dependencies above

  • # nano conf/bblayers.conf 
 

Set MACHINE in local.conf to one of the supported boards
  • #bitbake core-image-base
dd to a SD card the generated sdimg file (use xzcat if rpi-sdimg.xz is used)
Boot your RPI.


Ref:


Tuesday, 17 September 2019

Building your DevSecOps pipeline: 5 essential activities

This artical copied from below link:
https://www.synopsys.com/blogs/software-security/devsecops-pipeline-checklist/?cmp=em-sig-eloqua&utm_medium=email&utm_source=eloqua


This checklist describes the purpose, benefits, key enablers, and use cases of the top five key elements of the DevSecOps pipeline. Get started now.


No matter what you call it, SecDevOps, DevSecOps, or DevOpsSec, you have to build security into your continuous integration, continuous delivery, and continuous deployment pipeline. This checklist will guide you through the DevSecOps journey—as we’ll call it within this checklist—to assure that you’re integrating security into your pipeline.
Here, we’re going to look at each of the five activities listed in the overview above. We’ll examine their purpose, benefits, key enablers, and use cases. Let’s dig in.

1. Pre-commit checks

Pre-commit checks, the first step in the DevSecOps pipeline, consist of steps to complete before the developer checks code into the source code repository.
Purpose. Pre-commit checks are used to find and fix common security issues before changes are committed into source code repositories.
Benefits. The use of pre-commit hooks is very powerful. They can help a team automate manual tasks and increase their productivity. Additionally, security checks using static analysis tools in the IDE can take place with a limited number of rules.
Key enablers. Pre-commit checks enable activities such as updating a threat model when controls or new assets are added to the application. They also enable manual code review when a large change in the code base is detected. These checks can additionally trigger risk analysis when identifying security vulnerabilities.
Use case. These checks enable development teams to run scans in their IDE using Code Sight. This tool automatically provides ‘just in time’ security guidance as the code is written. Rather than scanning for bugs after the code is written and committed to your source code repositories, Code Sight acts as a desktop security expert. It provides guidance automatically when developers create code where risk may be introduced.
Next, create hooks to trigger activities such as threat modeling, architecture risk analysis, and manual code review. Create additional hooks to review your configuration files for hard-coded credentials.
Finally, use these hooks to distribute email notifications to your application security team or software security group (SSG). Notify them about critical code changes that developers have checked into source code repositories.

2. Commit-time checks

The next step in the DevSecOps pipeline is commit-time checks. This activity is automatically triggered by a check-in to a source code repository.
Purpose. To build and perform basic automated testing of the application. These tests return fast results to developers who committed the change to the source code repository.
Benefits. Commit-time checks ensure that code is compilable and buildable at all times. They also bring attention to critical and high security issues.
Key enablers. These checks identify well-defined processes for various software security activities. They also empower development teams to remediate critical and high risk issues. Additionally, they empower QA security testing.
Use case. First, compile and build the code. Next, configure and run static analysis with limited rule sets. One recommendation is to run your firm’s top 3 vulnerabilities (identified annually). For instance, vulnerabilities such as SQL injection and/or reflected and stored cross-site scripting (XSS). Use static application security testing (SAST) tools like Coverity to identify security issues. This is a fast, incremental scan that provides feedback to developers in minutes.
Next, automate security testing and gather metrics. Break the build and alert relevant teams on critical and high security issues.

3. Build-time checks

Build-time checks, the third activity in the DevSecOps pipeline, are automatically triggered by successful commit-time checks.
Purpose. To perform advanced automated testing of the application. This includes a deeper level of SAST, open source management, security testing, risk-based security tests, signing binary releases with PGP signatures, and storing artifacts in repositories.
Benefits. Build-time checks break the build in any failure, including:
  • When code doesn’t compile
  • In the event that unit tests fail
  • SAST failures
  • A high number of findings
  • When vulnerabilities are found (e.g., SQL injection or XSS)
These checks also identify dependencies and checks if there are any known, publicly disclosed vulnerabilities using tools (e.g., SCA).
Key enablers. These checks empower QA security testing with a well-defined process for various software security activities. They also empower development teams to remediate critical and high risk issues as they’re introduced.
Use case. Build-time checks allow users to configure more comprehensive SAST rule sets, such as the OWASP Top 10 when dealing with web applications. They also configure jobs to identify risks in third-party components, using tools such as Black Duck. These checks automate risk-based security testing. Risk-based security testing runs specific security tests based on the risk profile of the system.
Each test is intended to probe a specific risk that has been previously identified through risk analysis. They alert development teams of critical and high risk issues. They even digitally sign artifacts and store them in your artifact repositories. Last, but not least, build-time checks gather useful metrics.

4. Test-time checks

Moving down the DevSecOps pipeline, test-time checks are automatically triggered by successful build-time checks.
Purpose. Pick the latest ‘good’ build from the artifact repository and deploy it to a staging or test environment. All tests, including functional, integration, performance, advanced SAST, and DAST are executed on this build.
Benefits. This is the last testing phase before a product is released into production. The staging environment is the most representative of the production environment.
Key enablers. Test-time checks require well-defined processes for various software security activities. They empower development teams to remediate critical and high risk issues as soon as they’re introduced. They additionally empower QA security team testing methods. In addition, they trigger manual code review using SAST tools and out-of-band penetration testing.
Use case. Configuring a broader set of rules for SAST, in this case, might include using the tool’s full security rule sets. Since you already ran SAST in the earlier checks, ensure that you run tests that haven’t yet been covered. Configure to run DAST tools. The rule sets should test for common critical and high severity issues such as those outlined in the OWASP Top 10.
Include fuzz testing tools such as Defensics. Fuzz testing provides random data to the program’s input parameters in the hopes of causing an error state. Failing to handle malformed input properly can lead to security issues.
Configure and automate the deployment of the latest ‘good’ build to the staging environment. Then, alert the development teams of the critical and high risk issues. And finally, gather metrics from these activities.

5. Deploy-time checks

If all of the previous steps have been completed successfully, and the application is ready for deployment, deploy-time checks involving additional pre- and post-deployment security checks finish out the DevSecOps pipeline.
Purpose. Testing post-deployment provides an ongoing level of assurance that changes to the production environment haven’t introduced security issues. A good strategy is to implement a process that periodically triggers security testing.
Benefits. Deploy-time checks can help find bugs that may have slipped through pre-production testing activities. Continuous monitoring allows an organization to gain insight into the types of traffic a given application is receiving. Additionally, collecting application-level security metrics helps identify patterns of malicious users.
A threat intelligence program can also help teams stay ahead of the curve by proactively responding to newly discovered security issues that affect applications and platforms.
Key enablers. Defects identified through this activity can be fed back to development teams and used to change developer behavior.
Use case.
Pre-deployment
  • Automate configuration management
  • Automate provisioning the runtime environment
Post-deployment
  • Automate collecting application-level security metrics during continuous monitoring
  • Schedule security scanning
  • Perform vulnerability scanning
  • Assist in bug bounty scanning
  • Create an incident response plan
  • Provide insight to the DevSecOps team to drive a threat intelligence program

Examining a sample DevSecOps workflow

When implementing security into your DevSecOps pipeline, it’s important to conduct these activities with purpose. None of the checks are set in stone. You can more activities earlier or later within the development process as they suit your life cycle operations.
Let’s look at a sample deployment diagram that shows a high-level workflow. The visual below illustrates how these activities are performed and triggered.
DevSecOps pipeline checklist

Pre-commit phase

As a developer checks in code, the pre-commit hooks review changes to the code and configuration before committing it to the source code repository (e.g., SVN or Bitbucket). Client-side and server-side hooks are both relevant here.

Commit-time phase

Next, once the code is committed to the source code repository, run commit-time checks. This includes incremental SAST with predefined rule sets that provide quick feedback for developers (within seconds of code check-in). If you find critical or high risk issues (e.g., SQL injection or XSS), you must break the build and notify the developer immediately.
SAST should be incremental. In other words, run SAST only on the set of files that change. Additionally, be sure to gather metrics into a centralized dashboard. Automate defect tracking and create a defect. After all, security issues should be treated in the same fashion as quality issues.

Build-time phase

Once the commit-time checks are successful, the next phase in the DevSecOps pipeline are the build-time checks. Here, you’ll want to run even more comprehensive rule sets using SAST. Perhaps you’ll also want to run the OWASP Top 10 for your application. At this point, you should also run a software composition analysis (SCA) tool to identify vulnerabilities within your free and open source software (FOSS) or any associated licensing issues. As we saw with the commit-time checks, here you’ll want to break the build, automate bug tracking, and gather metrics.

Test-time phase

At this point, it’s time to move on to test-time checks. Before running security activities, ensure that you use the latest successful build artifact. If you aren’t confident of your SAST rules, run a full rule set of SAST analysis. Once your SAST tools give you a green signal, run DAST or IAST tools that you have configured. If you also own a fuzz testing tool, this is the right time to run it as well.
All vulnerabilities identified during your SAST, DAST, IAST, and fuzz testing activities should break the build, gather metrics, and immediately create a defect in your bug tracking system.
By now, you’re probably getting an idea of how your changes are progressing through the DevSecOps pipeline. You’re probably seeing what activities completed successfully, which vulnerabilities were found all in one dashboard, and whether to continue the DevSecOps pipeline or pause/stop the change from going into production.

Deploy-time phase

Now we move into the final phase: pre- and post-deployment checks. This is the time to automate configuration management. Provision the runtime environment (e.g., check access control and group permissions) if your application is using SSL to connect to the database.
Once the application goes live, schedule security scanning to identify bugs that may have slipped through pre-production testing. Implement a bug bounty program to triage and investigate issues reported by users. Enable continuous monitoring to gain insight into the types of traffic a given app receives.
Additionally, collecting application-level security metrics helps to identify patterns of malicious users. Last, but certainly not least, a threat intelligence program can help teams stay ahead of the curve. It can help teams proactively respond to newly discovered security issues affecting applications and platforms.

Summing it up

In this workflow, the focus is centered around only a few security activities. There are many more that could be covered in great detail (e.g., performing malicious code detection in the DevSecOps pipeline). This workflow also assumes that you have already automated other activities (e.g., unit tests, functional tests, user acceptance tests, integration tests, etc.).
A valuable takeaway here is that automation is key for DevSecOps. It’s also of great importance to have a DevSecOps pipeline with such highly valuable security activities. Bringing in one or more application security tools and automating that tool to scale security activities won’t cut it. If these tools aren’t properly configured, it will most assuredly backfire.
Security activities must be an integral part of the DevSecOps pipeline. DevOps teams have to own security the same way they own development and operations.
DevSecOps pipeline checklist