Monday, 18 February 2019

every Linux sysadmin should know

In a world bursting with new tools and diverse development environments, it's practically a necessity for any developer or engineer to learn some basic sysadmin commands. Specific commands and packages can help developers organize, troubleshoot, and optimize their applications and—when things go wrong—provide valuable triage information to operators and sysadmins.
Whether you are a new developer or want to manage your own application, the following 20 basic sysadmin commands can help you better understand your applications. They can also help you describe problems to sysadmins troubleshooting why an application might work locally but not on a remote host. These commands apply to Linux development environments, containers, virtual machines (VMs), and bare metal.

1. curl

curl transfers a URL. Use this command to test an application's endpoint or connectivity to an upstream service endpoint. curl can be useful for determining if your application can reach another service, such as a database, or checking if your service is healthy.
As an example, imagine your application throws an HTTP 500 error indicating it can't reach a MongoDB database:
$ curl -I -s myapplication:5000 HTTP/1.0 500 INTERNAL SERVER ERROR
The -I option shows the header information and the -s option silences the response body. Checking the endpoint of your database from your local desktop:
$ curl -I -s database:27017 HTTP/1.0 200 OK
So what could be the problem? Check if your application can get to other places besides the database from the application host:
$ curl -I -s https://opensource.com HTTP/1.1 200 OK
That seems to be okay. Now try to reach the database from the application host. Your application is using the database's hostname, so try that first:
$ curl database:27017 curl: (6) Couldn't resolve host 'database'
This indicates that your application cannot resolve the database because the URL of the database is unavailable or the host (container or VM) does not have a nameserver it can use to resolve the hostname.

2. python -m json.tool / jq

After you issue curl, the output of the API call may be difficult to read. Sometimes, you want to pretty-print the JSON output to find a specific entry. Python has a built-in JSON library that can help with this. You use python -m json.tool to indent and organize the JSON. To use Python's JSON module, pipe the output of a JSON file into the python -m json.tool command.
$ cat test.json {"title":"Person","type":"object","properties":{"firstName":{"type":"string"},"lastName":{"type":"string"},"age":{"description":"Age in years","type":"integer","minimum":0}},"required":["firstName","lastName"]}
To use the Python library, pipe the output to Python with the -m (module) option.
$ cat test.json | python -m json.tool {     "properties": {         "age": {             "description": "Age in years",             "minimum": 0,             "type": "integer"         },         "firstName": {             "type": "string"         },         "lastName": {             "type": "string"         }     },     "required": [         "firstName",         "lastName"     ],     "title": "Person",     "type": "object" }
For more advanced JSON parsing, you can install jq. jq provides some options that extract specific values from the JSON input. To pretty-print like the Python module above, simply apply jq to the output.
$ cat test.json | jq {   "title": "Person",   "type": "object",   "properties": {     "firstName": {       "type": "string"     },     "lastName": {       "type": "string"     },     "age": {       "description": "Age in years",       "type": "integer",       "minimum": 0     }   },   "required": [     "firstName",     "lastName"   ] }

3. ls

ls lists files in a directory. Sysadmins and developers issue this command quite often. In the container space, this command can help determine your container image's directory and files. Besides looking up your files, ls can help you examine your permissions. In the example below, you can't run myapp because of a permissions issue. When you check the permissions using ls -l, you realize that the permissions do not have an "x" in -rw-r--r--, which are read and write only.
$ ./myapp bash: ./myapp: Permission denied $ ls -l myapp -rw-r--r--. 1 root root 33 Jul 21 18:36 myapp

4. tail

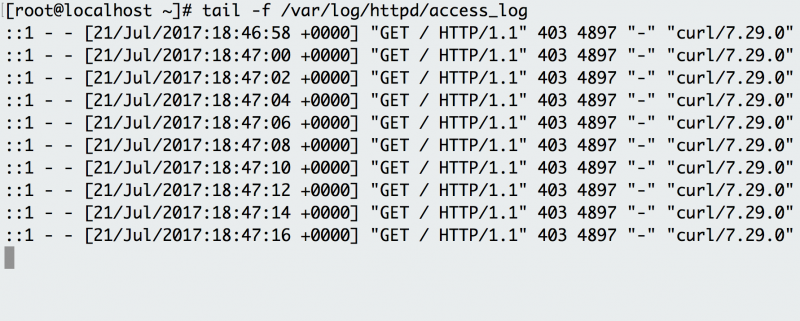
tail displays the last part of a file. You usually don't need every log line to troubleshoot. Instead, you want to check what your logs say about the most recent request to your application. For example, you can use tail to check what happens in the logs when you make a request to your Apache HTTP server.

example_tail.png

Use tail -f to follow Apache HTTP server logs and see the requests as they happen.
Use tail -f to follow Apache HTTP logs and see the requests as they happen.
The -f option indicates the "follow" option, which outputs the log lines as they are written to the file. The example has a background script that accesses the endpoint every few seconds and the log records the request. Instead of following the log in real time, you can also use tail to see the last 100 lines of the file with the -n option.
$ tail -n 100 /var/log/httpd/access_log

5. cat

cat concatenates and prints files. You might issue cat to check the contents of your dependencies file or to confirm the version of the application that you have already built locally.
$ cat requirements.txt flask flask_pymongo
The example above checks whether your Python Flask application has Flask listed as a dependency.

6. grep

grep searches file patterns. If you are looking for a specific pattern in the output of another command, grep highlights the relevant lines. Use this command for searching log files, specific processes, and more. If you want to see if Apache Tomcat starts up, you might become overwhelmed by the number of lines. By piping that output to the grep command, you isolate the lines that indicate server startup.
$ cat tomcat.log | grep org.apache.catalina.startup.Catalina.start 01-Jul-2017 18:03:47.542 INFO [main] org.apache.catalina.startup.Catalina.start Server startup in 681 ms

7. ps

ps shows process status. Use this command to determine a running application or confirm an expected process. For example, if you want to check for a running Tomcat web server, you use ps with its options to obtain the process ID of Tomcat.
$ ps -ef UID        PID  PPID  C STIME TTY          TIME CMD root         1     0  2 18:55 ?        00:00:02 /docker-java-home/jre/bi root        59     0  0 18:55 pts/0    00:00:00 /bin/sh root        75    59  0 18:57 pts/0    00:00:00 ps -ef
For even more legibility, use ps and pipe it to grep.
$ ps -ef | grep tomcat root         1     0  1 18:55 ?        00:00:02 /docker-java-home/jre/bi

8. env

env allows you to set or print the environment variables. During troubleshooting, you may find it useful for checking if the wrong environment variable prevents your application from starting. In the example below, this command is used to check the environment variables set on your application's host.
$ env PYTHON_PIP_VERSION=9.0.1 HOME=/root DB_NAME=test PATH=/usr/local/bin:/usr/local/sbin LANG=C.UTF-8 PYTHON_VERSION=3.4.6 PWD=/ DB_URI=mongodb://database:27017/test
Notice that the application is using Python3 and has environment variables to connect to a MongoDB database.

9. top

top displays and updates sorted process information. Use this tool to determine which processes are running and how much memory and CPU they consume. A common case occurs when you run an application and it dies a minute later. First, you check the application's return error, which is a memory error.
$ tail myapp.log Traceback (most recent call last): MemoryError
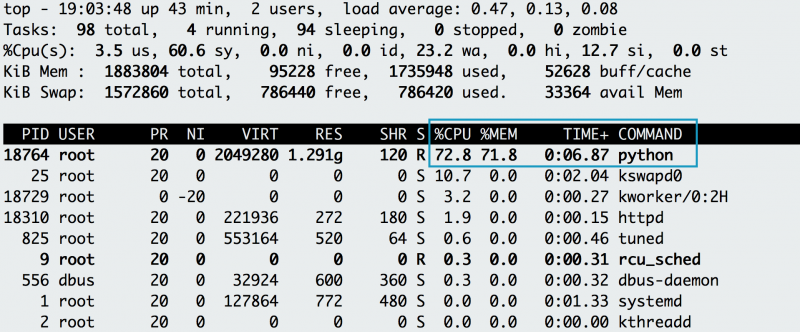
Is your application really out of memory? To confirm, use top to determine how much CPU and memory your application consumes. When issuing top, you notice a Python application using most of the CPU, with its memory usage climbing, and suspect it is your application. While it runs, you hit the "C" key to see the full command and reverse-engineer if the process is your application. It turns out to be your memory-intensive application (memeater.py). When your application has run out of memory, the system kills it with an out-of-memory (OOM) error.

example_top.png

Issuing top against an application that consumes all of its memory.
The memory and CPU usage of the application increases, eventually being OOM-killed.

example_topwithc.png

Pressing C while running top shows the full command
By hitting the "C" key, you can see the full command that started the application.
In addition to checking your own application, you can use top to debug other processes that utilize CPU or memory.
10. netstat

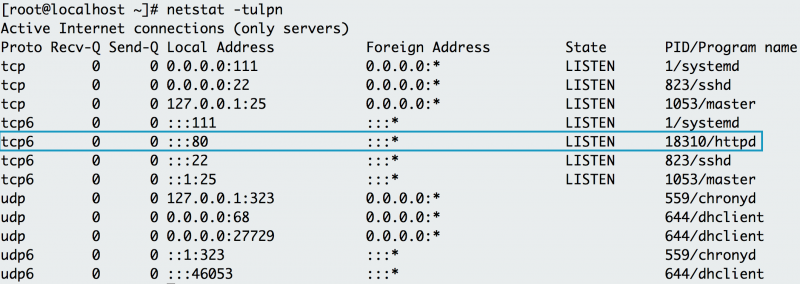
netstat shows the network status. This command shows network ports in use and their incoming connections. However, netstat does not come out-of-the-box on Linux. If you need to install it, you can find it in the net-tools package. As a developer who experiments locally or pushes an application to a host, you may receive an error that a port is already allocated or an address is already in use. Using netstat with protocol, process and port options demonstrates that Apache HTTP server already uses port 80 on the below host.

example_netstat.png

netstat verifies that Apache is running on port 80
Using netstat -tulpn shows that Apache already uses port 80 on this machine.

11. ip address

If ip address does not work on your host, it must be installed with the iproute2 package. ip address shows the interfaces and IP addresses of your application's host. You use ip address to verify your container or host's IP address. For example, when your container is attached to two networks, ip address can show which interface connects to which network. For a simple check, you can always use the ip address command to get the IP address of the host. The example below shows that the web tier container has an IP address of 172.17.0.2 on interface eth0.

example_ipaddr_0.png

ip address shows that the IP address of eth0 is 172.17.0.2
Using ip address shows that the IP address of the eth0 interface is 172.17.0.2

12. lsof

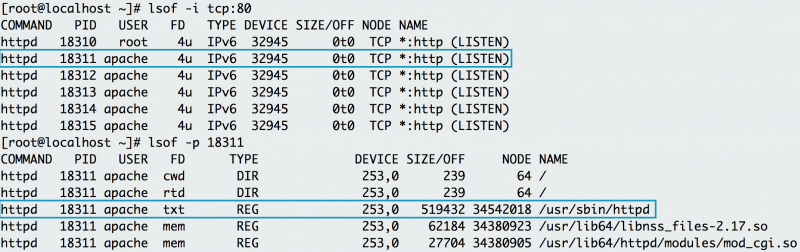
lsof lists the open files associated with your application. On some Linux machine images, you need to install lsof with the lsof package. In Linux, almost any interaction with the system is treated like a file. As a result, if your application writes to a file or opens a network connection, lsof will reflect that interaction as a file. Similar to netstat, you can use lsof to check for listening ports. For example, if you want to check if port 80 is in use, you use lsof to check which process is using it. Below, you can see that httpd (Apache) listens on port 80. You can also use lsof to check the process ID of httpd, examining where the web server's binary resides (/usr/sbin/httpd).

example_lsof.png

lsof reveals the origin of process information
Lsof shows that httpd listens on port 80. Examining httpd's process ID also shows all the files httpd needs in order to run.
The name of the open file in the list of open files helps pinpoint the origin of the process, specifically Apache.
13. df

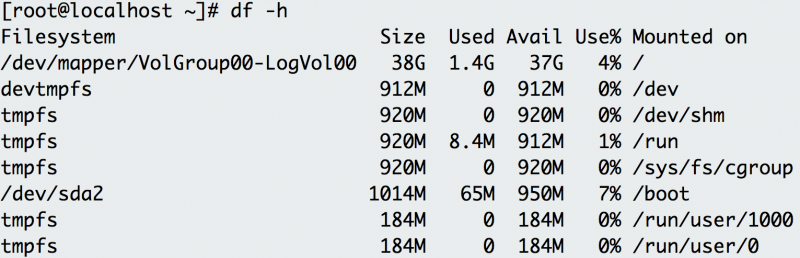
You can use df (display free disk space) to troubleshoot disk space issues. When you run your application on a container orchestrator, you might receive an error message signaling a lack of free space on the container host. While disk space should be managed and optimized by a sysadmin, you can use df to figure out the existing space in a directory and confirm if you are indeed out of space.

example_df.png

df shows all of the disk space available on the host
Df shows the disk space for each filesystem, its absolute space, and availability.
The -h option prints out the information in human-readable format. The example above shows plenty of disk space on this host.

14. du

To retrieve more detailed information about which files use the disk space in a directory, you can use the du command. If you wanted to find out which log takes up the most space in the /var/log directory, for example, you can use du with the -h (human-readable) option and the -s option for the total size.
$ du -sh /var/log/* 1.8M  /var/log/anaconda 384K  /var/log/audit 4.0K  /var/log/boot.log 0 /var/log/chrony 4.0K  /var/log/cron 4.0K  /var/log/maillog 64K /var/log/messages
The example above reveals the largest directory under /var/log to be /var/log/audit. You can use du in conjunction with df to determine what utilizes the disk space on your application's host.

15. id

To check the user running the application, use the id command to return the user identity. The example below uses Vagrant to test the application and isolate its development environment. After you log into the Vagrant box, if you try to install Apache HTTP Server (a dependency) the system states that you cannot perform the command as root. To check your user and group, issue the id command and notice that you are running as the "vagrant" user in the "vagrant" group.
$ yum -y install httpd Loaded plugins: fastestmirror You need to be root to perform this command. $ id uid=1000(vagrant) gid=1000(vagrant) groups=1000(vagrant) context=unconfined_u:unconfined_r:unconfined_t:s0-s0:c0.c1023
To correct this, you must run the command as a superuser, which provides elevated privileges.

16. chmod

When you run your application binary for the first time on your host, you may receive the error message "permission denied." As seen in the example for ls, you can check the permissions of your application binary.
$ ls -l total 4 -rw-rw-r--. 1 vagrant vagrant 34 Jul 11 02:17 test.sh
This shows that you don't have execution rights (no "x") to run the binary. chmod can correct the permissions to enable your user to run the binary.
$ chmod +x test.sh [vagrant@localhost ~]$ ls -l total 4 -rwxrwxr-x. 1 vagrant vagrant 34 Jul 11 02:17 test.sh
As demonstrated in the example, this updates the permissions with execution rights. Now when you try to execute your binary, the application doesn't throw a permission-denied error. Chmod may be useful when you load a binary into a container as well. It ensures that your container has the correct permissions to execute your binary.

17. dig / nslookup

A domain name server (DNS) helps resolve a URL to a set of application servers. However, you may find that a URL does not resolve, which causes a connectivity issue for your application. For example, say you attempt to access your database at the mydatabase URL from your application's host. Instead, you receive a "cannot resolve" error. To troubleshoot, you try using dig (DNS lookup utility) or nslookup (query Internet name servers) to figure out why the application can't seem to resolve the database.
$ nslookup mydatabase Server:   10.0.2.3 Address:  10.0.2.3#53 ** server can't find mydatabase: NXDOMAIN
Using nslookup shows that mydatabase can't be resolved. Trying to resolve with dig yields the same result.
$ dig mydatabase ; <<>> DiG 9.9.4-RedHat-9.9.4-50.el7_3.1 <<>> mydatabase ;; global options: +cmd ;; connection timed out; no servers could be reached
These errors could be caused by many different issues. If you can't debug the root cause, reach out to your sysadmin for more investigation. For local testing, this issue may indicate that your host's nameservers aren't configured appropriately. To use these commands, you will need to install the BIND Utilities package.

18. iptables

iptables blocks or allows traffic on a Linux host, similar to a network firewall. This tool may prevent certain applications from receiving or transmitting requests. More specifically, if your application has difficulty reaching another endpoint, iptables may be denying traffic to the endpoint. For example, imagine your application's host cannot reach Opensource.com. You use curl to test the connection.
$ curl -vvv opensource.com * About to connect() to opensource.com port 80 (#0) *   Trying 54.204.39.132... * Connection timed out * Failed connect to opensource.com:80; Connection timed out * Closing connection 0 curl: (7) Failed connect to opensource.com:80; Connection timed out
The connection times out. You suspect that something might be blocking the traffic, so you show the iptables rules with the -S option.
$ iptables -S -P INPUT DROP -P FORWARD DROP -P OUTPUT DROP -A INPUT -p tcp -m tcp --dport 22 -j ACCEPT -A INPUT -i eth0 -p udp -m udp --sport 53 -j ACCEPT -A OUTPUT -p tcp -m tcp --sport 22 -j ACCEPT -A OUTPUT -o eth0 -p udp -m udp --dport 53 -j ACCEPT
The first three rules show that traffic drops by default. The remaining rules allow SSH and DNS traffic. In this case, follow up with your sysadmin if you require a rule to allow traffic to external endpoints. If this is a host you use for local development or testing, you can use the iptables command to allow the correct traffic. Use caution when adding rules that allow traffic to your host.

19. sestatus

You usually find SELinux (a Linux security module) enforced on an application host managed by an enterprise. SELinux provides least-privilege access to processes running on the host, preventing potentially malicious processes from accessing important files on the system. In some situations, an application needs to access a specific file but may throw an error. To check if SELinux blocks the application, use tail and grep to look for a "denied" message in the /var/log/audit logging. Otherwise, you can check to see if the box has SELinux enabled by using sestatus.
$ sestatus SELinux status:                 enabled SELinuxfs mount:                /sys/fs/selinux SELinux root directory:         /etc/selinux Loaded policy name:             targeted Current mode:                   enforcing Mode from config file:          enforcing Policy MLS status:              enabled Policy deny_unknown status:     allowed Max kernel policy version:      28
The output above indicates that the application's host has SELinux enabled. On your local development environment, you can update SELinux to be more permissive. If you need help with a remote host, your sysadmin can help you determine the best practice for allowing your application to access the file it needs.

20. history

When you issue so many commands for testing and debugging, you may forget the useful ones! Every shell has a variant of the history command. It shows the history of commands you have issued since the start of the session. You can use history to log which commands you used to troubleshoot your application. For example, when you issue history over the course of this article, it shows the various commands you experimented with and learned.
$ history     1  clear     2  df -h     3  du
What if you want to execute a command in your previous history, but you don't want to retype it? Use ! before the command number to re-execute.

example_history.png

Re-execute a command in your history
Adding ! before the command number you want to execute issues the command again.
Basic commands can enhance your troubleshooting expertise when determining why your application works in one development environment but perhaps not in another. Many sysadmins leverage these commands to debug problems with systems. Understanding some of these useful troubleshooting commands can help you communicate with sysadmins and resolve issues with your application.

Friday, 15 February 2019

crash your Linux system: Dangerous Commands

inux commands can be very dangerous when not used properly. It makes you a hero and zero in a second. Without proper knowledge one can easily destroy their system in seconds and we know internet is full of trolls, so having knowledge of these dangerous commands can be useful for beginners.
NOTE: If someone give you advice to execute a gibberish command and you don't know about that, then you can easily check it via explain shell.
Here's a list of some of the dangerous commands that can harm your system or completely destroy them:

1. Deletes everything recursively

The most dangerous command will delete everything from your system.
## delete root directory entirely
$ rm -rf /
Bash
And the other variations of this command are:
## delete the home folder
$ rm -rf ~
## delete everything from current folder
$ rm -rf *
## delete all your configuration files
$ rm -rf .*
Bash

2. Fork Bomb Command :(){ :|: & };:

This weird looking command will create endless copies of itself which will cause your system to hang and may result in corruption of data.
$ :(){ :|: & };:
Bash

3. Format entire hard drive

$ mkfs.ext4 /dev/sda1
Bash
This command will reformat your entire hard drive using ext4 filesystem. Here /dev/sda1 is the path of first partition.
Other variation of this command is mkfs.ext3.

4. Flushing the hard drive.

$ anybashcommand > /dev/sda
Bash
It writes directly to primary hard drive and therefore crash all the data with raw buffer data.

5. Fill your hard drive with zero's

$$ dd if=/dev/zero of=/dev/hda
Bash
Here dd performs low level copying from one location to another, where if=/dev/zero produce infinite streams of zero in /dev/hda.

6. Creating a black hole in hard drive.

$ mv / /dev/null
Bash
Here '/dev/null' is a special location in hard disk which can be think as a black hole. Everything you put into it will be dissolved.

7. Delete superuser

$ rm -f /usr/bin/sudo;rm -f /bin/su
Bash
It will revoke superuser access from root user and thereby unable to perform any root privileges command.

8. Delete boot directory

$ rm -rf /boot
Bash
The boot directory is used for system startup, kernal loading etc. Deleting it will unable to perform any system startup and thereby crash linux.

Tuesday, 5 February 2019

Kali Linux Metapackages

One of our goals when developing Kali Linux was to provide multiple metapackages that would allow us to easily install subsets of tools based on their particular needs. Until recently, we only had a handful of these meta packages but we have since expanded the metapackage list to include far more options:
  • kali-linux
  • kali-linux-all
  • kali-linux-forensic
  • kali-linux-full
  • kali-linux-gpu
  • kali-linux-pwtools
  • kali-linux-rfid
  • kali-linux-sdr
  • kali-linux-top10
  • kali-linux-voip
  • kali-linux-web
  • kali-linux-wireless
These metapackages allow for easy installation of certain tools in a specific field, or alternatively, for the installation of a full Kali suite. All of the Kali metapackages follow a particular naming convention, starting with “kali-linux” so if you want to see which metapackages are available, you can search for them as follows:
apt-get update && apt-cache search kali-linux
Although we tried to make the metapackage names self-explanatory, we are limited in the practical length we can use, so let’s take a brief look at each of them and see how much disk space is used by each one:
kali-linux
The kali-linux metapackage is a completely bare-bones installation of Kali Linux and includes various network services such as Apache and SSH, the Kali kernel, and a number of version control applications like git, svn, etc. All of the other metapackages listed below also contain kali-linux.
Installation Size: 1.5 GB
kali-linux-full
When you download a Kali Linux ISO, you are essentially downloading an installation that has the kali-linux-full metapackage installed. This package includes all of the tools you are familiar with in Kali.
Installation Size: 9.0 GB
kali-linux-all
In order to keep our ISO sizes reasonable, we are unable to include every single tool that we package for Kali and there are a number of tools that are not able to be used depending on hardware, such as various GPU tools. If you want to install every available Kali Linux package, you can install the kali-linux-all metapackage.
Installation Size: 15 GB
kali-linux-top10
In Kali Linux, we have a sub-menu called “Top 10 Security Tools”. The kali-linux-top10 metapackage will install all of these tools for you in one fell swoop.
Installation Size: 3.5 GB
top10-menu
kali-linux-forensic
If you are doing forensics work, you don’t want your analysis system to contain a bunch of unnecessary tools. To the rescue comes the kali-linux-forensic metapackage, which only contains the forensics tools in Kali.
Installation Size: 3.1 GB
kali-linux-gpu
GPU utilities are very powerful but need special hardware in order to function correctly. For this reason, they are not included in the default Kali Linux installation but you can install them all at once with kali-linux-gpu and get cracking.
Installation Size: 4.8 GB
kali-linux-pwtools
The kali-linux-pwtools metapackage contains over 40 different password cracking utilities as well as the GPU tools contained in kali-linux-gpu.
Installation Size: 6.0 GB
kali-linux-rfid
For our users who are doing RFID research and exploitation, we have the kali-linux-rfid metapackage containing all of the RFID tools available in Kali Linux.
Installation Size: 1.5 GB
kali-linux-sdr
The kali-linux-sdr metapackage contains a large selection of tools for your Software Defined Radio hacking needs.
Installation Size: 2.4 GB
kali-linux-voip
Many people have told us they use Kali Linux to conduct VoIP testing and research so they will be happy to know we now have a dedicated kali-linux-voip metapackage with 20+ tools.
Installation Size: 1.8 GB
kali-linux-web
Web application assessments are very common in the field of penetration testing and for this reason, Kali includes the kali-linux-web metapackage containing dozens of tools related to web application hacking.
Installation Size: 4.9 GB
kali-linux-wireless
Like web applications, many penetration testing assessments are targeted towards wireless networks. The kali-linux-wireless metapackage contains all the tools you’ll need in one easy to install package.
Installation Size: 6.6 GB
To see the list of tools included in a metapackage, you can use simple apt commands. For example, to list all the tools included in the kali-linux-web metapackage, we could:
apt-cache show kali-linux-web |grep Depends

Thursday, 17 January 2019

Git-Notes

To delete a branch

Local branch: git branch -d <local_branch> Remote branch: git push origin --delete <remote_branch>

To create new branch from existing branch

git checkout -b <new_branch_name> <source_branch_name>

To push my branch to remote server

git push -u origin <my_branch>

To view commit history logs

git reflog

To reset to particular commit log

git reset HEAD@{N}
*N is target number of commit log to reset to.

To show last git commit message on current checkout branch

git show --summary

To revert commits in certain branch to particular commit

git checkout <branch>
git reset --hard <commit-hash>
git push -f origin <branch>

To fetch all git branches

git pull --all

To create local branch to tracks remote branch

git checkout --track origin/john_branch
where --track is shorthand for git checkout -b [branch] [remotename]/[branch]

To reset local branch to match latest remote branch

git fetch origin
git reset --hard origin/master
git clean -fd

To rename a branch

git branch -m old_branch new_branch         # Rename branch locally    
git push origin :old_branch                 # Delete the old branch    
git push --set-upstream origin new_branch   # Push the new branch, set local branch to track the new remote

Successful git branching

Ref: https://nvie.com/posts/a-successful-git-branching-model/

Creating a feature branch

git checkout -b myfeature develop

Incorporating a finished feature on develop

git checkout develop
git merge --no-ff myfeature
.
.
.
git branch -d myfeature
git push origin develop


Using Git

Global Settings

Related Setup: https://gist.github.com/hofmannsven/6814278
Related Pro Tips: https://ochronus.com/git-tips-from-the-trenches/
Interactive Beginners Tutorial: http://try.github.io/

Reminder

Press minus + shift + s and return to chop/fold long lines!
Show folder content: ls -la

Notes

Do not put (external) dependencies in version control!

Setup

See where Git is located: which git
Get the version of Git: git --version
Create an alias (shortcut) for git status: git config --global alias.st status

Help

Help: git help

General

Initialize Git: git init
Get everything ready to commit: git add .
Get custom file ready to commit: git add index.html
Commit changes: git commit -m "Message"
Add and commit in one step: git commit -am "Message"
Remove files from Git: git rm index.html
Update all changes: git add -u
Remove file but do not track anymore: git rm --cached index.html
Move or rename files: git mv index.html dir/index_new.html
Undo modifications (restore files from latest commited version): git checkout -- index.html
Restore file from a custom commit (in current branch): git checkout 6eb715d -- index.html

Reset

Go back to commit: git revert 073791e7dd71b90daa853b2c5acc2c925f02dbc6
Soft reset (move HEAD only; neither staging nor working dir is changed): git reset --soft 073791e7dd71b90daa853b2c5acc2c925f02dbc6
Undo latest commit: git reset --soft HEAD~
Mixed reset (move HEAD and change staging to match repo; does not affect working dir): git reset --mixed 073791e7dd71b90daa853b2c5acc2c925f02dbc6
Hard reset (move HEAD and change staging dir and working dir to match repo): git reset --hard 073791e7dd71b90daa853b2c5acc2c925f02dbc6

Update & Delete

Test-Delete untracked files: git clean -n
Delete untracked files (not staging): git clean -f
Unstage (undo adds): git reset HEAD index.html
Commit to most recent commit: git commit --amend -m "Message"
Update most recent commit message: git commit --amend -m "New Message"

Branch

Show branches: git branch
Create branch: git branch branchname
Change to branch: git checkout branchname
Create and change to new branch: git checkout -b branchname
Rename branch: git branch -m branchname new_branchname or: git branch --move branchname new_branchname
Show all completely merged branches with current branch: git branch --merged
Delete merged branch (only possible if not HEAD): git branch -d branchname or: git branch --delete branchname
Delete not merged branch: git branch -D branch_to_delete

Merge

True merge (fast forward): git merge branchname
Merge to master (only if fast forward): git merge --ff-only branchname
Merge to master (force a new commit): git merge --no-ff branchname
Stop merge (in case of conflicts): git merge --abort
Stop merge (in case of conflicts): git reset --merge // prior to v1.7.4
Merge only one specific commit: git cherry-pick 073791e7

Stash

Put in stash: git stash save "Message"
Show stash: git stash list
Show stash stats: git stash show stash@{0}
Show stash changes: git stash show -p stash@{0}
Use custom stash item and drop it: git stash pop stash@{0}
Use custom stash item and do not drop it: git stash apply stash@{0}
Delete custom stash item: git stash drop stash@{0}
Delete complete stash: git stash clear

Gitignore & Gitkeep

About: https://help.github.com/articles/ignoring-files
Useful templates: https://github.com/github/gitignore
Add or edit gitignore: nano .gitignore
Track empty dir: touch dir/.gitkeep

Log

Show commits: git log
Show oneline-summary of commits: git log --oneline
Show oneline-summary of commits with full SHA-1: git log --format=oneline
Show oneline-summary of the last three commits: git log --oneline -3
Show only custom commits: git log --author="Sven" git log --grep="Message" git log --until=2013-01-01 git log --since=2013-01-01
Show only custom data of commit: git log --format=short git log --format=full git log --format=fuller git log --format=email git log --format=raw
Show changes: git log -p
Show every commit since special commit for custom file only: git log 6eb715d.. index.html
Show changes of every commit since special commit for custom file only: git log -p 6eb715d.. index.html
Show stats and summary of commits: git log --stat --summary
Show history of commits as graph: git log --graph
Show history of commits as graph-summary: git log --oneline --graph --all --decorate

Compare

Compare modified files: git diff
Compare modified files and highlight changes only: git diff --color-words index.html
Compare modified files within the staging area: git diff --staged
Compare branches: git diff master..branchname
Compare branches like above: git diff --color-words master..branchname^
Compare commits: git diff 6eb715d git diff 6eb715d..HEAD git diff 6eb715d..537a09f
Compare commits of file: git diff 6eb715d index.html git diff 6eb715d..537a09f index.html
Compare without caring about spaces: git diff -b 6eb715d..HEAD or: git diff --ignore-space-change 6eb715d..HEAD
Compare without caring about all spaces: git diff -w 6eb715d..HEAD or: git diff --ignore-all-space 6eb715d..HEAD
Useful comparings: git diff --stat --summary 6eb715d..HEAD
Blame: git blame -L10,+1 index.html

Releases & Version Tags

Show all released versions: git tag
Show all released versions with comments: git tag -l -n1
Create release version: git tag v1.0.0
Create release version with comment: git tag -a v1.0.0 -m 'Message'
Checkout a specific release version: git checkout v1.0.0

Collaborate

Show remote: git remote
Show remote details: git remote -v
Add remote origin from GitHub project: git remote add origin https://github.com/user/project.git
Add remote origin from existing empty project on server: git remote add origin ssh://root@123.123.123.123/path/to/repository/.git
Remove origin: git remote rm origin
Show remote branches: git branch -r
Show all branches: git branch -a
Compare: git diff origin/master..master
Push (set default with -u): git push -u origin master
Push to default: git push origin master
Fetch: git fetch origin
Fetch a custom branch: git fetch origin branchname:local_branchname
Pull: git pull
Pull specific branch: git pull origin branchname
Merge fetched commits: git merge origin/master
Clone to localhost: git clone https://github.com/user/project.git or: git clone ssh://user@domain.com/~/dir/.git
Clone to localhost folder: git clone https://github.com/user/project.git ~/dir/folder
Clone specific branch to localhost: git clone -b branchname https://github.com/user/project.git
Delete remote branch (push nothing): git push origin :branchname or: git push origin --delete branchname

Archive

Create a zip-archive: git archive --format zip --output filename.zip master
Export/write custom log to a file: git log --author=sven --all > log.txt

Troubleshooting

Ignore files that have already been committed to a Git repository: http://stackoverflow.com/a/1139797/1815847

Security

Hide Git on the web via .htaccess: RedirectMatch 404 /\.git (more info here: http://stackoverflow.com/a/17916515/1815847)

Large File Storage

Website: https://git-lfs.github.com/
Install: brew install git-lfs
Track *.psd files: git lfs track "*.psd" (init, add, commit and push as written above)
 

How to delete a commit from git


Using Rebase this will allow you to remove one or more consecutive commits

Example git log

Number
Hash
Commit Message
Author
1
2c6a45b
(HEAD) Adding public method to access protected method
Tom
2
ae45fab
Updates to database interface
Contractor 1
3
77b9b82
Improving database interface
Contractor 2
4
3c9093c
Merged develop branch into master
Tom
5
b3d92c5
Adding new Event CMS Module
Paul
6
7feddbb
Adding CMS class and files
Tom
7
a809379
Adding project to Git
Tom

Using Rebase

Using the git log above we want to remove the following commits; 2 & 3 (ae45fab & 77b9b82). As they are consecutive commits we can use rebase.

git rebase --onto <branch name>~<first commit number to remove> <branch name>~<first commit to be kept> <branch name>

e.g to remove commits 2 & 3 above

git rebase --onto repair~3 repair~1 repair


Delete Commit History in Git Repository


Follow the below steps to complete this task.
Warning: This will remove your old commit history completely, You can’t recover it again.
  • Create Orphan Branch – Create a new orphan branch in git repository. The newly created branch will not show in ‘git branch’ command.
    $ git checkout --orphan temp_branch
    
  • Add Files to Branch – Now add all files to newly created branch and commit them using following commands.
    $ git add -A
    $ git commit -am "the first commit"
    
  • Delete master Branch – Now you can delete the master branch from your git repository.
    $ git branch -D master
    
  • Rename Current Branch – After deleting the master branch, let’s rename newly created branch name to master.
    $ git branch -m master
    
  • Push Changes – You have completed the changes to your local git repository. Finally, push your changes to remote (Github) repository forcefully.
    $ git push -f origin master


Short Form of commands:

cd Repo 
rm -rf .git
git init
git remote add origin git@github.com:JohnDoe/foobar.git
git remote -v
git add --all
git commit -am "Initial commit"
git push -f origin master


First Method

Deleting the .git folder may cause problems in our git repository. If we want to delete all of our commits history, but keep the code in its current state, try this:

# Check out to a temporary branch:
git checkout --orphan TEMP_BRANCH

# Add all the files:
git add -A

# Commit the changes:
git commit -am "Initial commit"

# Delete the old branch:
git branch -D master

# Rename the temporary branch to master:
git branch -m master

# Finally, force update to our repository:
git push -f origin master

This will not keep our old commits history around. But if this doesn't work, try the next method below.

Second Method

# Clone the project, e.g. `myproject` is my project repository:
git clone https://github/heiswayi/myproject.git

# Since all of the commits history are in the `.git` folder, we have to remove it:
cd myproject

# And delete the `.git` folder:
git rm -rf .git

# Now, re-initialize the repository:
git init
git remote add origin https://github.com/heiswayi/myproject.git
git remote -v

# Add all the files and commit the changes:
git add --all
git commit -am "Initial commit"

# Force push update to the master branch of our project repository:
git push -f origin master

NOTE: You might need to provide the credentials for your GitHub account.